modern ikea play kitchen hack
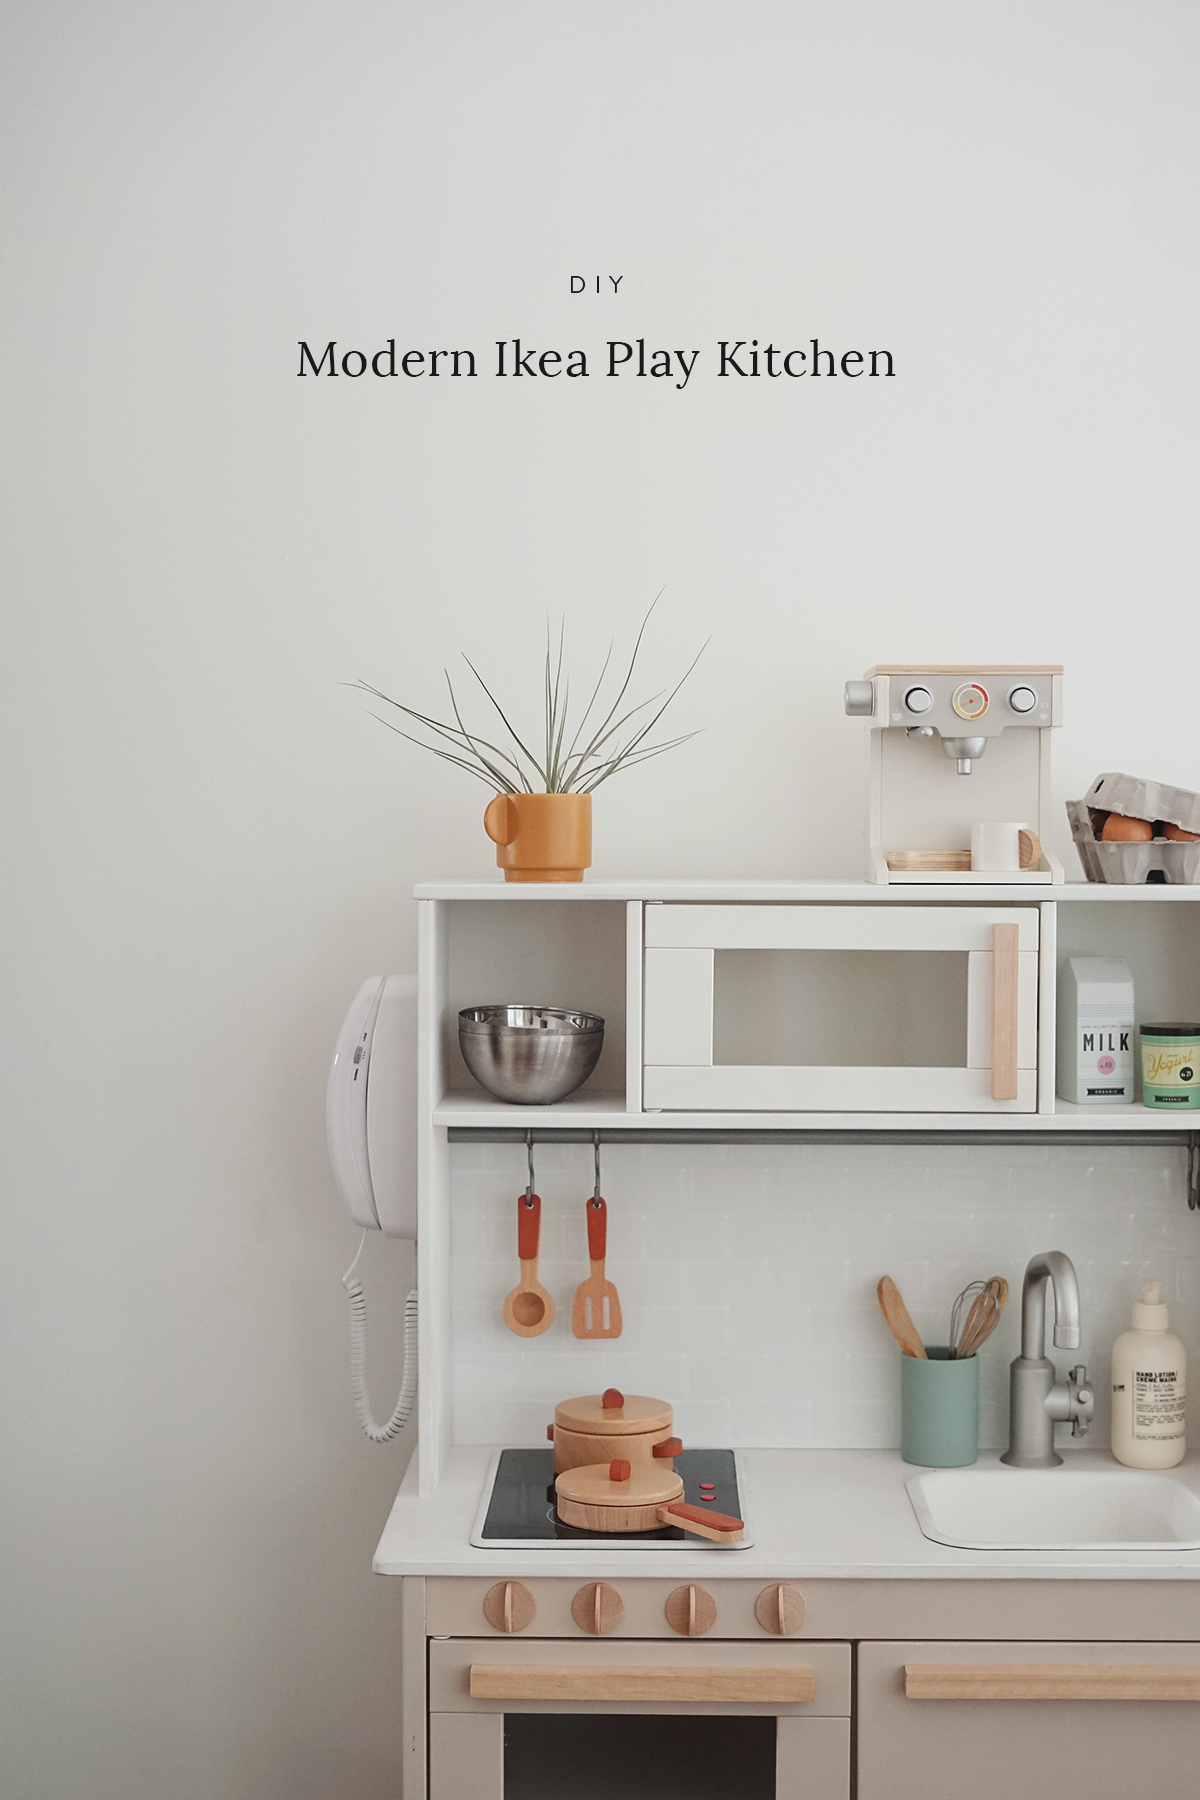
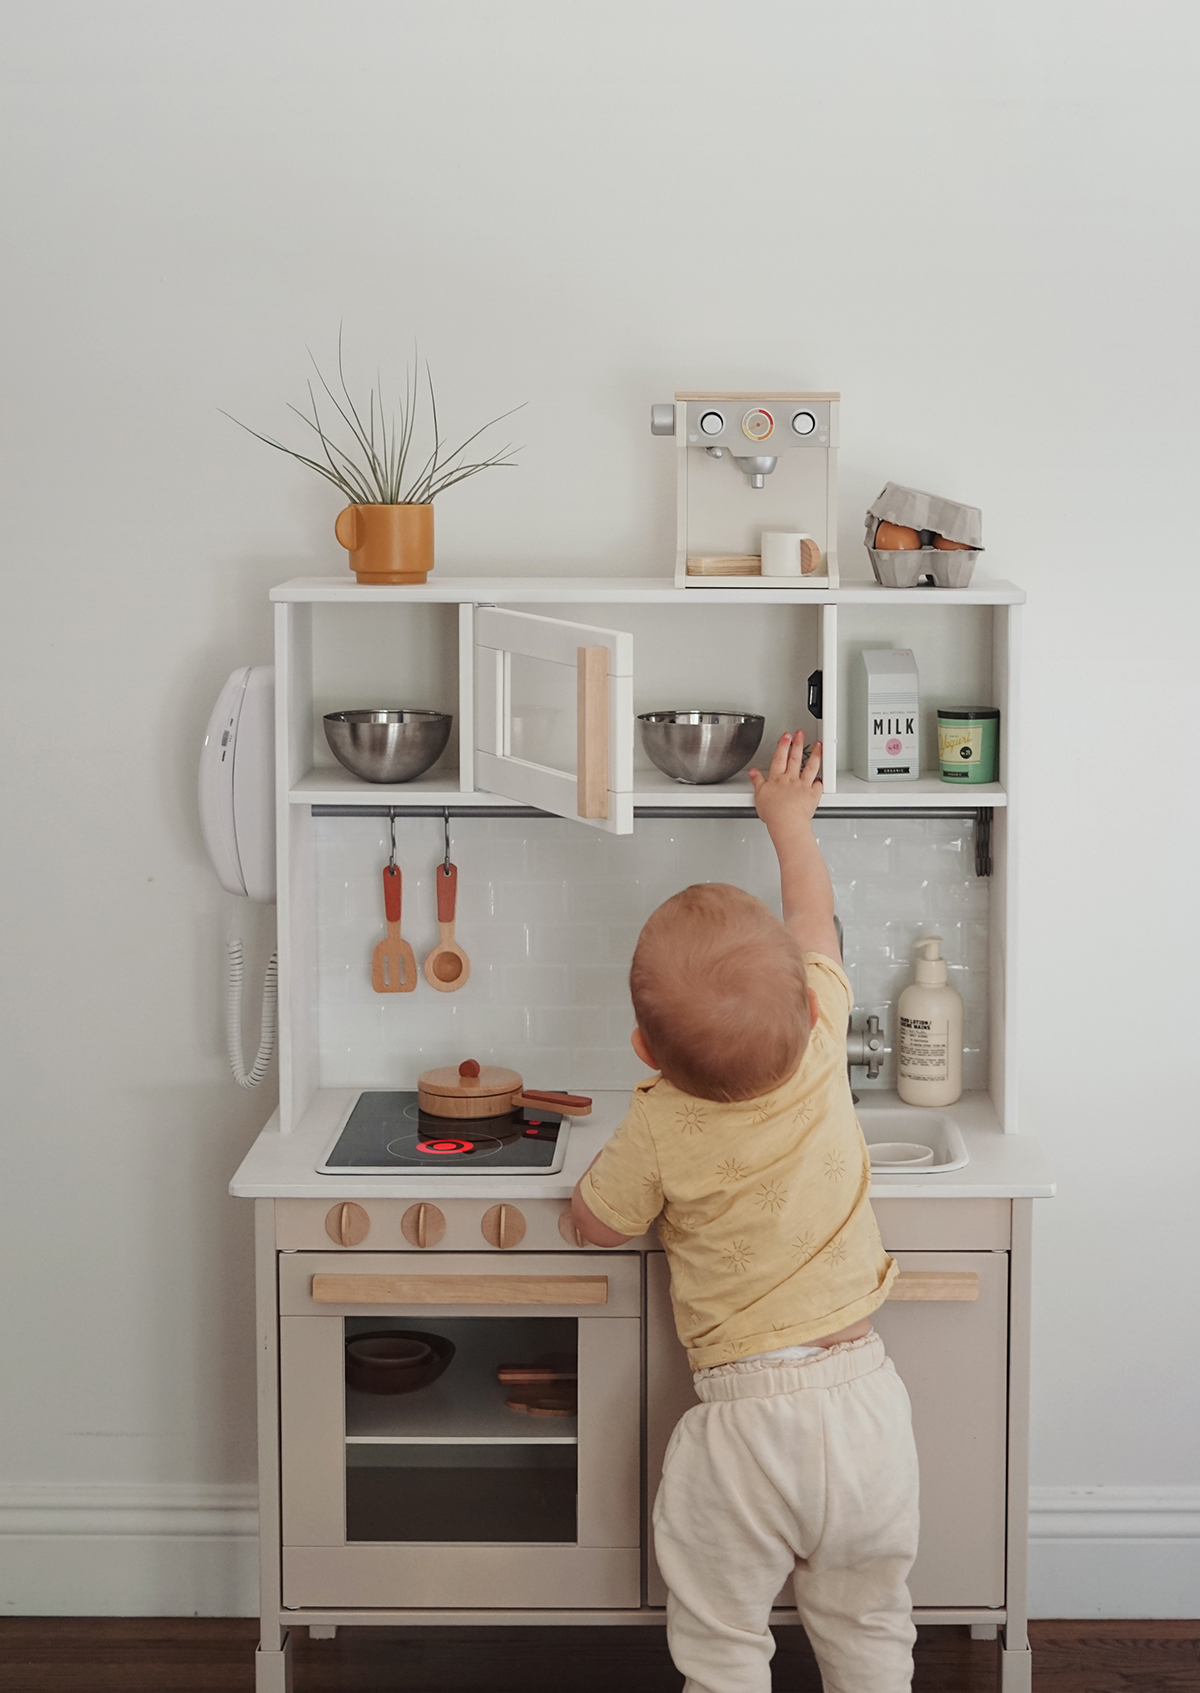
so excited to share arlo’s play kitchen!! i honestly don’t think i’ve ever been so passionate about a project. i planned to do this for his christmas present, but once it was done i decided to just let him start playing with it now because he is obsessed. just like me! there have been sooo many iterations of this ikea hack, but i’ve never really seen one before that was truly my arlo’s style before.
when i was a kid i was obsessed with my dollhouse. my mom used leftover wallpaper and carpet samples from our house so it matched (TEARS!). my dad worked in the mall business and at his office there was a model of the mall they did next door. every friday, my dad would pick me up from school and take me out to lunch at the mall and over to his office so i could stare at the model. forever. he would just hold me up and i would just take it all in lol — so i guess i really like miniature things. and a miniature kitchen is no different apparently. the day i finished the kitchen, i pretty much just sat nearby looking at it. so normal.
anyway, i hope that since it’s only early november, you’ll have time to do your own for your own kid (and more importantly, you)! let’s get into the details. there are A LOT. but quickly, in case you don’t know what the original ikea duktig kitchen looks like, here’s a before and after.
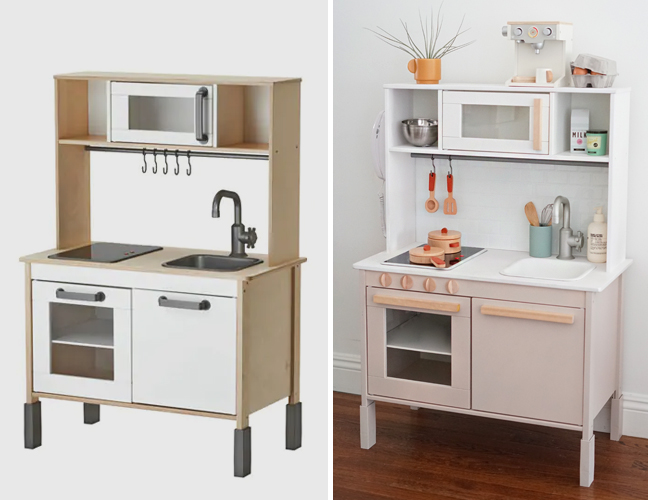
and here’s a step by step of how i updated it! (and btw if you’re not into diying your kid’s kitchen i found a bunch of beautiful options you can read about here)
1. paint!
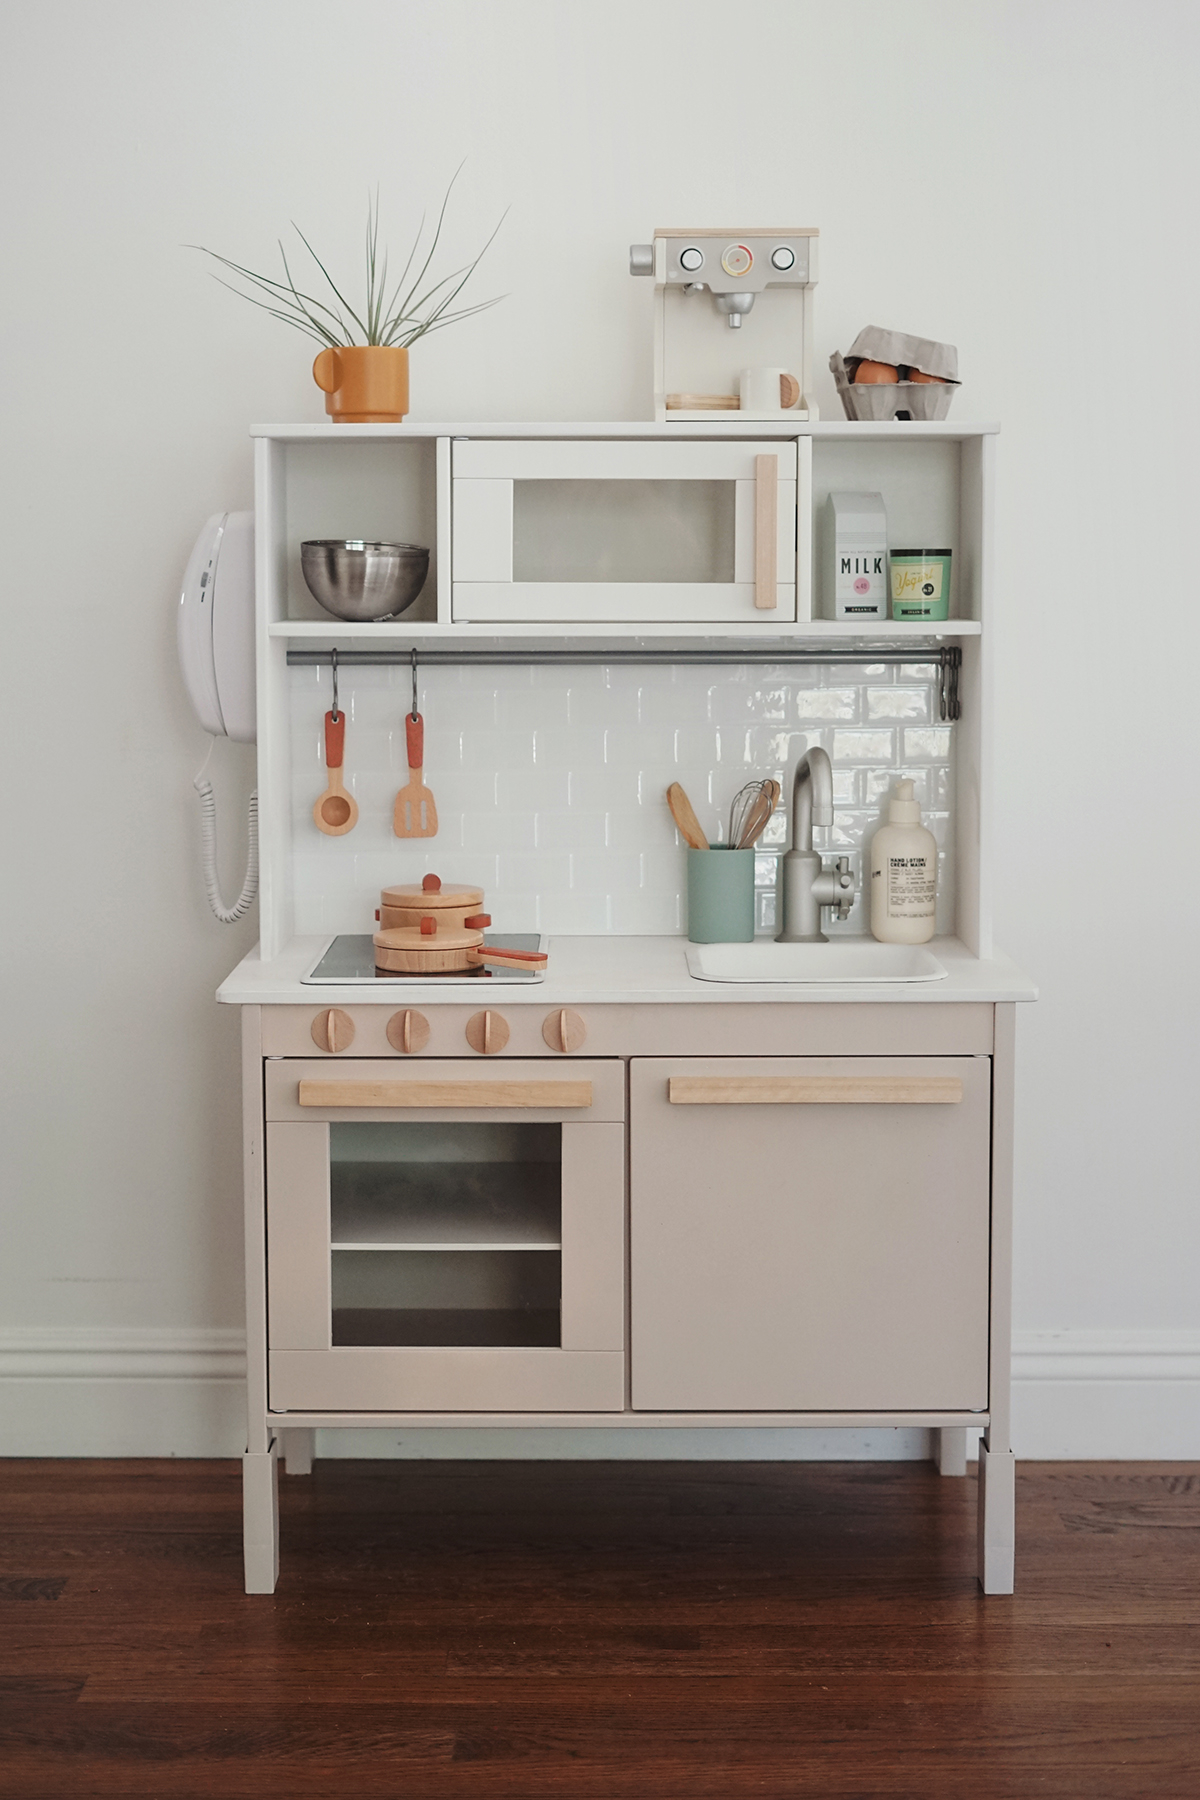
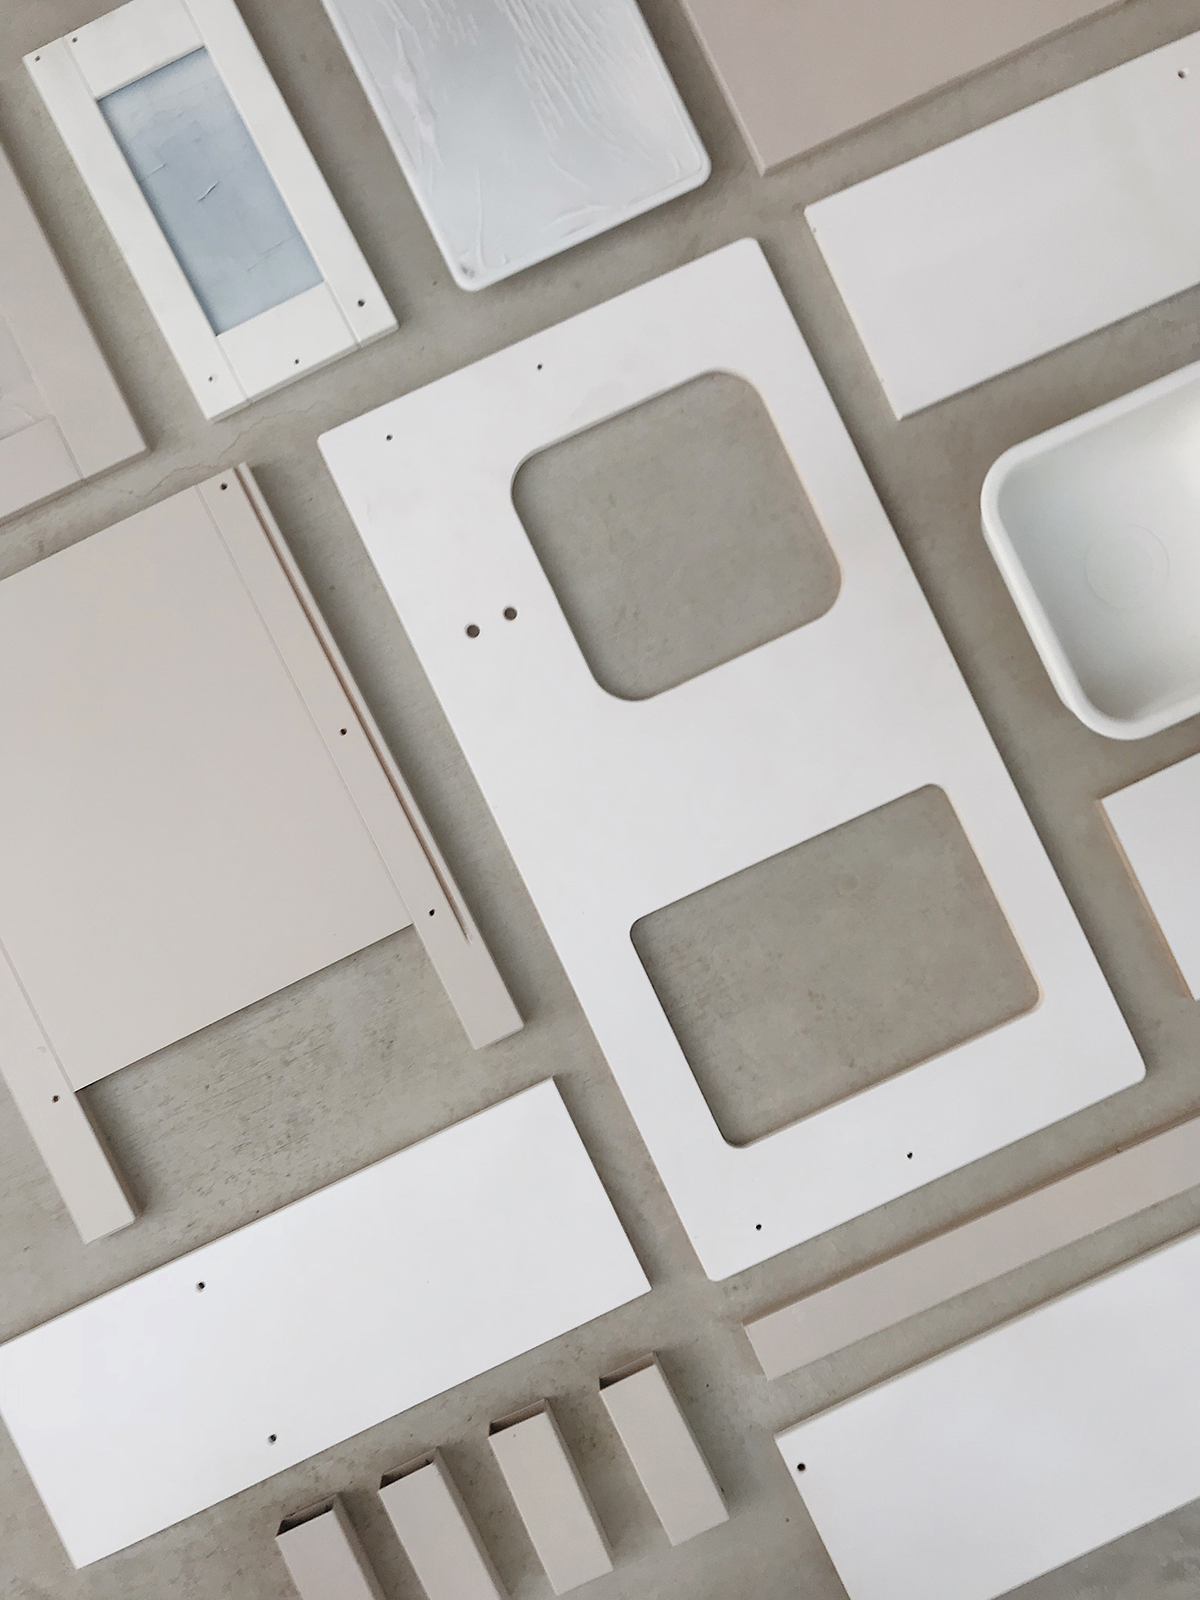
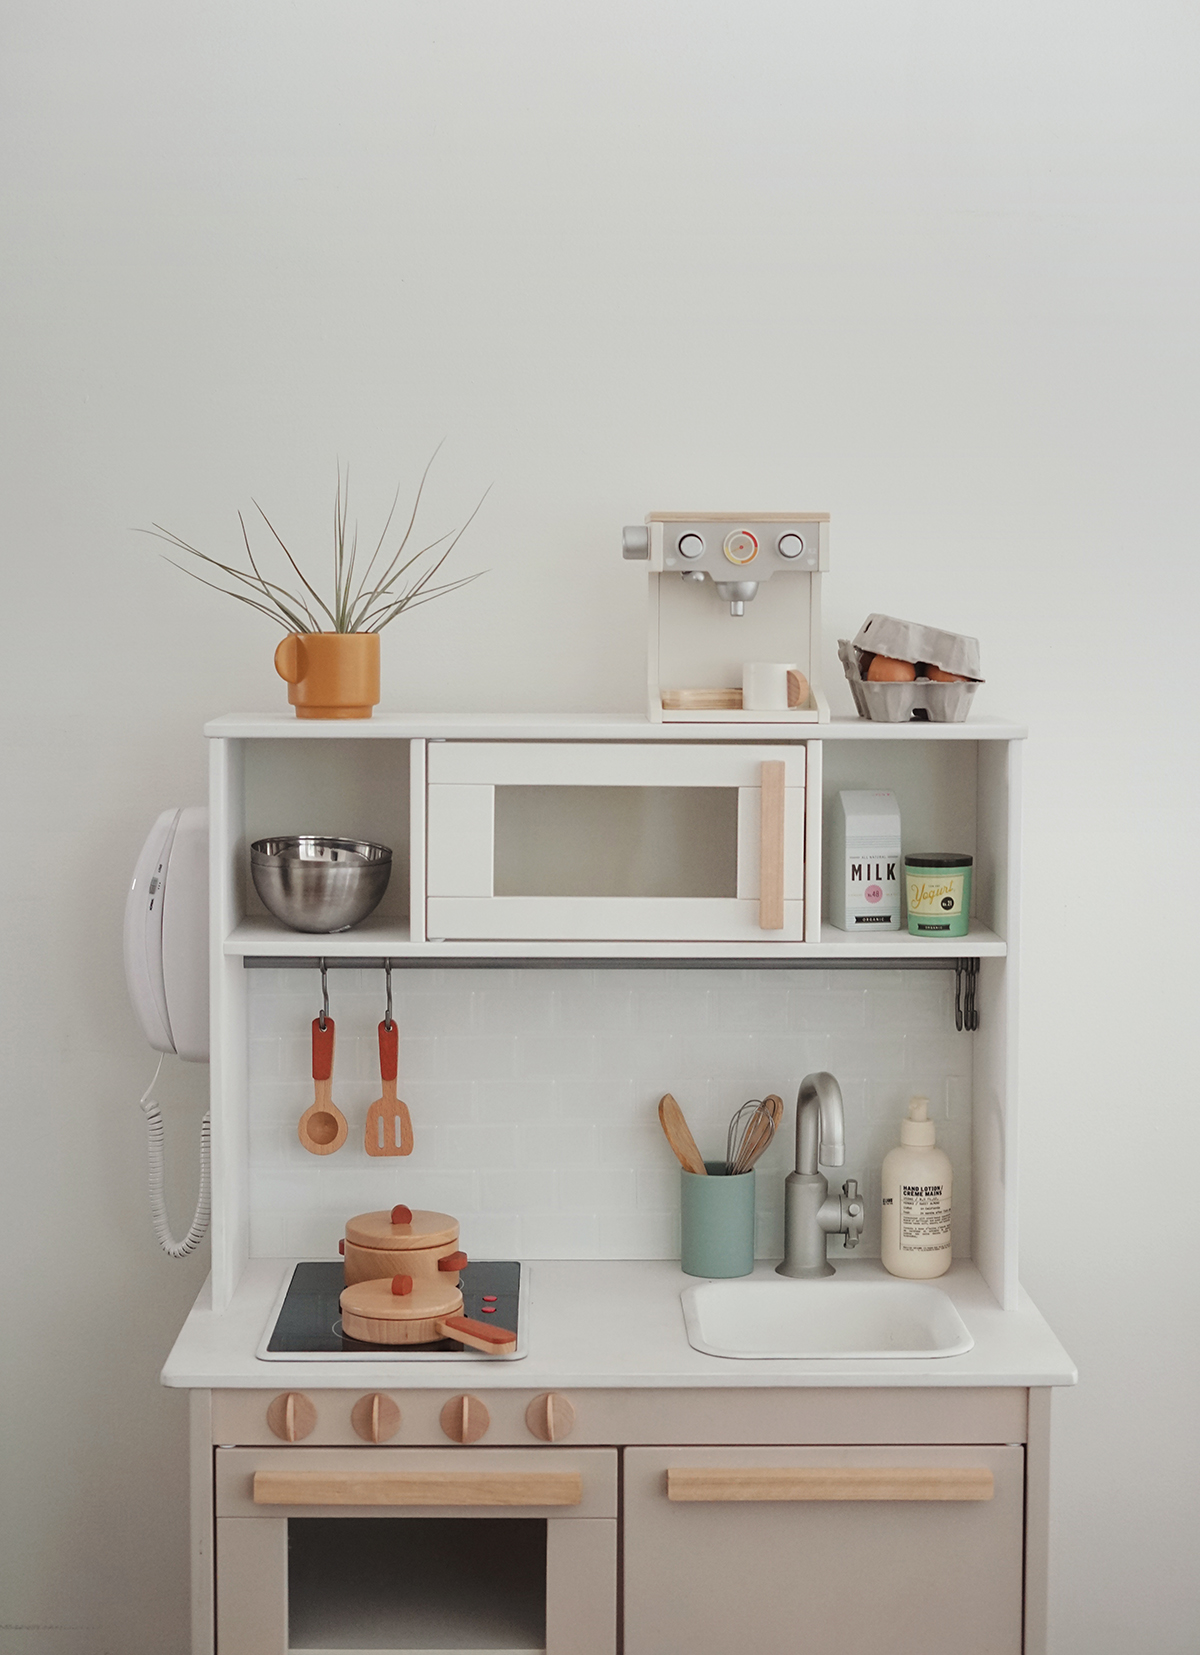
i originally wanted the kitchen to match our kitchen (ala my dollhouse), but i couldn’t come up with a way that didn’t involve contact paper, and i didn’t want to have it look crappy so soon, so we decided to do beige on bottom and white on top as sort of a nod to our kitchen. (sure why not.) painting was definitely the most trying and time consuming part of this project. first i took all the pieces out of the box and then tried to figure out what was the top and what was the bottom. once you familiarize yourself with it, it starts making sense, just keep referencing the photos of the kitchen.
i taped off all the plastic parts on the cabinets and the stovetop. i trusted that blue protective film on the stove even though it looked not that perfect up close, i added a few pieces of tape but i wish it was a little more perfect. i used a white paint pen to fix little blemishes on the stove after the fact and now that it’s on there i don’t notice any imperfections though. i also really made a goof and taped/painted the wrong sides of the microwave and stove. (i didn’t even realize until i was done and everything was inside so i had to go and paint some more) maybe try not to do that.
i sealed everything at least twice, but with all of the plastic pieces (the sink, the stove and the faucet), i was really paranoid about the paint chipping, so i sealed them like literally a dozen times. btw, i cannot believe how many moms reached out to me on instagram saying theirs chipped and i asked if they sealed theirs and they said no. SO HOPEFULLY mine won’t. i’m sure they will a bit, but the sealing for sure helps more than nothing. you guys need to seal! spray paint on plastic is just always sort of an inevitable chipping disaster. i had already clocked so much time with spraying everything outside that i just kept going until i got reaaaally over it.
even though the faucet was already silver, i got nuts and decided i wanted it to be satin nickel like our kitchen sink. so happy i did because the color is much lighter than the original and feels like it blends better with the kitchen now. i left the rod and hooks as is because those seemed like they would just chip immediately.
a lot of pieces already come white, but i wanted to paint them all so they’d match and lose the grain that was on only some of them.
there are a few pieces that will confuse you when it’s unassembled. like i only realized at the last minute that the piece that goes between the stove and cabinet i wanted to paint beige, but i wanted the sides to stay white. so i taped off everything but the edge to paint. you might get tripped up a couple of times so don’t rush into painting before you really get a feel of what everything is.
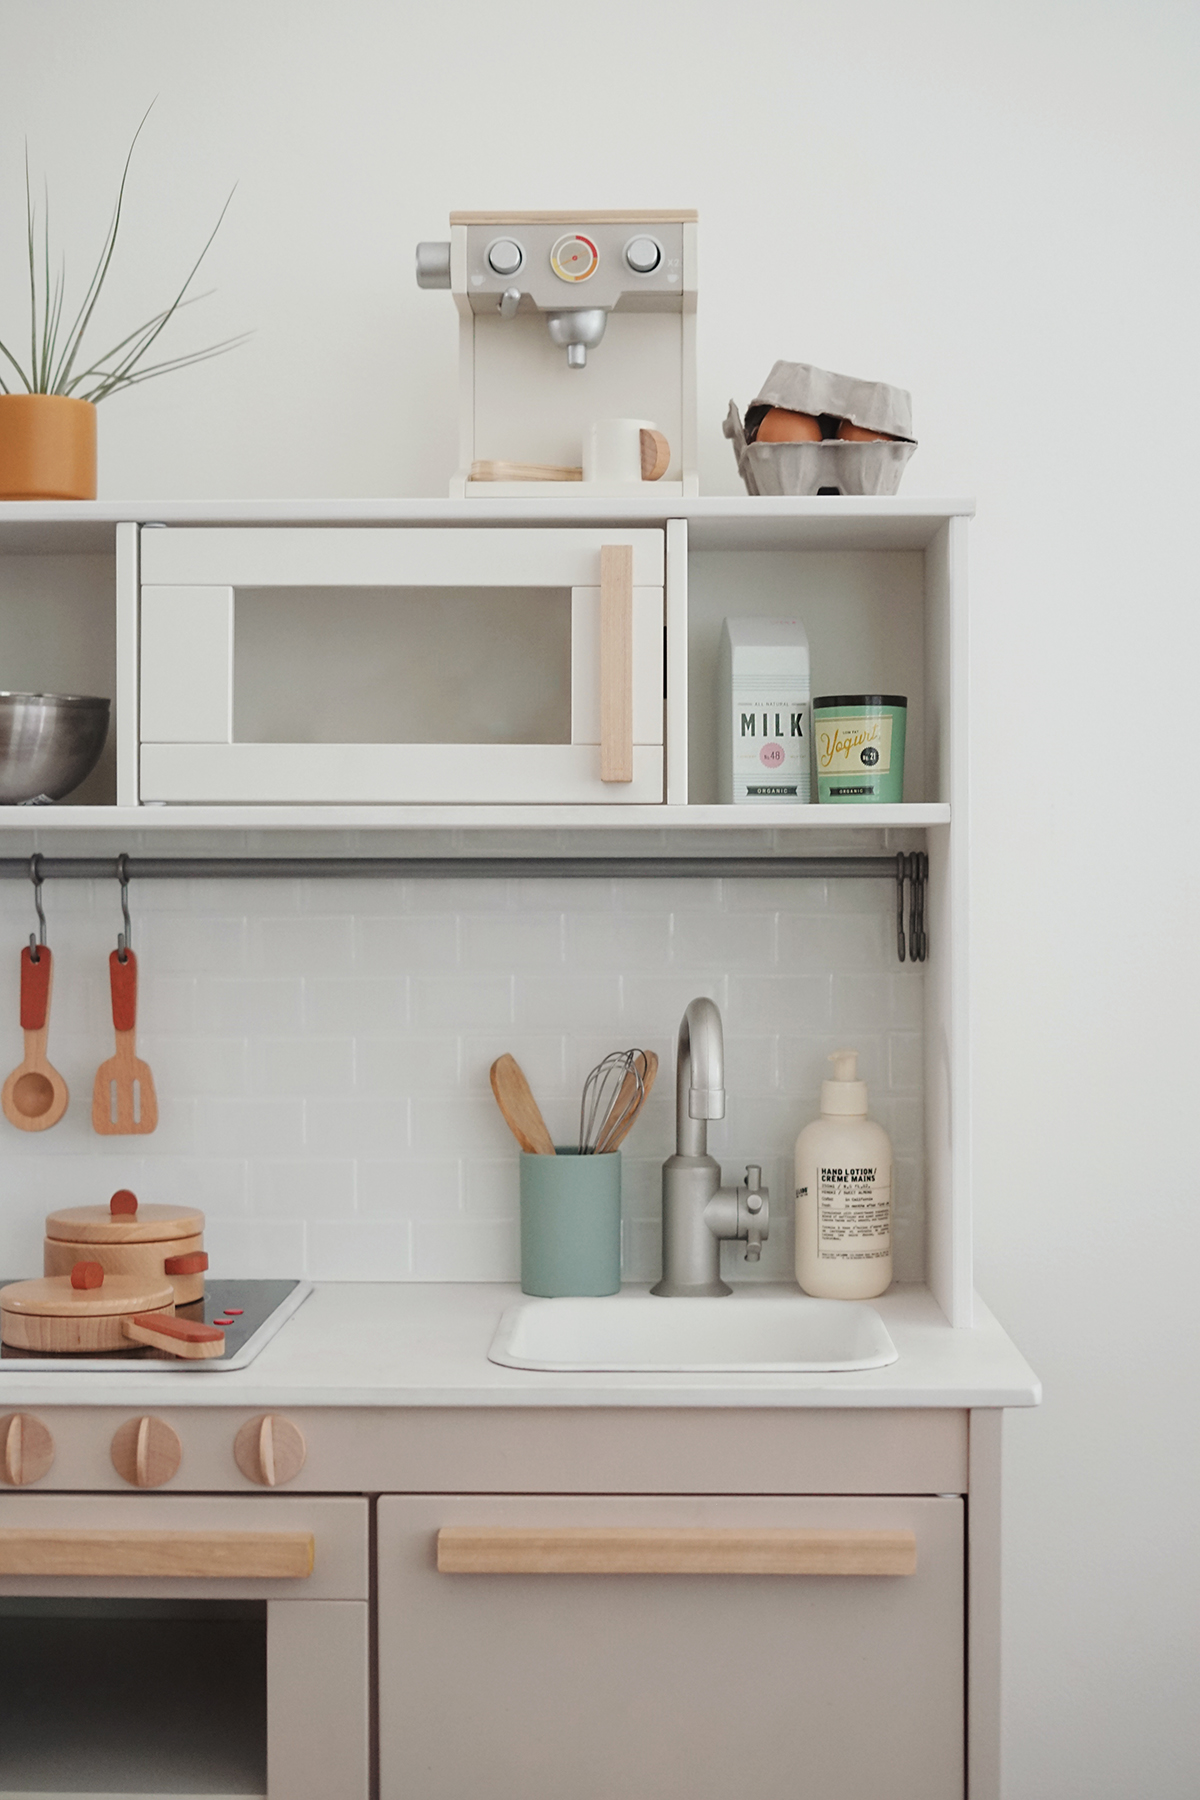
2. add in a backsplash
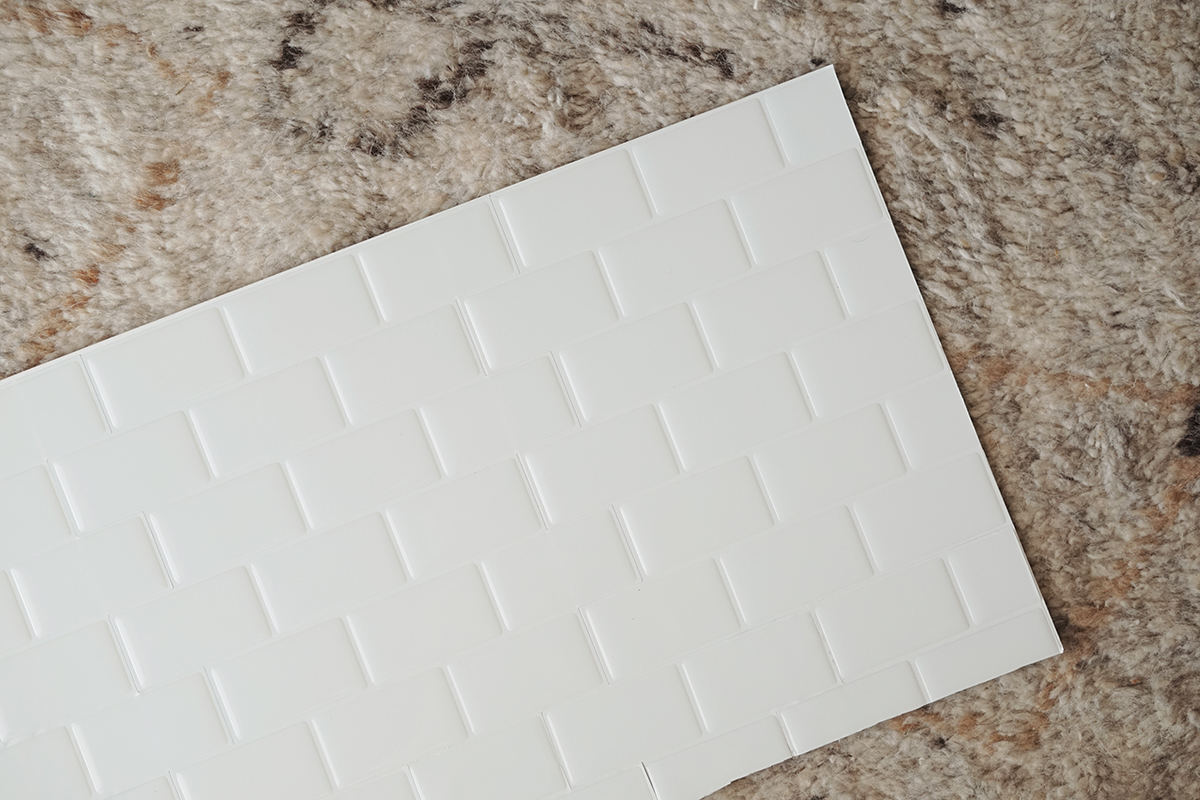
once we assembled the kitchen, i got a really thick piece of poster board from the craft store and measured it on the back. i then cut it out and tiled it using some subway tile stickers (these are similar). the backsplash was basically the last element we added and it made such a big impact. it really felt like it took it to another level!
as you can see below if you look closely, i messed up on the tiling quite a few times and i was getting really mad at myself, but once it went up you really don’t notice any of that. i added some wood glue along the edges of the kitchen, stuck the backsplash on there and then used painters tape to secure it for a day while drying.
3. swap out the hardware
as i said, i wanted to have the bottom be wood to match our kitchen but couldn’t figure out how to do it the right way, so instead decided to do all wood hardware as like, a nod to our kitchen. i considered buying wood knobs but struggled to find anything that would look right/fit/not cost a ton. so we decided to make them! and while that sounds complicated, it couldn’t be more simple.
our original plan was to use the square dowels and actually make them into pulls, but once we were about to cut everything i was scared they would protrude out too far and be dangerous/annoying. so instead, we just cut the square dowel rods (they’re 3/4″) and glued them onto the cabinets directly. i would have liked to have a pull to hang a little dish towel from but i am so happy with how these turned out. i worried arlo wouldn’t be able to grab them as well as an actual pull, but he hasn’t struggled with it at all.
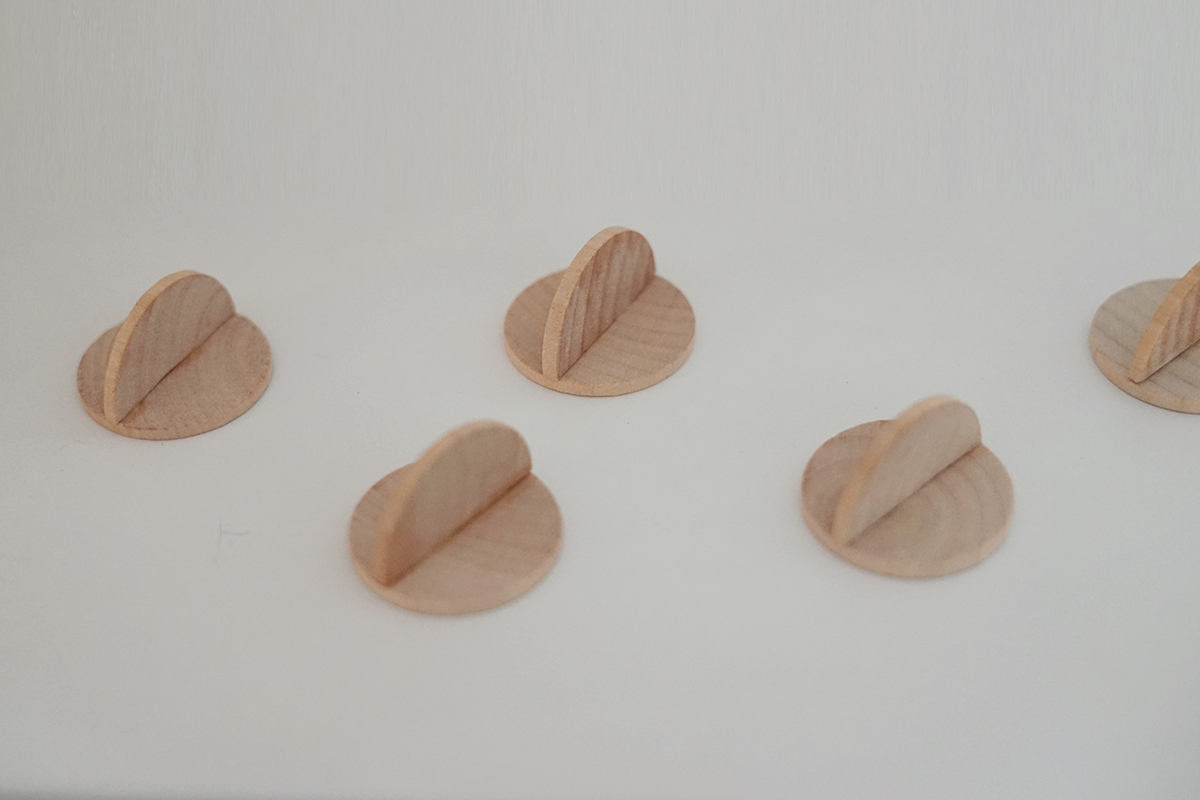
and for the adorable little wood oven knobs, i got a bag of wood rounds from the craft store and gid cut a few of them down the center, and glued the halves on! could they be cuter?!?!! we were worried that he would pull them off and break them immediately but so far so good. he barely messes with them since they don’t actually function so they’re basically just for me.
4. add accessories
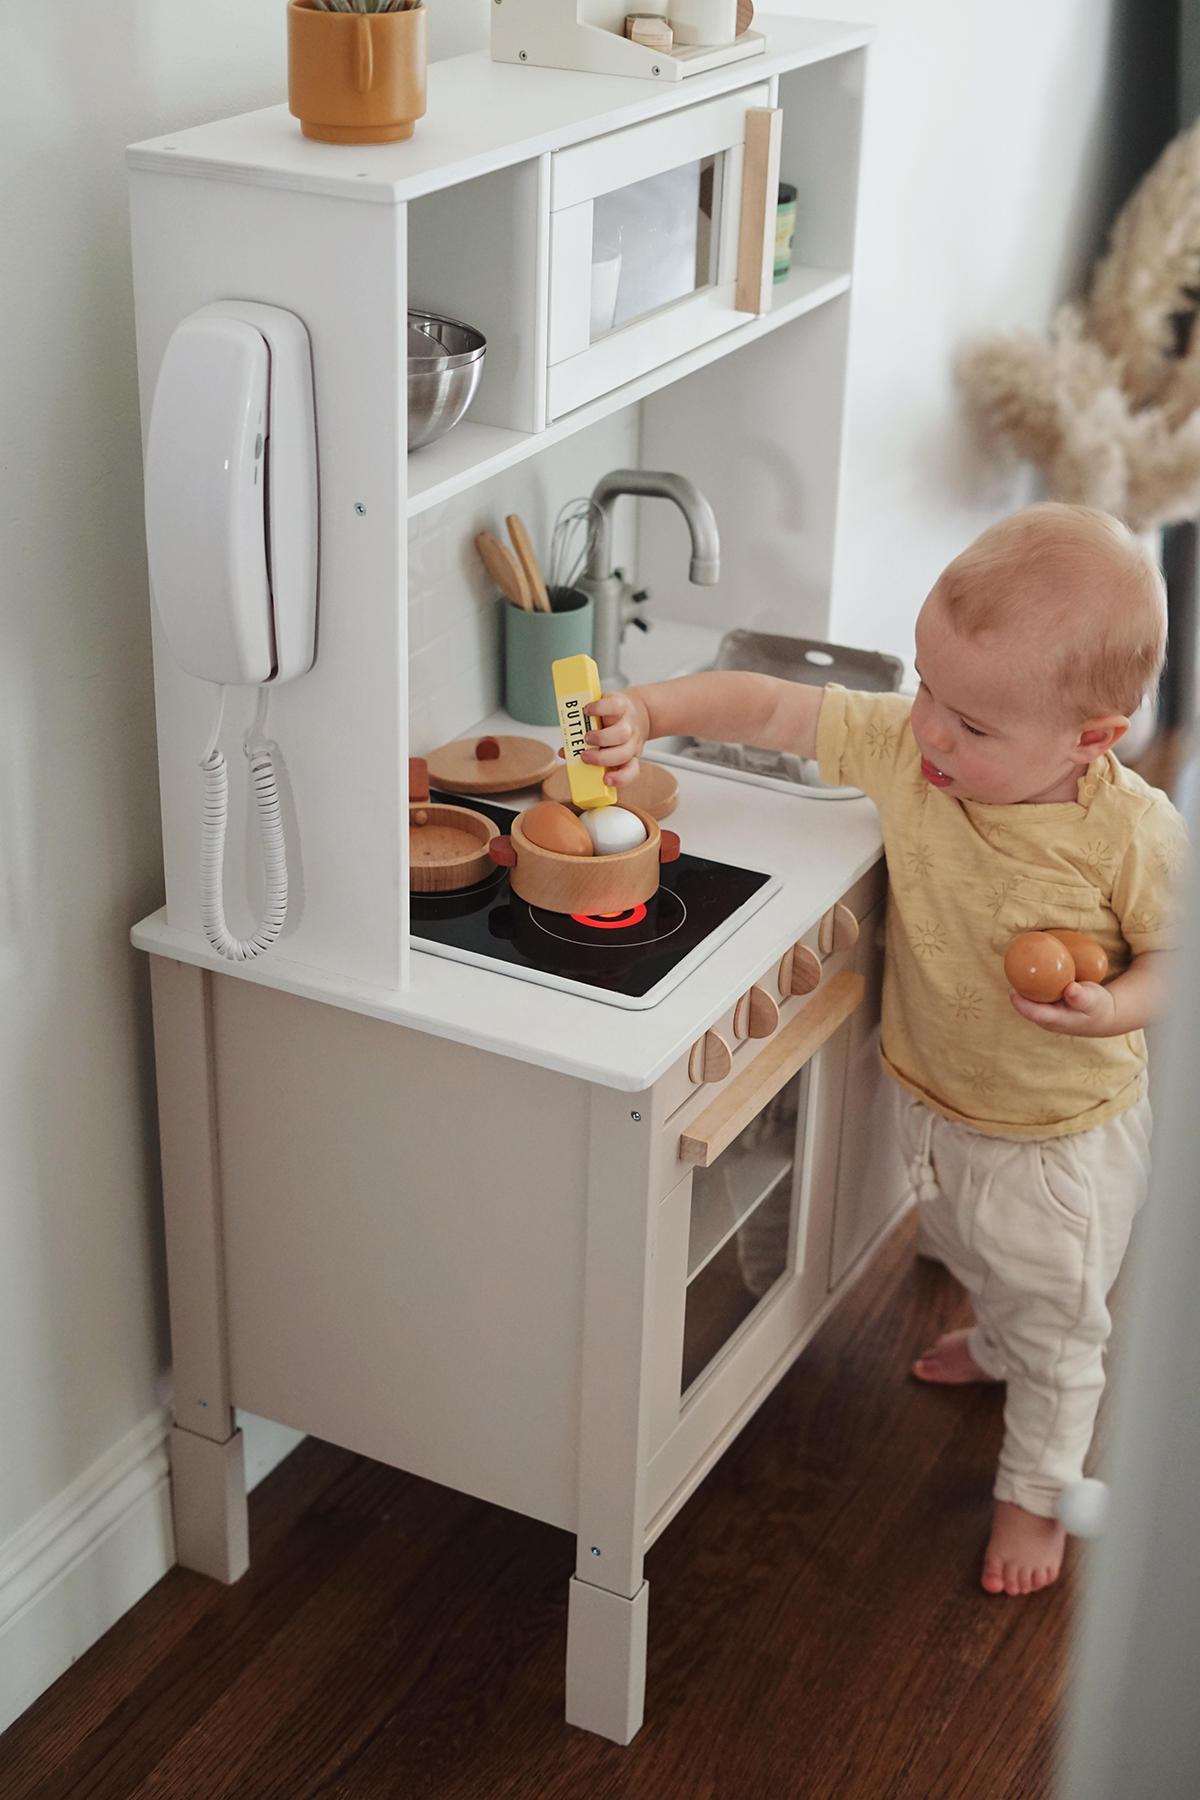
arlo loves to pretend everything is a phone, he holds up the remote and the thermometers and his shoes to his head and says “YA?!” so i knew we had to include a phone on here. plus one more place he can press buttons. (we’re planning to get a shorter, safer cord for him but haven’t found one that fits yet, right now he’s not playing with the kitchen unattended don’t worry.)
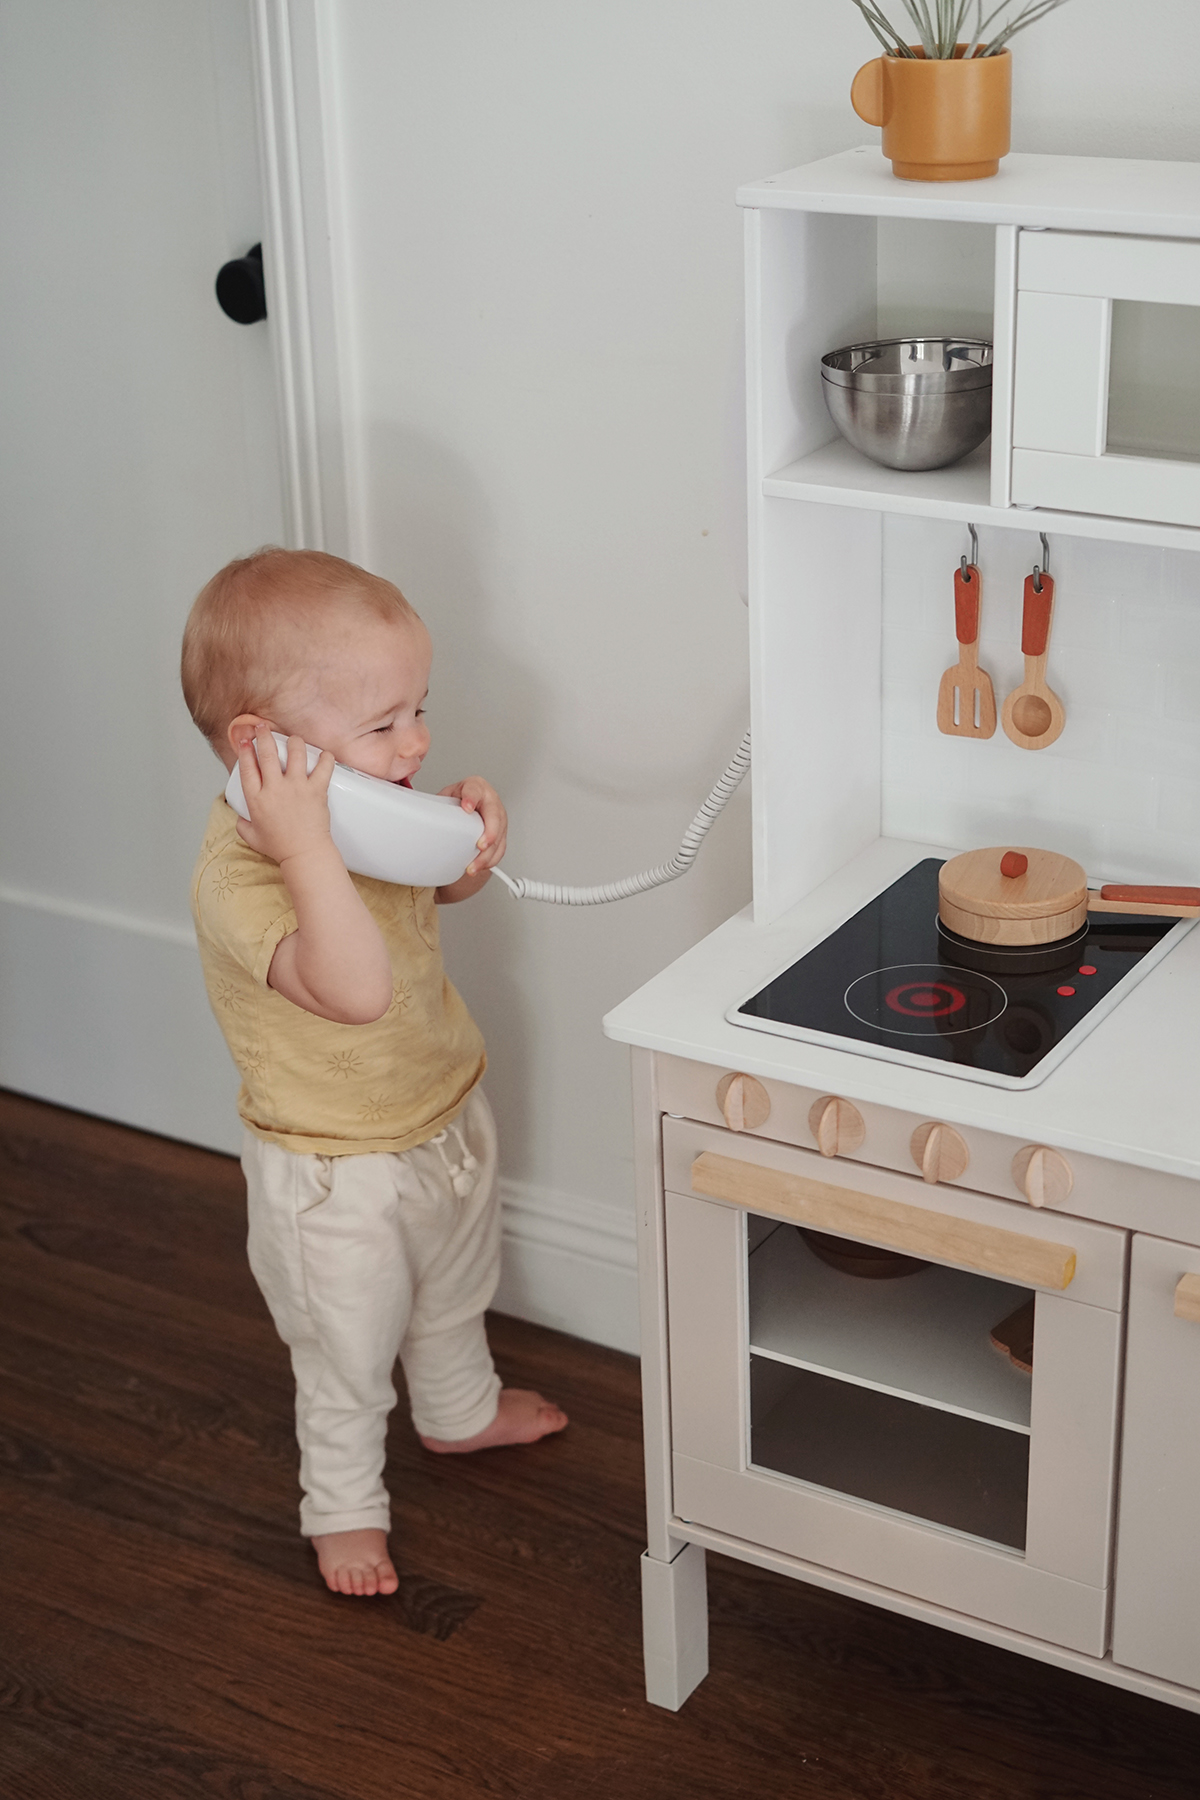
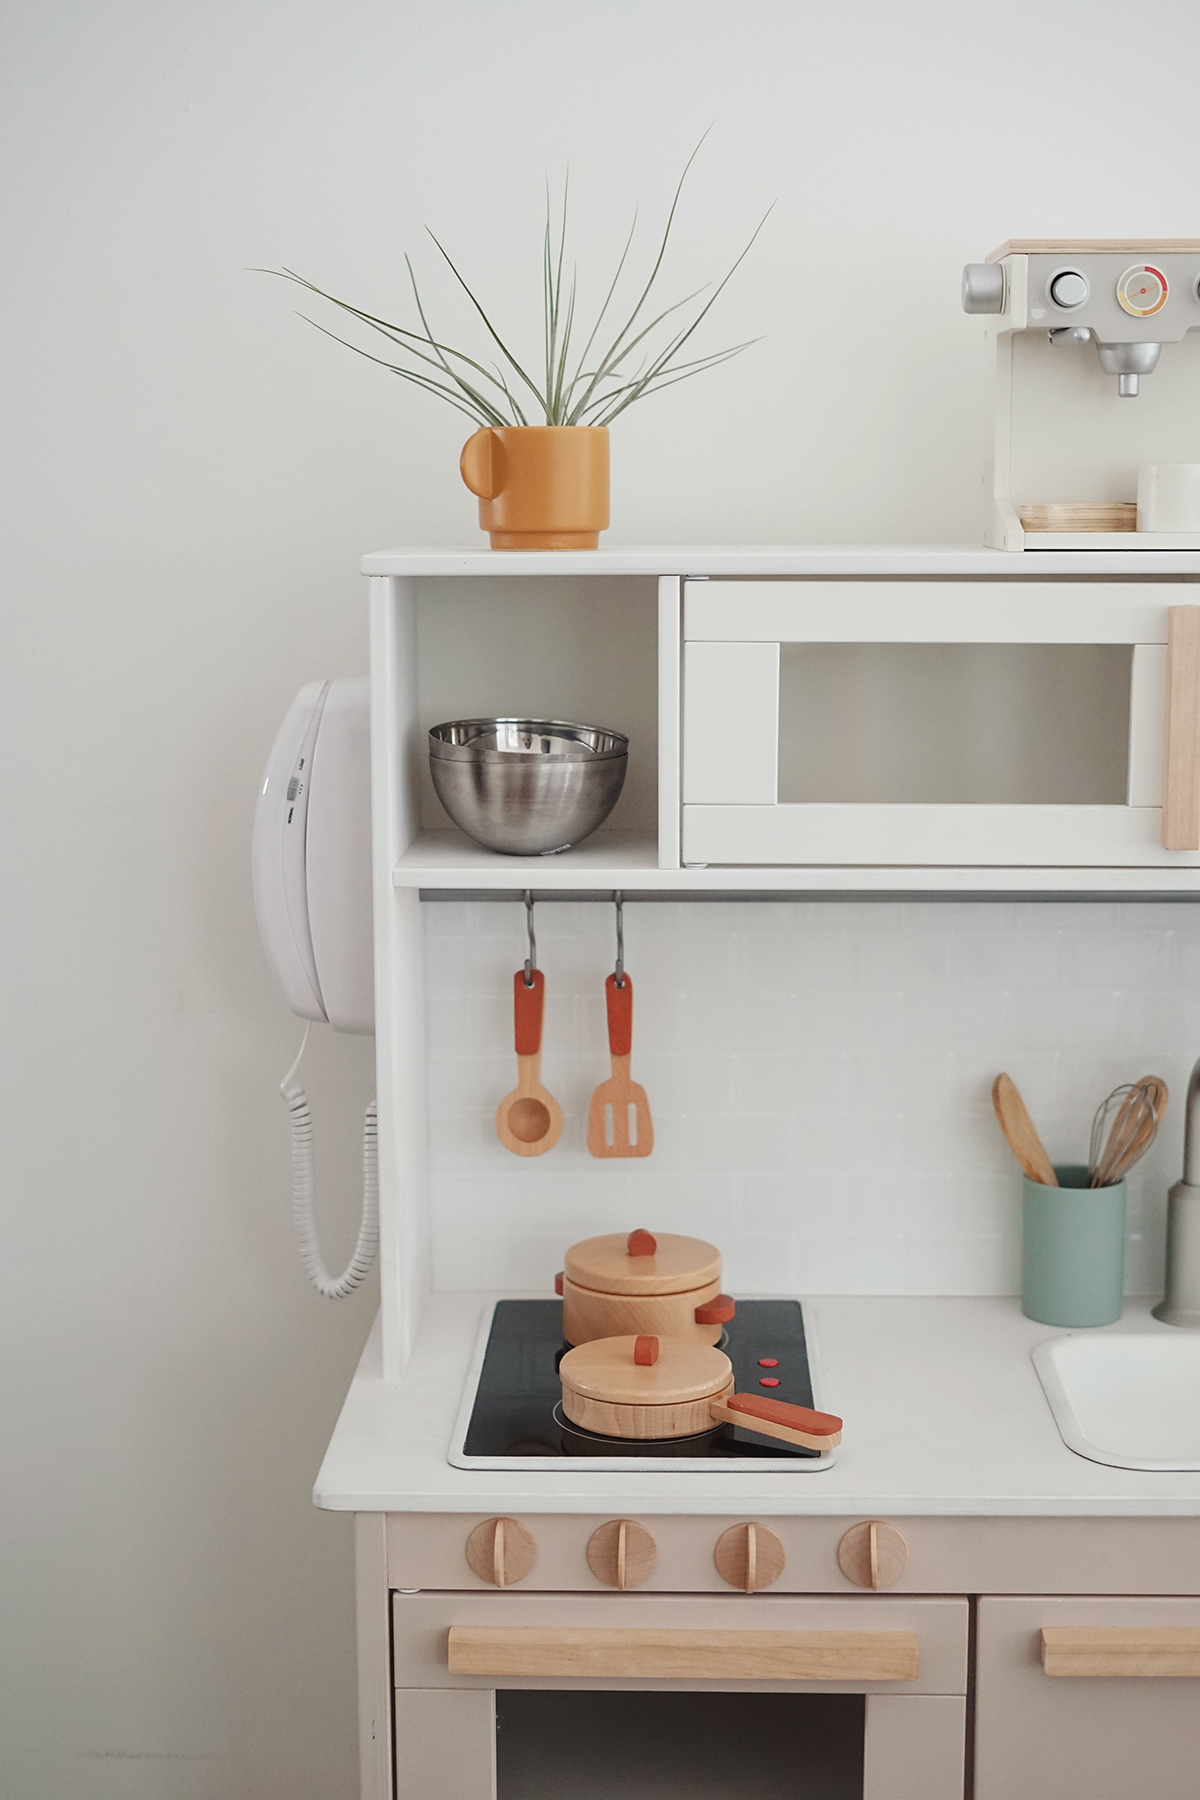
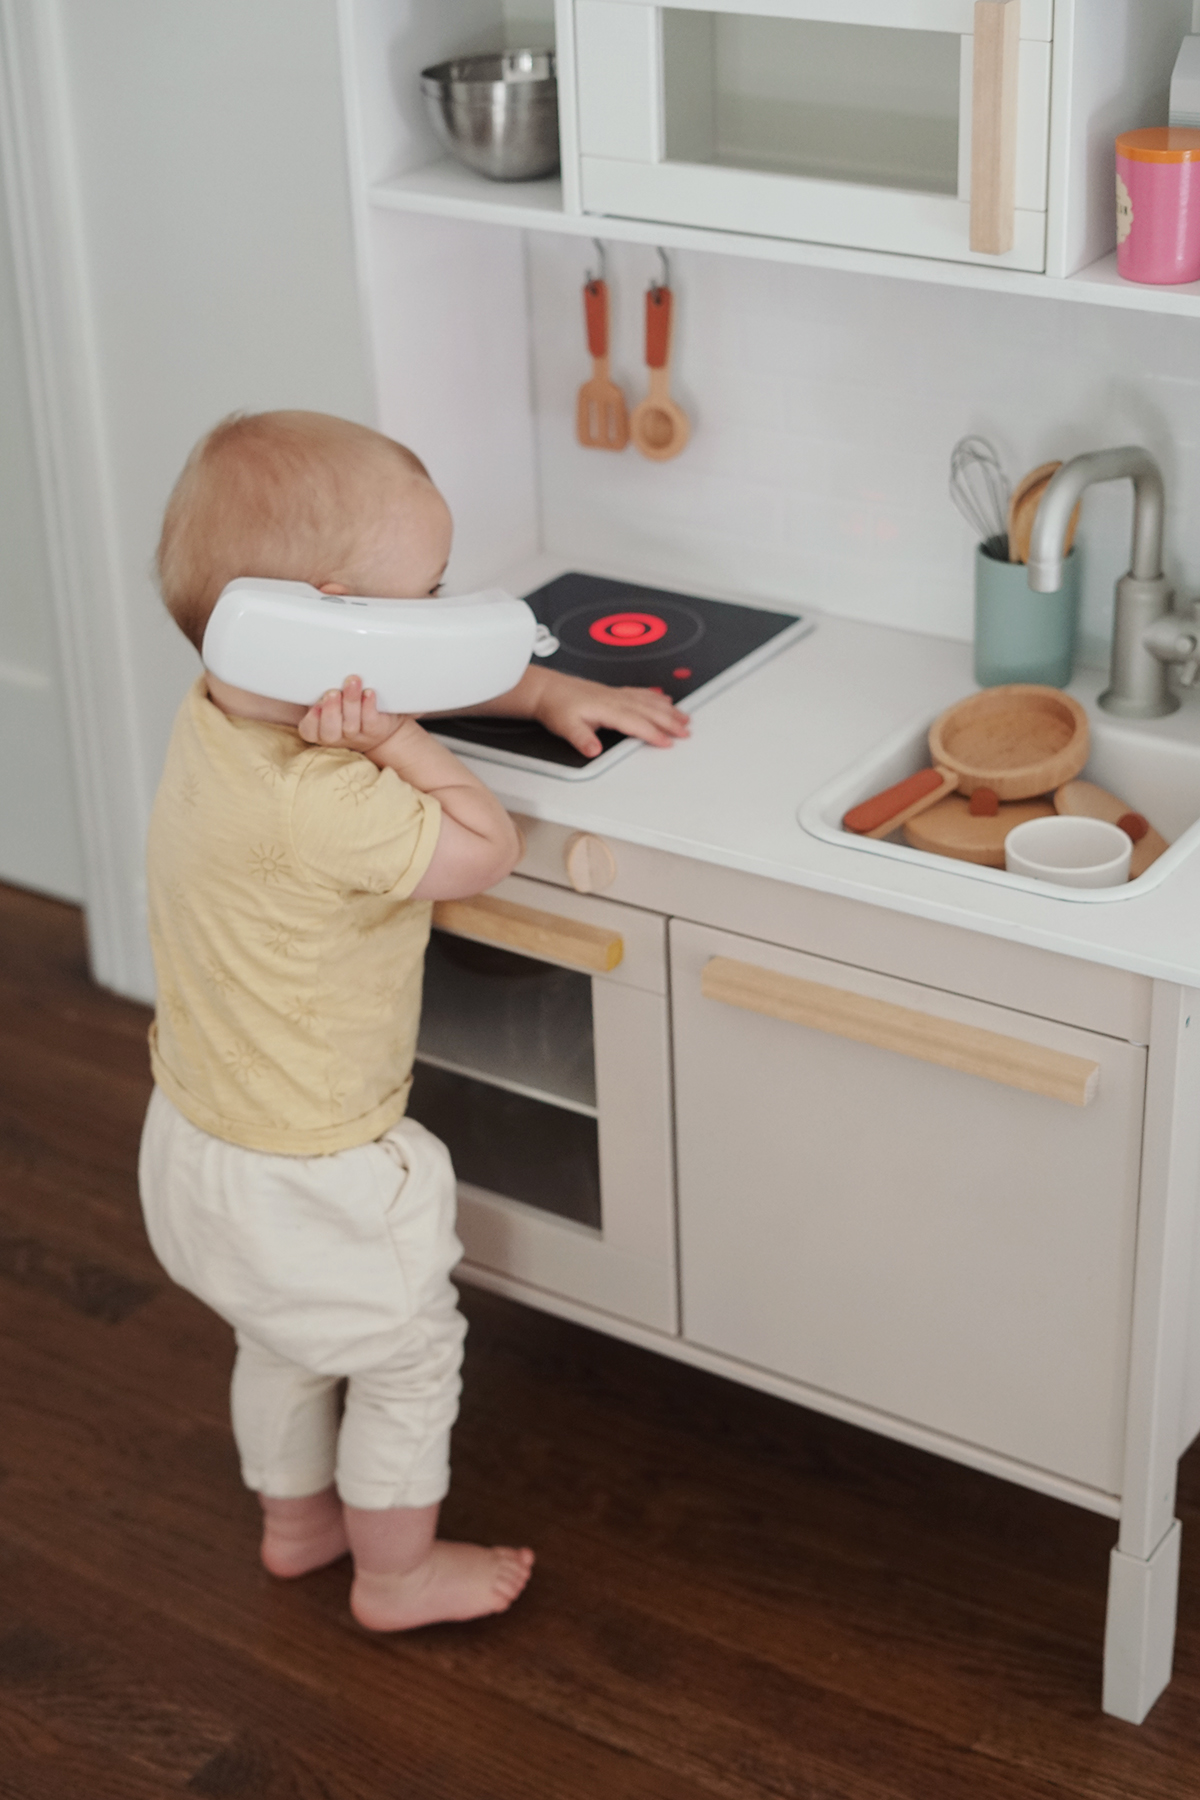
that photo is so me, a sink full of dishes but i’m too busy talking on the phone to do them.
you might have seen arlo knows how to work our nespresso like a grownup barista, so when i saw this little wood espresso machine (no longer available but here’s a similar one) i knew he needed it. and i just noticed from the website that i did not properly put it together and the part i thought was a spoon actually goes on there, so oops lol. i also want this mixer HELP MEEEE.
i got this little toothbrush cup for his utensil crock (similar one here), the mini whisk we already had from ikea, and the wooden spoons were ones from our kitchen we cut down to fit. the pot and pan set (similar one here) come with a bunch of pieces and they work so perfectly with the kitchen. i didn’t include in the photos, but we also bought arlo a SECOND set of pots and pans and i blame gid for that because he rationalized and now we have two sets of cookware. it’s really absurd. anyway they are gorgeous.
i got the play food from crate & barrel but it’s not available anymore (here’s a different cute set), again they come in a big set! so cute. i also added a le labo soap for photos because how could i not? but i’ll be taking that back now.
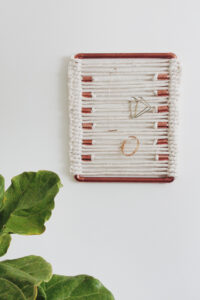
i also shared a diy project for making your own play kitchen dinnerware here!!
i’ve seen a lot of people replacing their stovetop with a cuter alternative, which i agree, looks so much better, but the fact that the stove that comes with the kitchen lights up and has buttons — i knew arlo would love it too much to skip it, so i kept it as is.

i think that’s it! let me know if you have any questions and i would love to see if you try it out yourself!!!
sources
ikea kitchen / beige spray paint / white spray paint
wood for oven knobs / satin nickel spray paint / spray sealer
subway tile stickers (similar) / phone / pot and pan set (similar)


THIS IS SO GOOD!!
you’ve really outdone yourself, madfis. nicely done.
This is amazing!!! Great job
Love this!! I’m doing this for my daughter for Christmas this year. How much of the subway tile did you buy? Thanks!
that pack of 5 was the perfect amount!
Do you have a different recommendation for subway tile! That link doesn’t work! Thank you!
This is incredible! I’m about to embark on this same project myself and have been scouring Instagram and Pinterest for inspiration and this is definitely one of the best I’ve seen! Do you mind if I ask where the adorable milk carton is from? Thank you!
This is so impressive Molly Arlo is so blessed to have creative parents. I think he is on his way to
Being a chef.
Thanks for the shout out to your crazy mom who made your awesome doll house when you were young. Wish I had a photo of that one.
Mom
This kitchen is amazing. I already hacked the ikea kitchen for my daughter last year but now I’m thinking she needs a reno based on your design! Was 5 sheets enough for the backsplash?
Awesome!! Thanks so much for keeping the cooktop. That is my biggest beef with Ikea play kitchen makeovers I see online. Like, please do not make something less functional/fun for a kid for the sake of design. Like sure make it pretty but don’t take away from the play factor, add to it! You’ve done it! My poor child’s is as-is out of the box. Maybe some day…..
This has to be the best looking play kitchen EVER. I love how much Arlo loves it.
Sara
How did you apply the paint? A brush or roller? Thanks!
This is *unspeakably* charming. Arlo gabbing on the phone in the kitchen is too much!!
You’ve inspired my daughter’s birthday gift! Just curious – what paint colors did you use?
linked to all the spray paints i used 🙂
Hi! Beautiful kitchen! I dont find the link to the spray paints. Could you please link them again? Thank you!
So sweet!! How many cans of beige spray paint did you use?
How many cans of beige + white spray paint did you end up using? And how did you make it splotch-free? Did you have a brush over certain areas or anything?
Thanks!
i think 2 beige and 2 white but maybe a little more white because i went so overboard on the extra coats for the plastic stuff! just stay far away and slowly layer on the paint versus try to do it all at once and the finish won’t be splotchy!!
This looks great!!!
I’m hoping to do my sons for xmas (also an Arlo 😀 ) and I just wondered how many packs of the tiles you ordered from amazon?
Thanks in advance x
hi! i love love love this! I have the kitchen on order and have all my accessories already. the kitchen is arriving just before the holidays though so I wanted to ask you for the door pull measurements if you don’t mind? I am going to cut them before so we can just add them in quickly. what length did you cut the microwave handle and the two on front? thank you so much! you are incredibly inspiring!
I was wondering how you cut the knobs? This kitchen is beautifully done!!
Oh noooo, he put the steel bowl in the microwave!!! j/kkk 🙂
I may have missed it, but how did you attach the phone?
This has to be the best looking play kitchen EVER. I love how much Arlo loves it.
Thanks
Loved this post and all these helpful!
What a beautiful kitchen!!! I am just about to embark on making one for my daughter. I like the stove top you have. It looks like there are buttons and it lights up. Can you share how you made it or where you bought it? Thank you so much!
I love the phone, where do you find it ?
i can’t wait for ours to arrive so we can attempt our own hack! did you use the same white paint for the counter tops and for the kitchen sink? love this so much!!! thank you for sharing!
Love this kitchen ♥ Thank you for sharing.
Where did you buy that beautiful little mug?
So, since this was written have you had any chipping. I really want to paint the one I just bought for Christmas, but I am very afraid of it chipping.
I’m curious about the same thing. I’m almost done following your hack but having a tricky time with the change in temperature outside and the spray paint. It’s the project that is never ending because of winter lol.
After all this work, please tell me it hasn’t chipped! Also wondering how you cut the wood discs?
Thanks for the hack, very excited for it to be finished!
sorry just seeing this now! we cut the wood discs with a craft knife and ruler! the wood is pretty thin so it’s not too challenging. it hasn’t chipped much at all, condition is pretty good!!! hope yours turned out great.
It has turned out great, will add the knobs this week! Thanks for the tip. There has been a little chipping on the sink from her banging pots on it but so far so good. One handle fell off also but I think I just had too think a coat of wood glue so I’m going to sand and reattach, the others are fine. I love it, when I look at a before picture it was totally worth it. If it wasn’t winter, it would have been a waaaay quicker project, my own fault for procrastinating. Thanks again:)
Hi! I love this so much! You linked to a satin tan paint- do you remember if the one you used was satin or matte?
BEST HACK IVE EVER SEEN! Had been waiting for Christmas to do this for my babe and time has finally arrived!
You mention something about last minute deciding you wanted the part that goes between stove and cabinet painted beige but you wanted the sides to stay white? What part is that?
Also, is the difference in the white you painted and the color white that the kitchen already comes with very marked?? Having trouble finding white spray paint that is not glossy where I live.
Thank you in advance!
You said you didn’t want to use contact paper so it wouldnt look “crappy” so fast. What is “crappy” about contact paper? I am about to get started on my kid’s kitchen with contact paper and I was just wondering if you knew something I didn’t about contact paper. Thanks!
it can just start to peel over time!
Beautiful kitchen!! Can’t wait to try it too.
I didn’t see the links to the paint you used. Do you mind sharing again please?
Thank you!
What type of glue did you use for the knobs and pulls?
What kind of sealer did you use for the paint?
Is Arlo still interested in this? Or has he out grown it?
Hi Molly! Thank you so much for putting all these little details together, and sharing them. I was wondering if you could give the measurements of the pulls? How long are each of them?
Also, where did you find your milk carton at?
Just started on this for my daughter’s Christmas present! I’m wondering if you painted the inside of the bottom beige or white? It’s hard to tell from the pictures. Thanks!!
I am almost done doing my kids thanks to yours for all the helpful information, but the thing I cannot figure out is how to best attach the phone. How did you mount it?? That wood panel is so thin so I’m thinking that using a screw isnt the best idea? Please help!!
Hi Katie,
I purchased the same phone and successfully mounted it using this adhesive material I purchased from Amazon. I cut a strip an applied it down the center of the base and then stuck it to the side of our kitchen. I have used this material for other projects before and feel quite confident that the phone is not going anywhere. Plus side, no drilling holes and it took mere seconds to mount!
Washable Adhesive Tape Nano Double Sided Transparent Silicone Gel Grip
https://www.amazon.com/gp/product/B07V4QH7DT/ref=ppx_yo_dt_b_search_asin_title?ie=UTF8&psc=1
Hi, following up to see how you mounted the phone and if you were able to find a shorter cord?
She ended up showing how she mounted it in her IG stories. She did use screws to mount it. It ended up being easier than I expected, but there’s also a comment above with information about how to do it without drilling holes.
Thanks, I must have missed both. Found my own solution today, so all set! 🙂
Hi Molly!
I bought this same phone to mount on the side of our play kitchen but can’t seem to get the hand piece to stick to the base when I hang it up…. any tips?
Hi Shelby. I recently purchased the same phone. In the instruction book that came with the phone, it shows how to remove the tab on the phone receiver, reverse it and reattach. This will keep the phone secure when hung up.
How did you get your phone to stay? We have 3M hooks but my toddler somehow can pull it off still! Thank you
I believe the blogger used screws.
I used an adhesive material I had purchased from Amazon. It’s incredibly strong and our phone has not budged every since I attached it.
Washable Adhesive Tape Nano… https://www.amazon.com/dp/B07V4QH7DT?ref=ppx_pop_mob_ap_share
I know this is a very old post but wondering about the satin vs matte for white spray paint? Thank you!!
How did the sealing work out and which one did you use?
Any idea what brand the toy food was? Crate and barrel no longer sells it 🙁
Hi!! Is the beige called satin silver lilac? That’s the one linked! ❤️
Hiya! I’m ready to embark on my own reno journey and Arlo’s kitchen is such an inspo! I’m just wondering now – how is the paint fairing after several years? Any chips? Thanks so much