-
printable neighborhood scavenger hunt
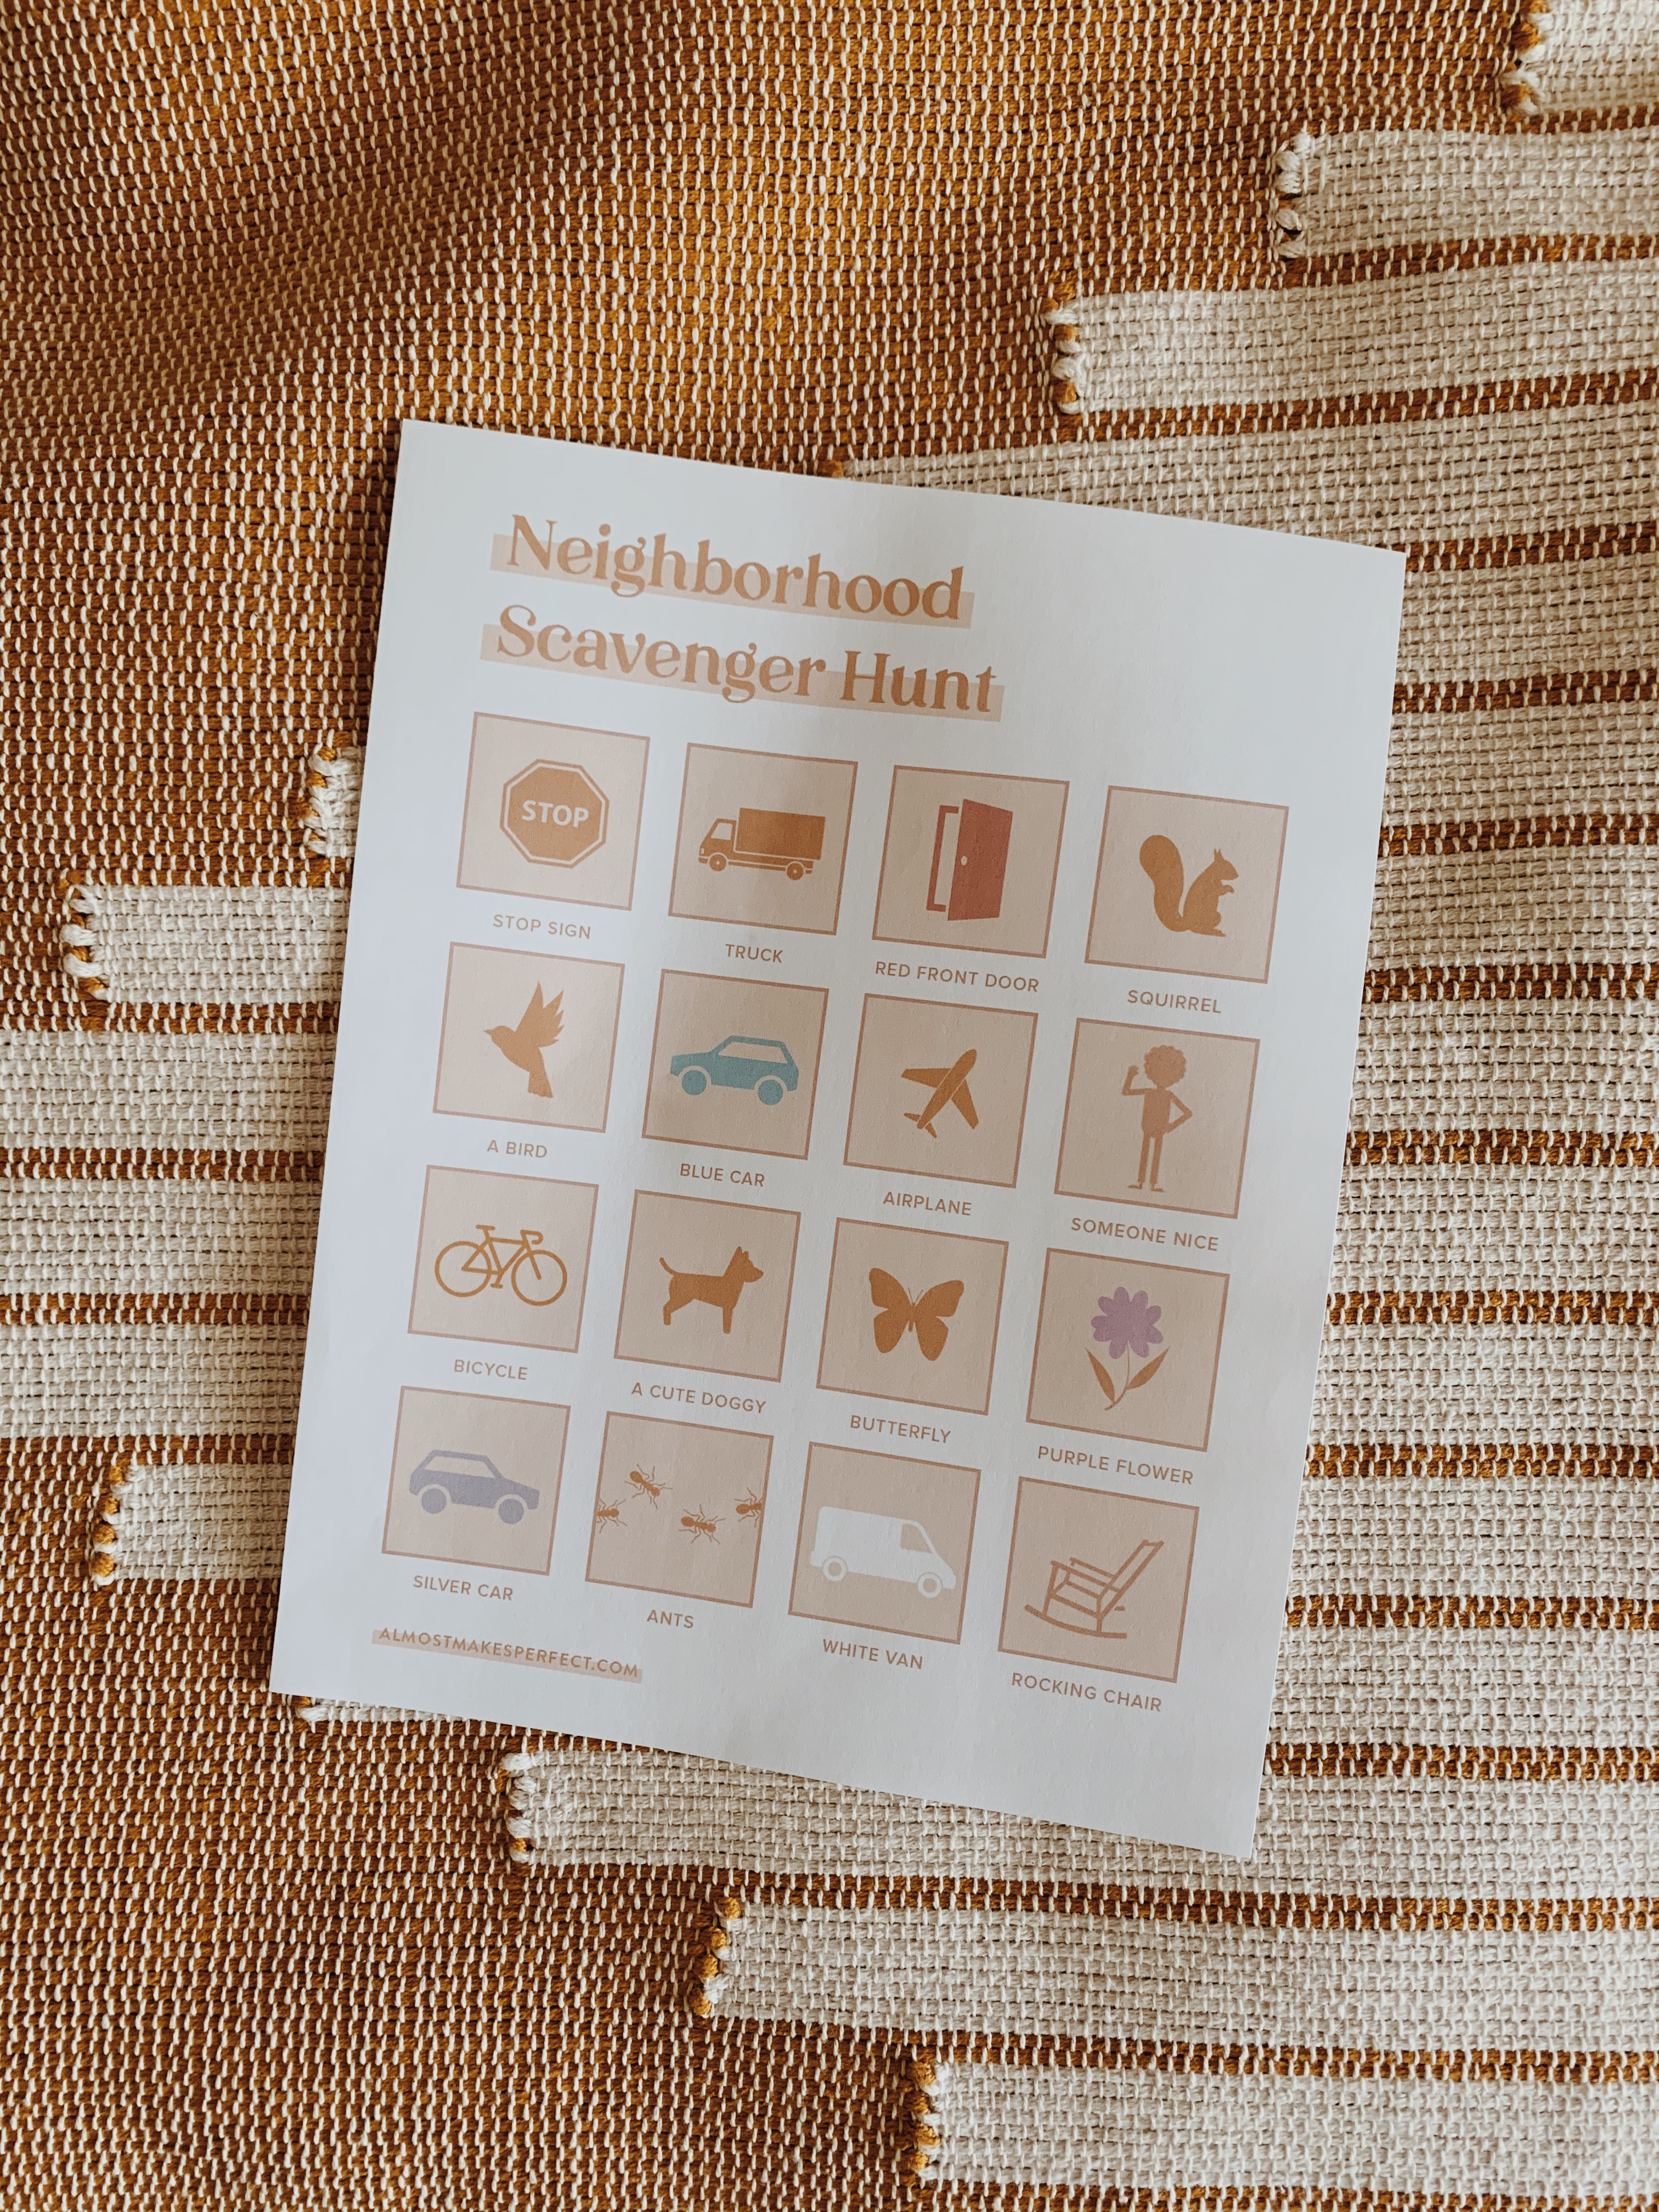
for those of you who are still able to roam around your neighborhood, a perfect activity for any kid who needs some motivation to get outside and walk around (arlo most certainly does)– i put together this printable scavenger hunt list. obviously everyone lives in different climates, so i’m sorry if you don’t have squirrels or airplanes or nice people where you live, but i tried my best! Read More
-
30 stylish + functional diaper bag backpacks
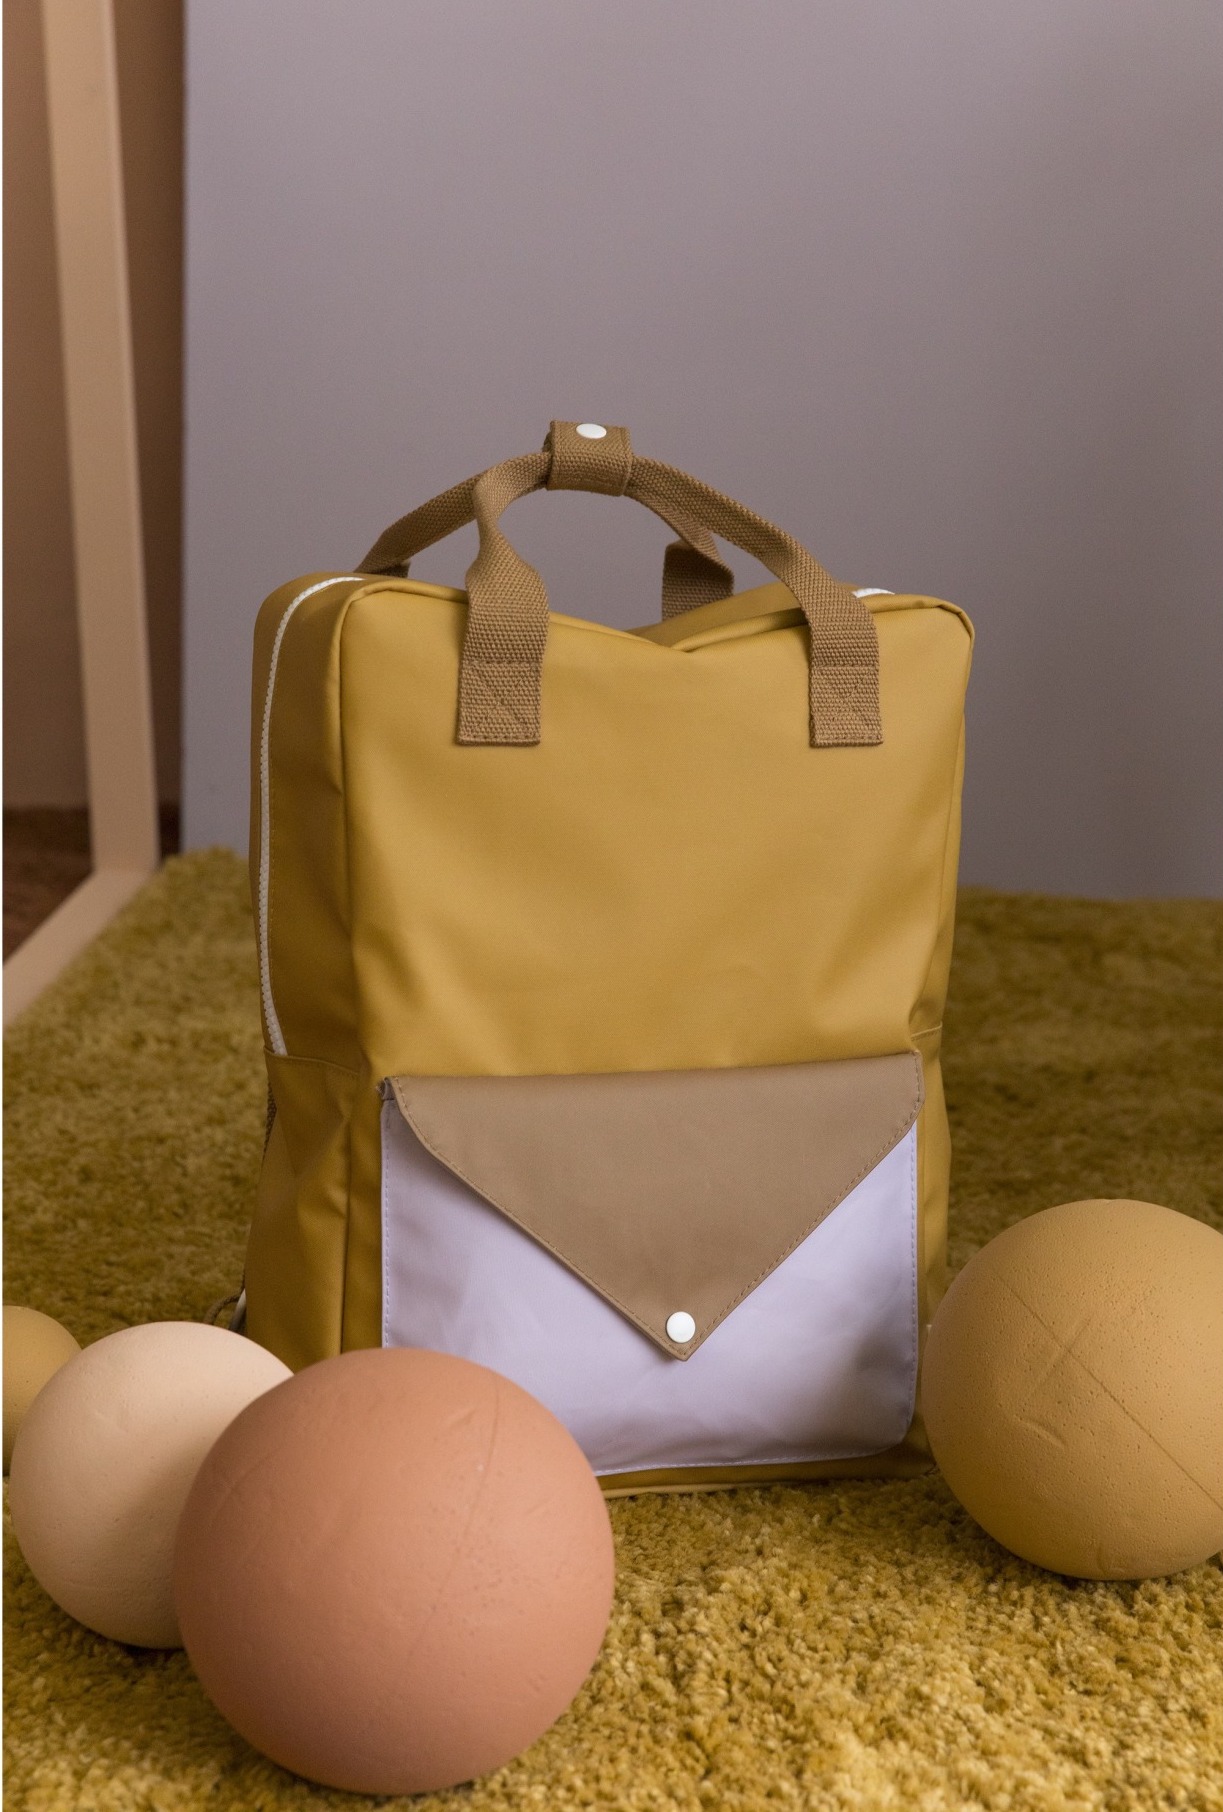
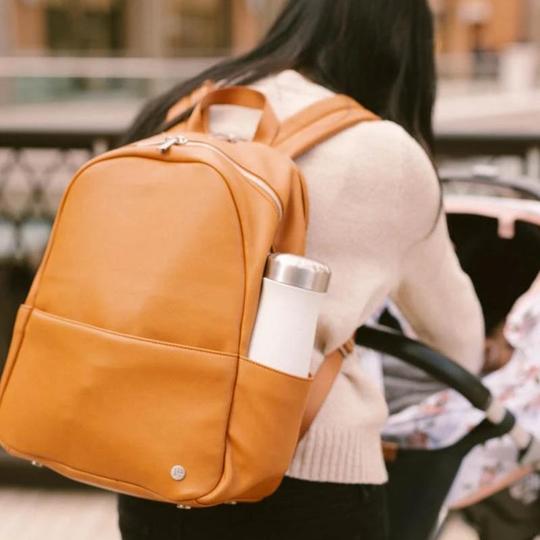
so the last time i did a roundup post of diaper bags, i just chose bags that looked good. after two and half years of having a kid, i have super different opinions on what i need in a bag. while arlo probably won’t be in diapers that much longer (LOL…) i still want a bag that i can use daily to corral my things, his snacks, his activities and toys– our current baggu backpack is cute, but i have to take everything out to get one thing and its just not ideal whatsoever. our one before that was a fawn design bag which is beautiful but i found it too heavy. so i had pretty specific criteria for my new bag.
since i was on the hunt and searching mostly for bags that open wide, i decided to ask you guys on instagram stories your favorites and got SOOOO MANY RECOMMENDATIONS! thank you all so much. so many bags and brands i had never even heard of. these are mostly the ones you guys loved the most, i just narrowed down the suggestions with the ones i found most stylish. i was looking for ones that opened super wide, ones that had lots of handy pockets, ones that would actually be super helpful for moms. i hope this helps you if you’re on the hunt too! Read More
-
printable daily schedule for staying at home with kids
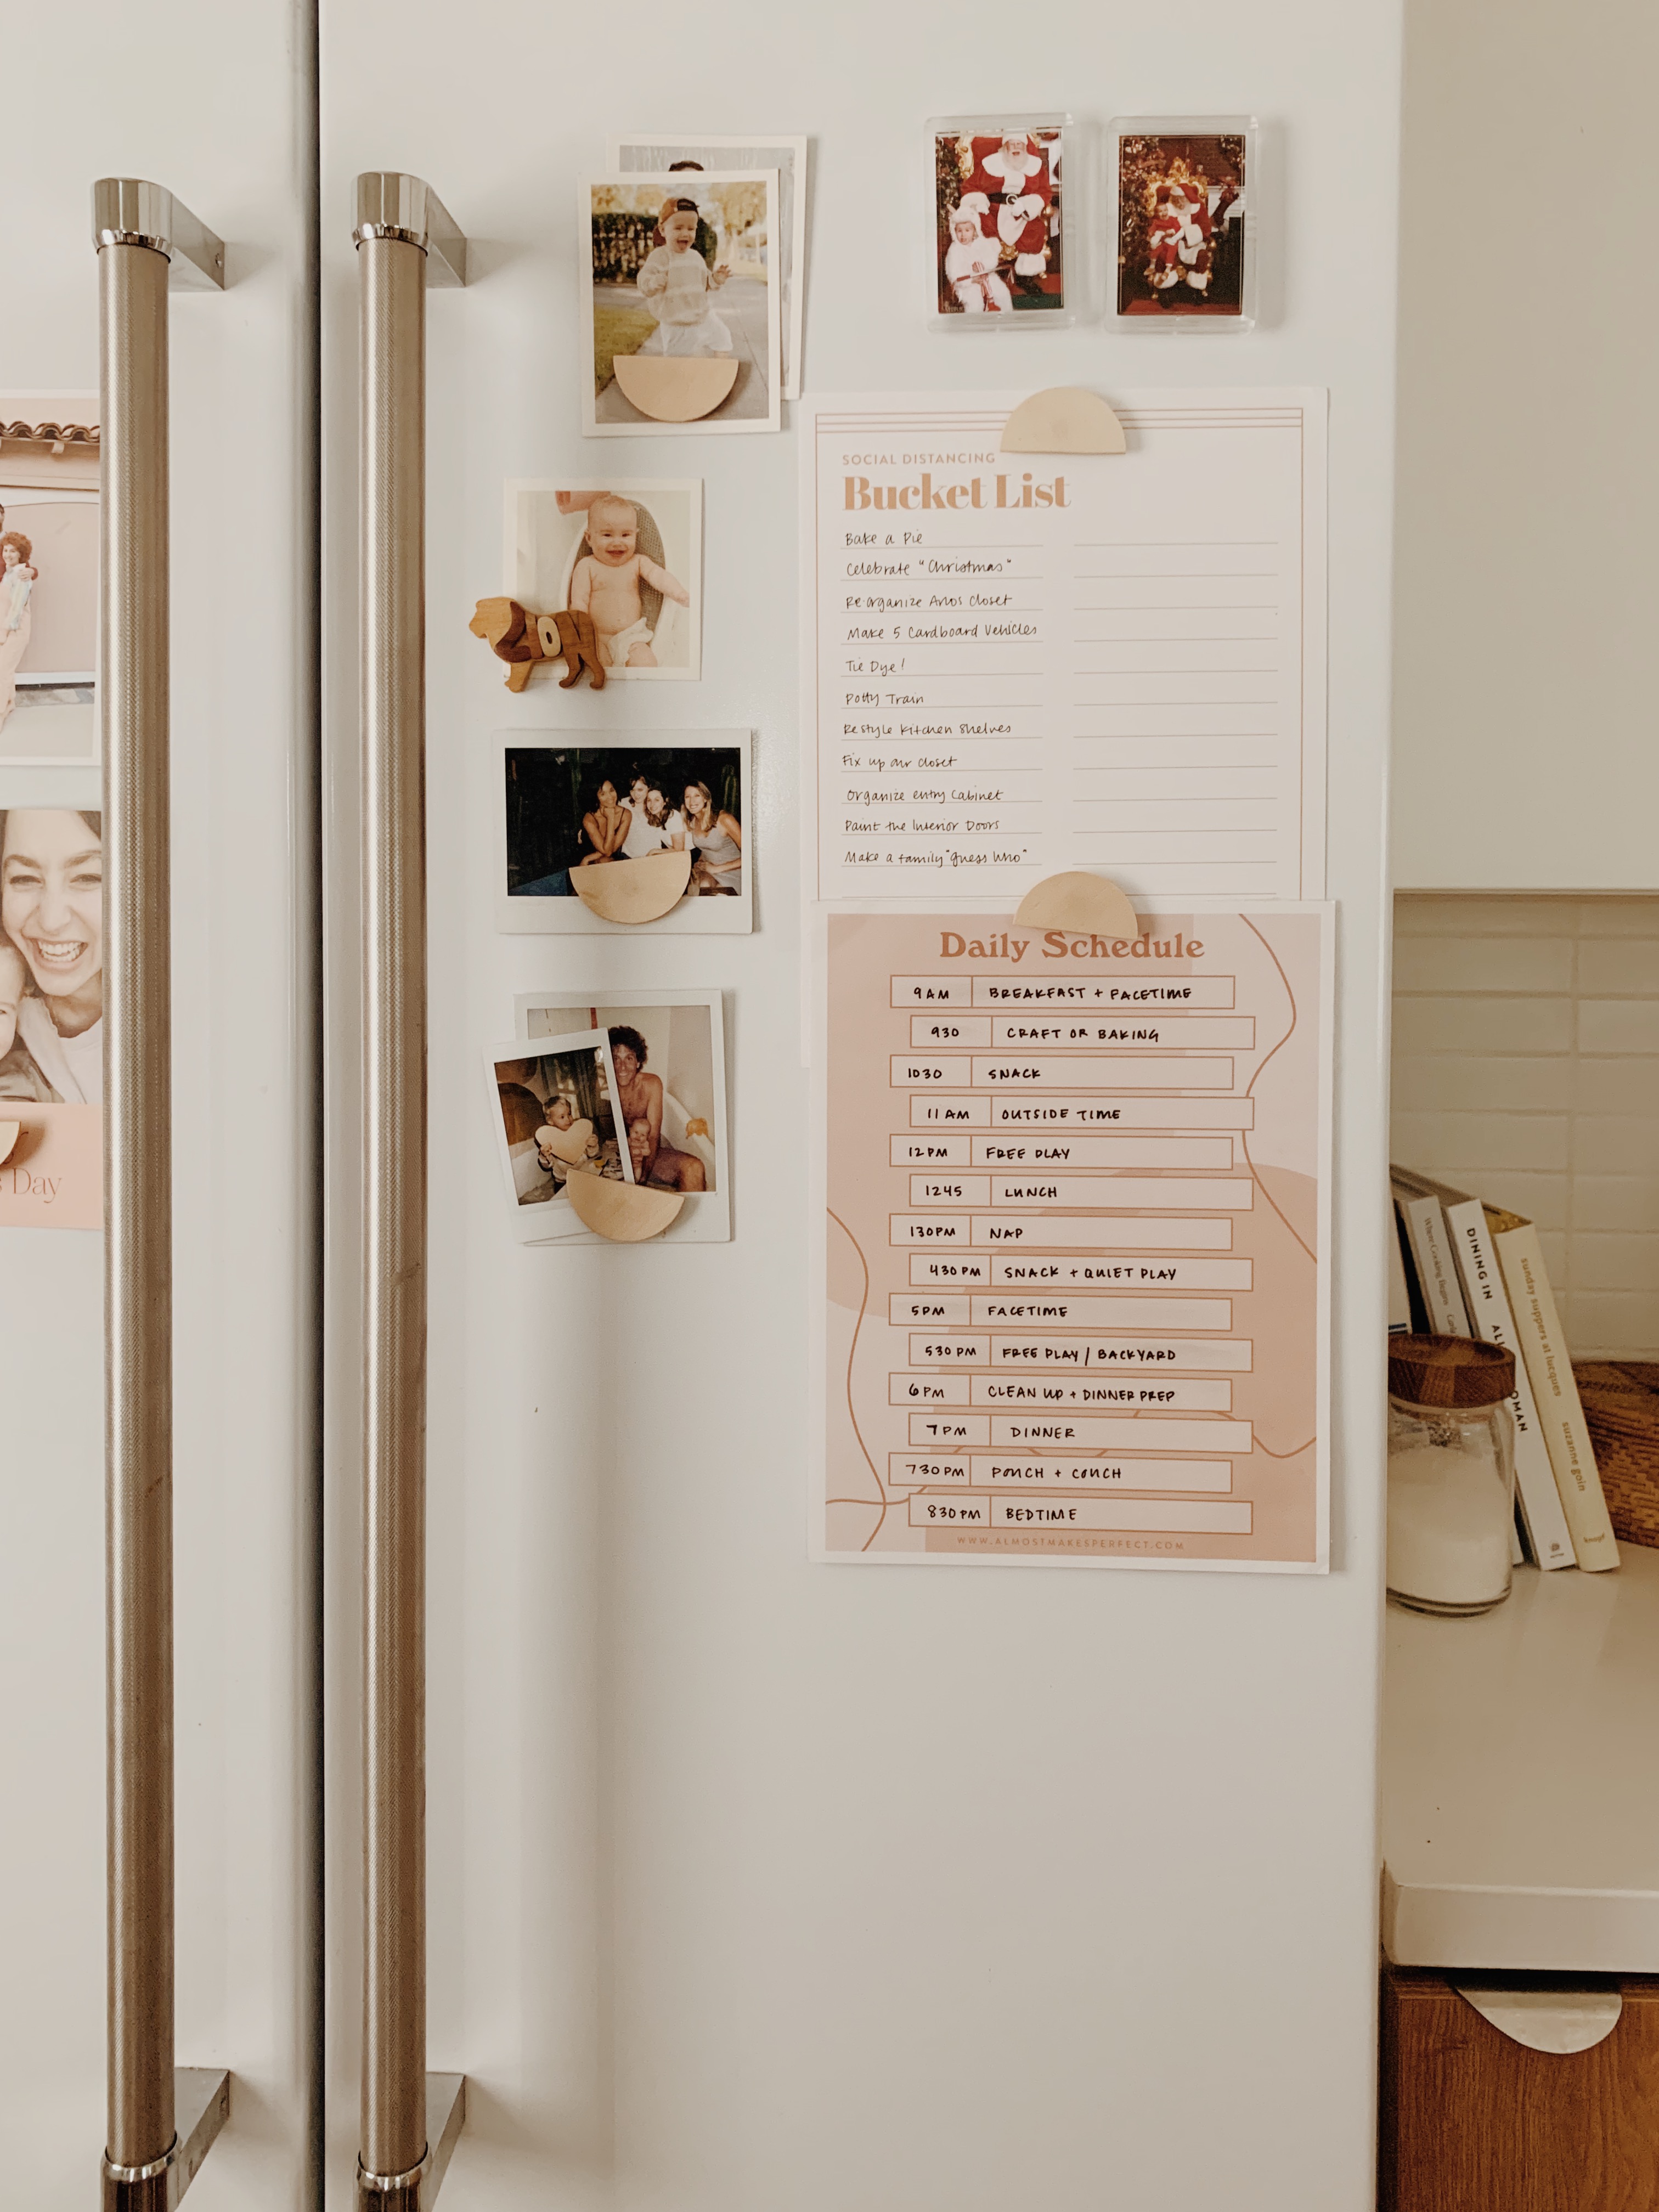
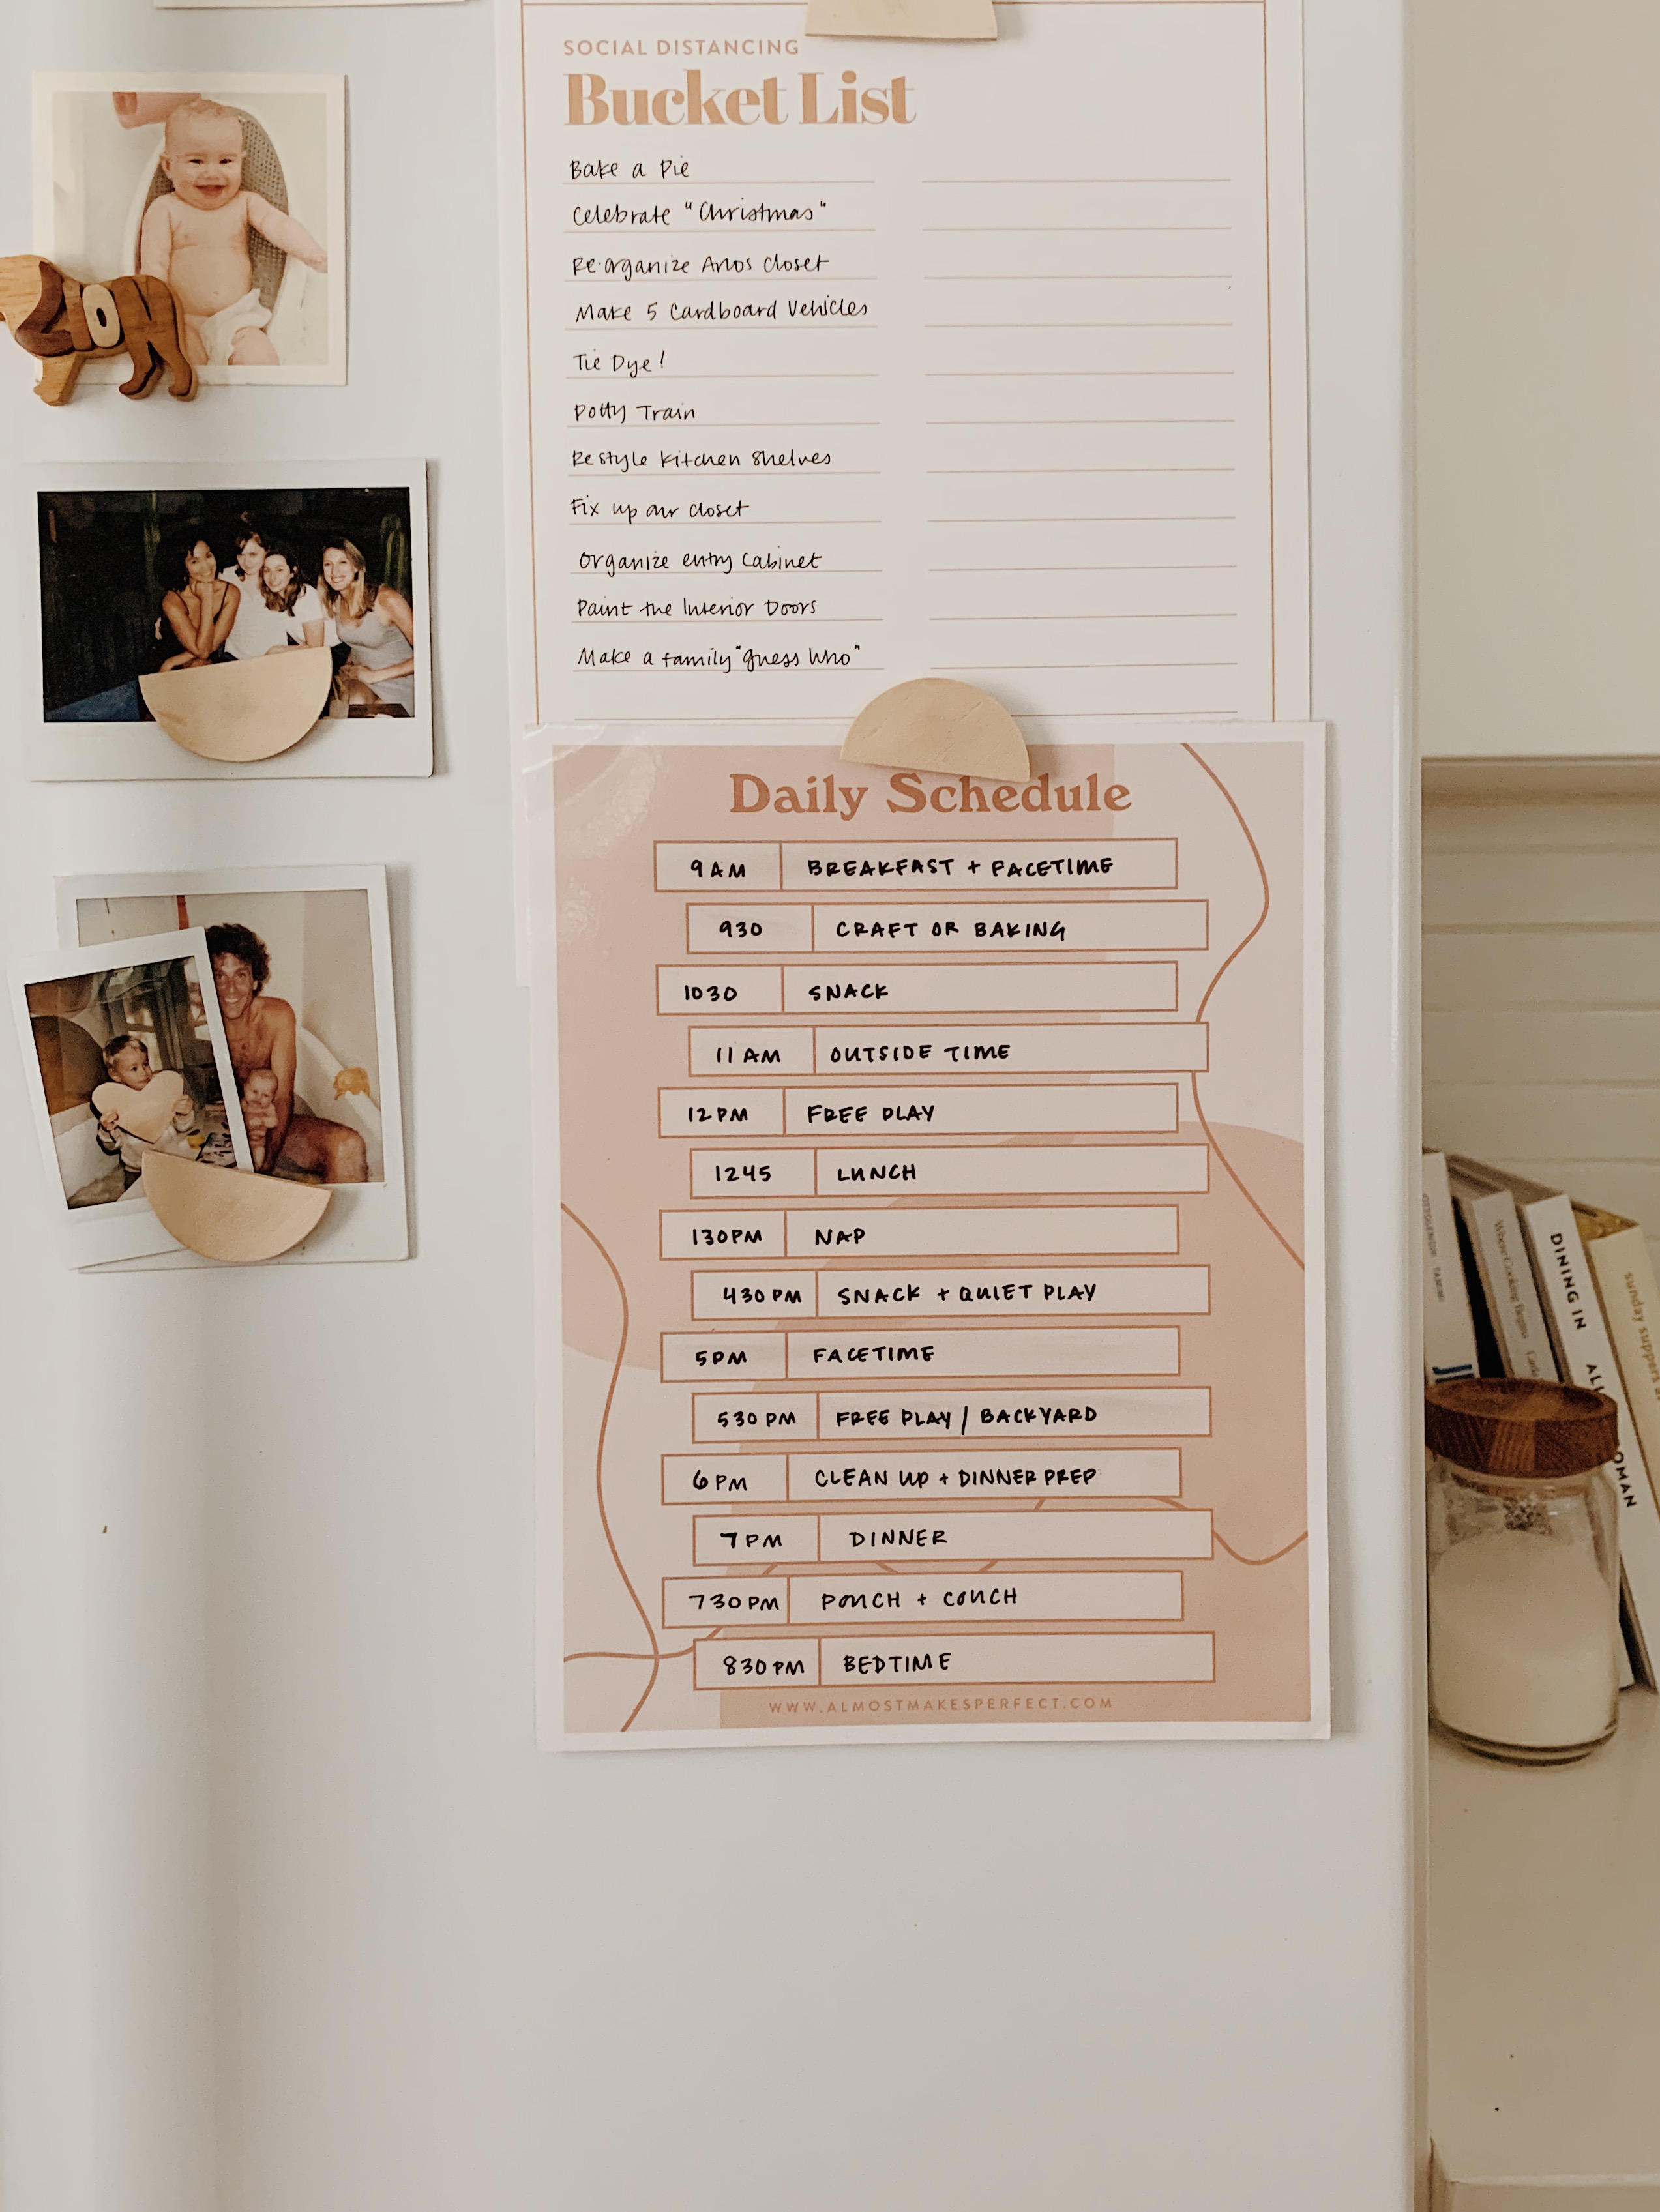
i’ve been meaning to share this for two weeks now, but really wanted to figure out the best way to laminate without a laminator (therefore making it redo-able)
while i’ve developed a loose daily routine, we definitely don’t stick to a strict schedule whatsover, so this is more just a general guideline for the day for me (and mostly a reminder to give him snacks before he gets super cranky and i’m like ARLO WHY ARE YOU SO DAMN CRANKY!?) but hopefully for those of you who have older kids and are on more of a real school schedule, this will be even more helpful!Read More
-
the craft supplies we’re using
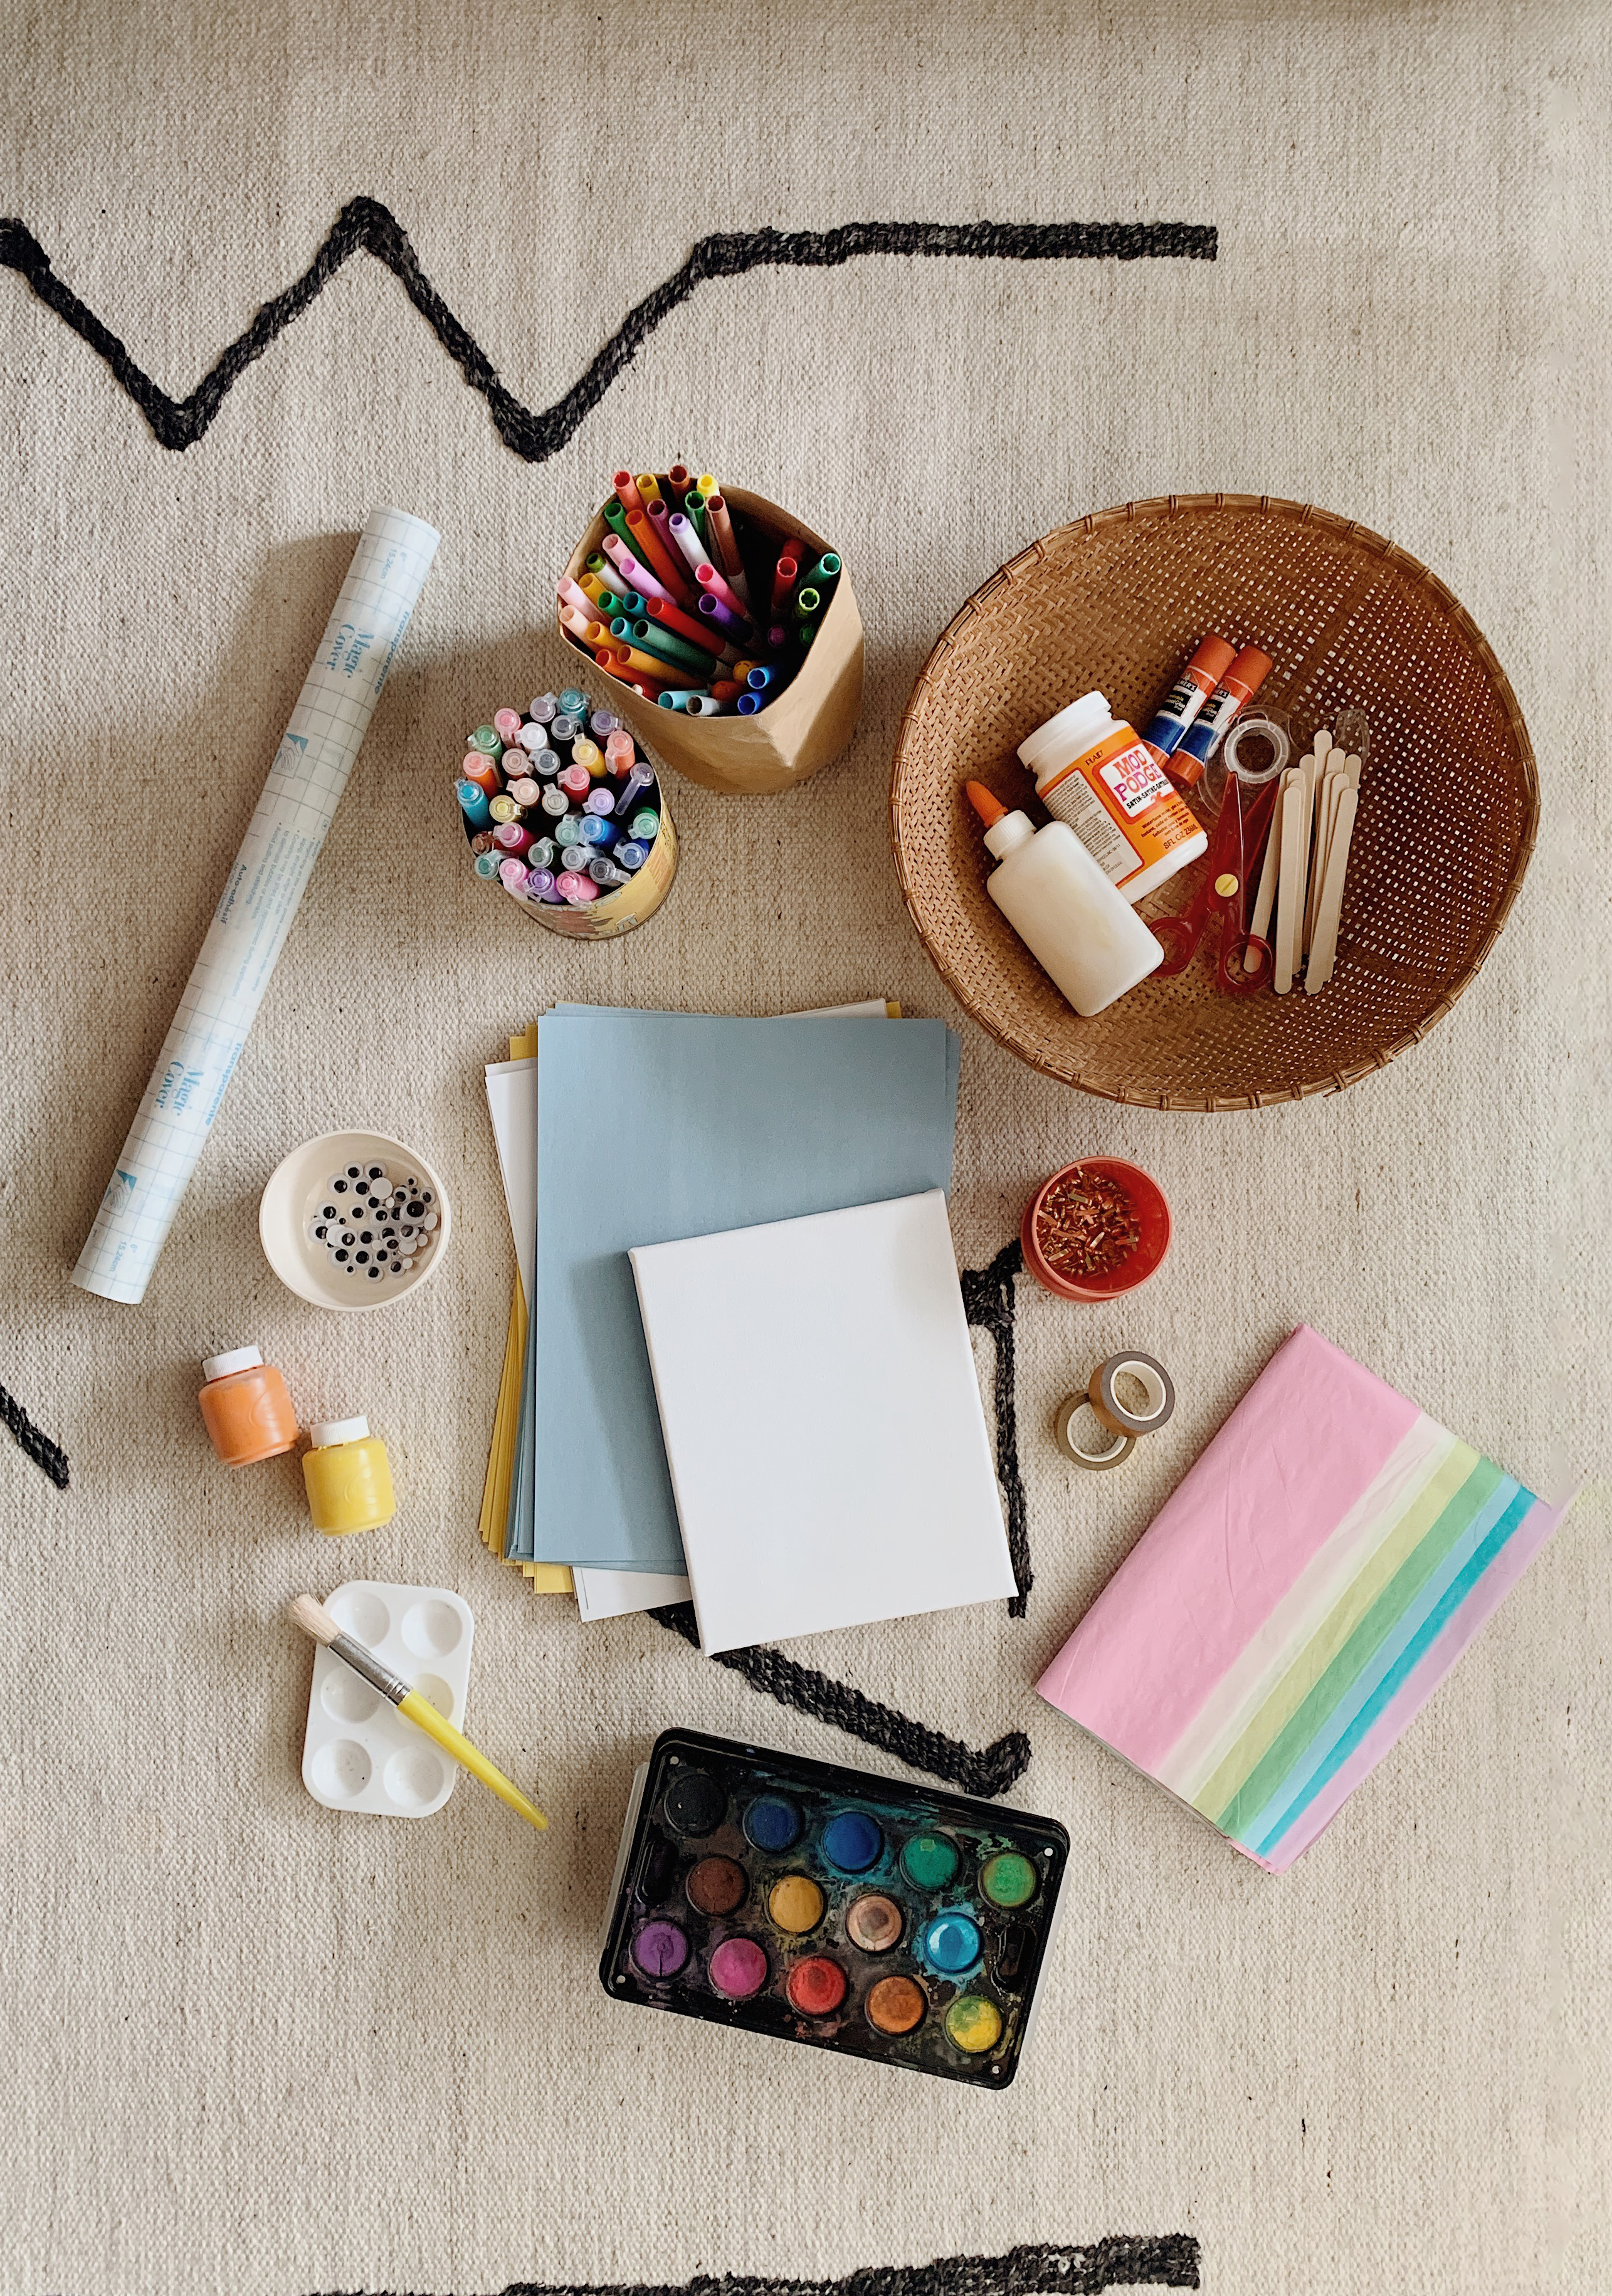
omg i’ve been getting so many messages everyday about our craft supplies so i thought i should list them all in one place for reference! i’ve always had art supplies for arlo (paints, brushes, palettes, canvases, paper and markers) but that was it. when this self-quarantining thing happened i panicked and bought a bunch of crafting supplies online right away because i figured that having one daily project would help both of us get through the days. so far so good.
every night when i get in bed, i look on pinterest and find a project for us to try the following day, it’s been v low pressure to just focus on doing one easy craft and not stressing me out at all, which is the point. i hope you guys are all going easy on yourselves and not trying to be the perfect homeschool teachers of all a sudden. just do what you can, and if it’s not fun, don’t do it. (oh and the way i find crafts to do is just google things he loves like under the sea craft, robot craft, etc)
but having a supply has really helped– so i’m going to list all the things we have (and a couple items that haven’t arrived yet) but i can continue to add to it. i mean, who knows how long we’ll all be here. also going to try to do blog posts of some of the projects i’ve been sharing on IG stories, since i know it’s easier to reference that way.
another thing i’ve been doing is keeping a big stash of household things to reuse for crafts: the caps to arlos yogurt smoothies, toilet paper and paper towel rolls, cardboard (but especially love the thin cardboard that they use for packaging our cat food and baby pouches).
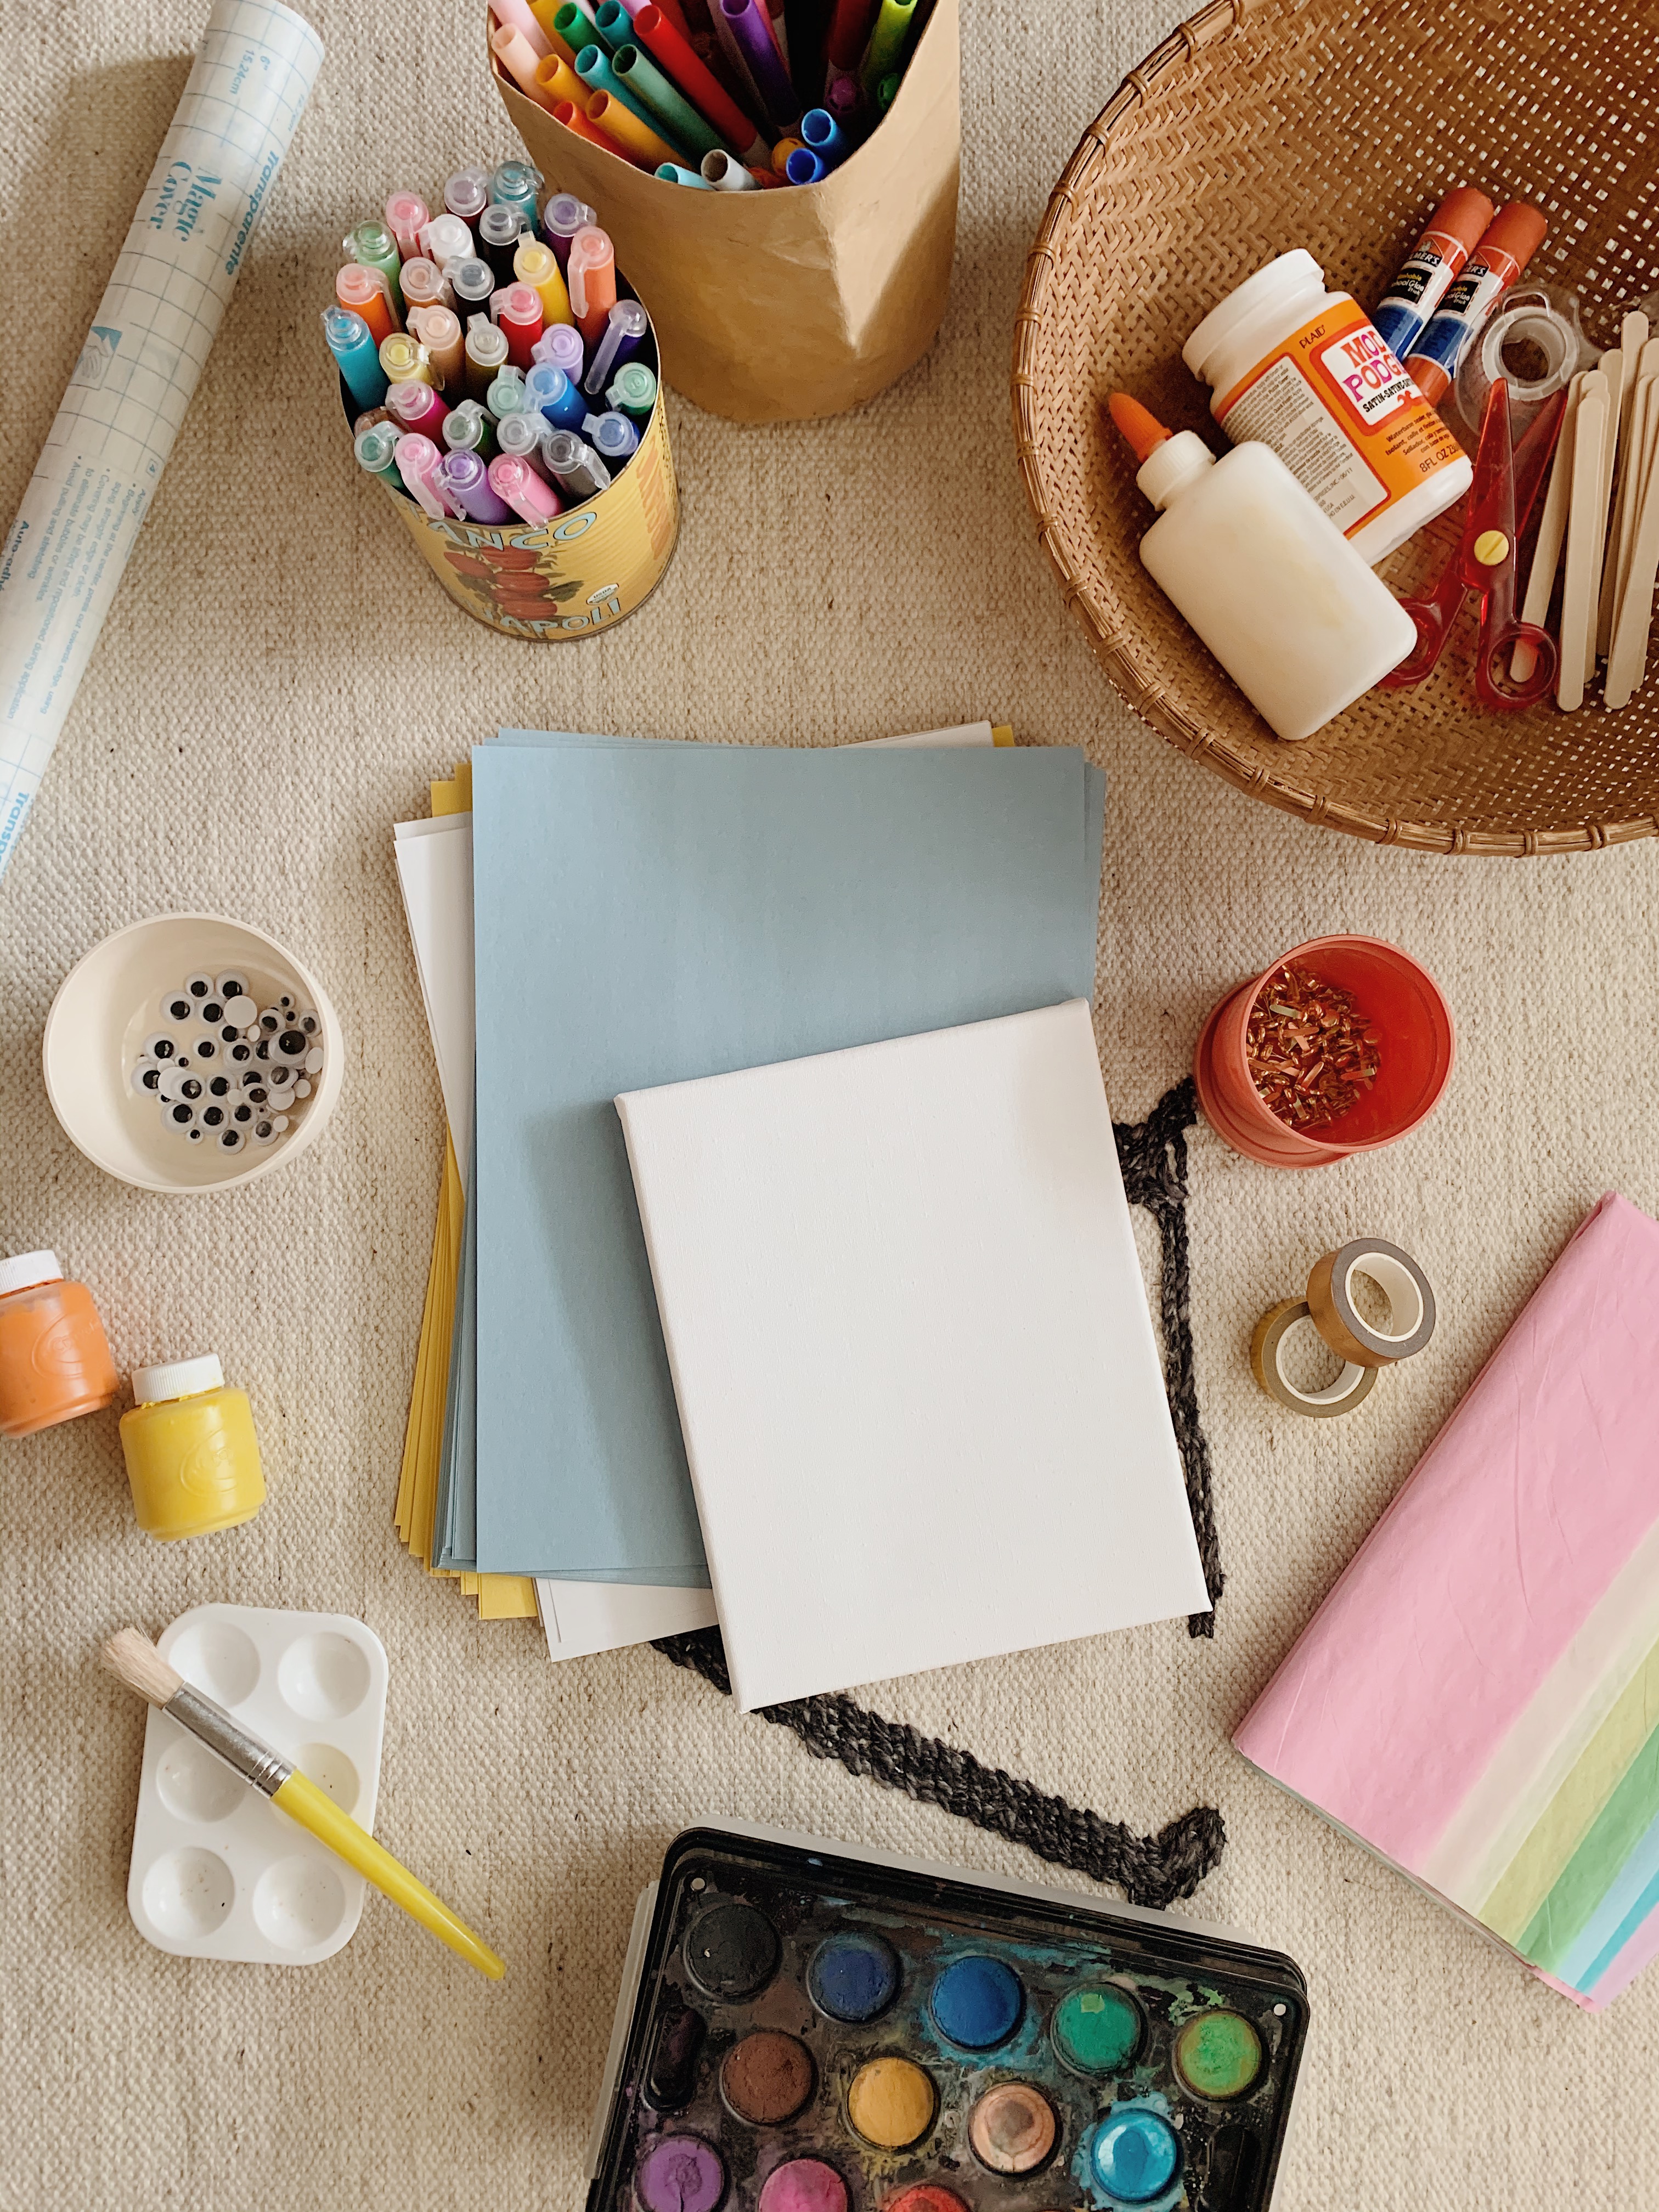
craft supplies we’re using
watercolor palette — you’ve prob seen arlo using this ikea for a long time, but linking to a similar one (actually this one looks better because it has way more colors!) the trick to arlos watercolor art looking so good is we dont use the dinky little brushes the sets come with, i always give him the big fat brushes (and he’s really gotten how the process works too)
washable paint — i just bought this set but it hasn’t arrived yet. i plan for us to use it a lot, BUT i will be doing all the mixing and then handing off to arlo. to ensure it isnt a giant mess, AND then i can mix pretty colors MUAHAHA
craft paints in cups — also we got these and i love that they are separated into three, so arlo can use one set at a time (he always hands me the pink ones and says here you go mommy you paint with these)
paint cakes — we don’t actually have these but i’ve heard these tempera paint cakes are great and way less messy than the tubs of paint.
paint palettes — these are the perfect tiny size for them, i have a few of them.
paint brushes — we have this ikea set that we love the most so i was excited to see it on amazon, but i forgot to include it in these photos!
construction paper — i got a pack that seems to be out of stock but this looks similar. a heavier stock would have been nice in retrospect but this will work fine for us. ps omg i would have gotten THIS ONE if it were up to me, but arlo is very bossy about his love of blue.
tissue paper — i really like the pastel colors of this tissue paper pack i got, so far we’ve only done one project where i cut it up into small pieces for him to glue onto a fish and he said it was “too hard”, but we’ll try again soon lol
little canvases — i’ve had a habit of collecting these from target because they’re super inexpensive and i love the petite size. arlo seems more passionate about painting on canvas than paper in general (smart boy)
easel — we don’t use this easel that often but arlo always gets into it when we do. i’ve seen a lot of cardboard easels though, which is a solid option if you are trying to get your kid more into painting.
paper — for everyday art we have him use thinner less expensive paper. but i’ve been asked about the paper i’ve had him use for art i know i’m going to hang which is this one!
googly eyes — literally every craft is made better with googly eyes. i bought a variety pack of them that had way too many small ones so i got this pack of giant ones instead. because we all know the big googly eyes are obv the best ones.
paint markers — this the marker set i used on our rocks! i chose fine tip so i could do more detail but it’s a little more challenging when you’re trying to fill up a big space
clear contact paper — this is what i used for our floral collages. i got just for that project but i think i’ll be using a lot for other stuff too.
markers — these are the markers we’ve been using for months now, i really like them. lots of pretty colors and the tips stay in really good shape for how often we’re using them.
washi tape — i’ve been buying these 3 pack of washi tape for a while now because i use it all the time for hanging arlos art, packaging magnets and now been using here and there on projects. but i love this pretty colorful pack too!
brass fasteners — i got these because i saw them used in a couple of different projects, to basically “hinge” anything like robot limbs, etc.
pipe cleaners — i didn’t want to get a 300 pack or whatever of fuzzy sticks, so i got this smaller pack (probably a worse deal but i was trying to spend less than $5 on these)
popsicle sticks — i mean what craft station doesn’t have popsicle sticks? we haven’t used these much yet but the other day when i made arlo a little forky, he genuinely showed 40% more interest once it was on a stick.
glue sticks — i think glue sticks are the best option for toddlers since they are the least messy, and i got this giant pack because it was such an insanely low price. i couldn’t resist!!!
kid scissors — ok this three pack actually doesn’t work well at all, but if you have a kid who likes to do everything themself this is perfect. arlo gets a little frustrated with them.
mod podge — i think it might be a little messy for arlos age but i do love mod podge. you can use as a glue or a sealer/finish. as a kid i was obsessed with making collages and going over with it!
blank cards and envelopes — i love having arlo create special snail mail for family, but especially now more than ever. i’ve been trying to include a little photo of arlo taped on since we have an instax camera which makes the mail extra special.
you can also shop most of this stuff on my amazon faves here
ok i hope this lists help you! i will continue to share our crafts and add to the list if we get more stuff, but i feel pretty good about the fact that we can make most of the things now. hope you’re feeling inspired!!
-
printable social distancing bucket list
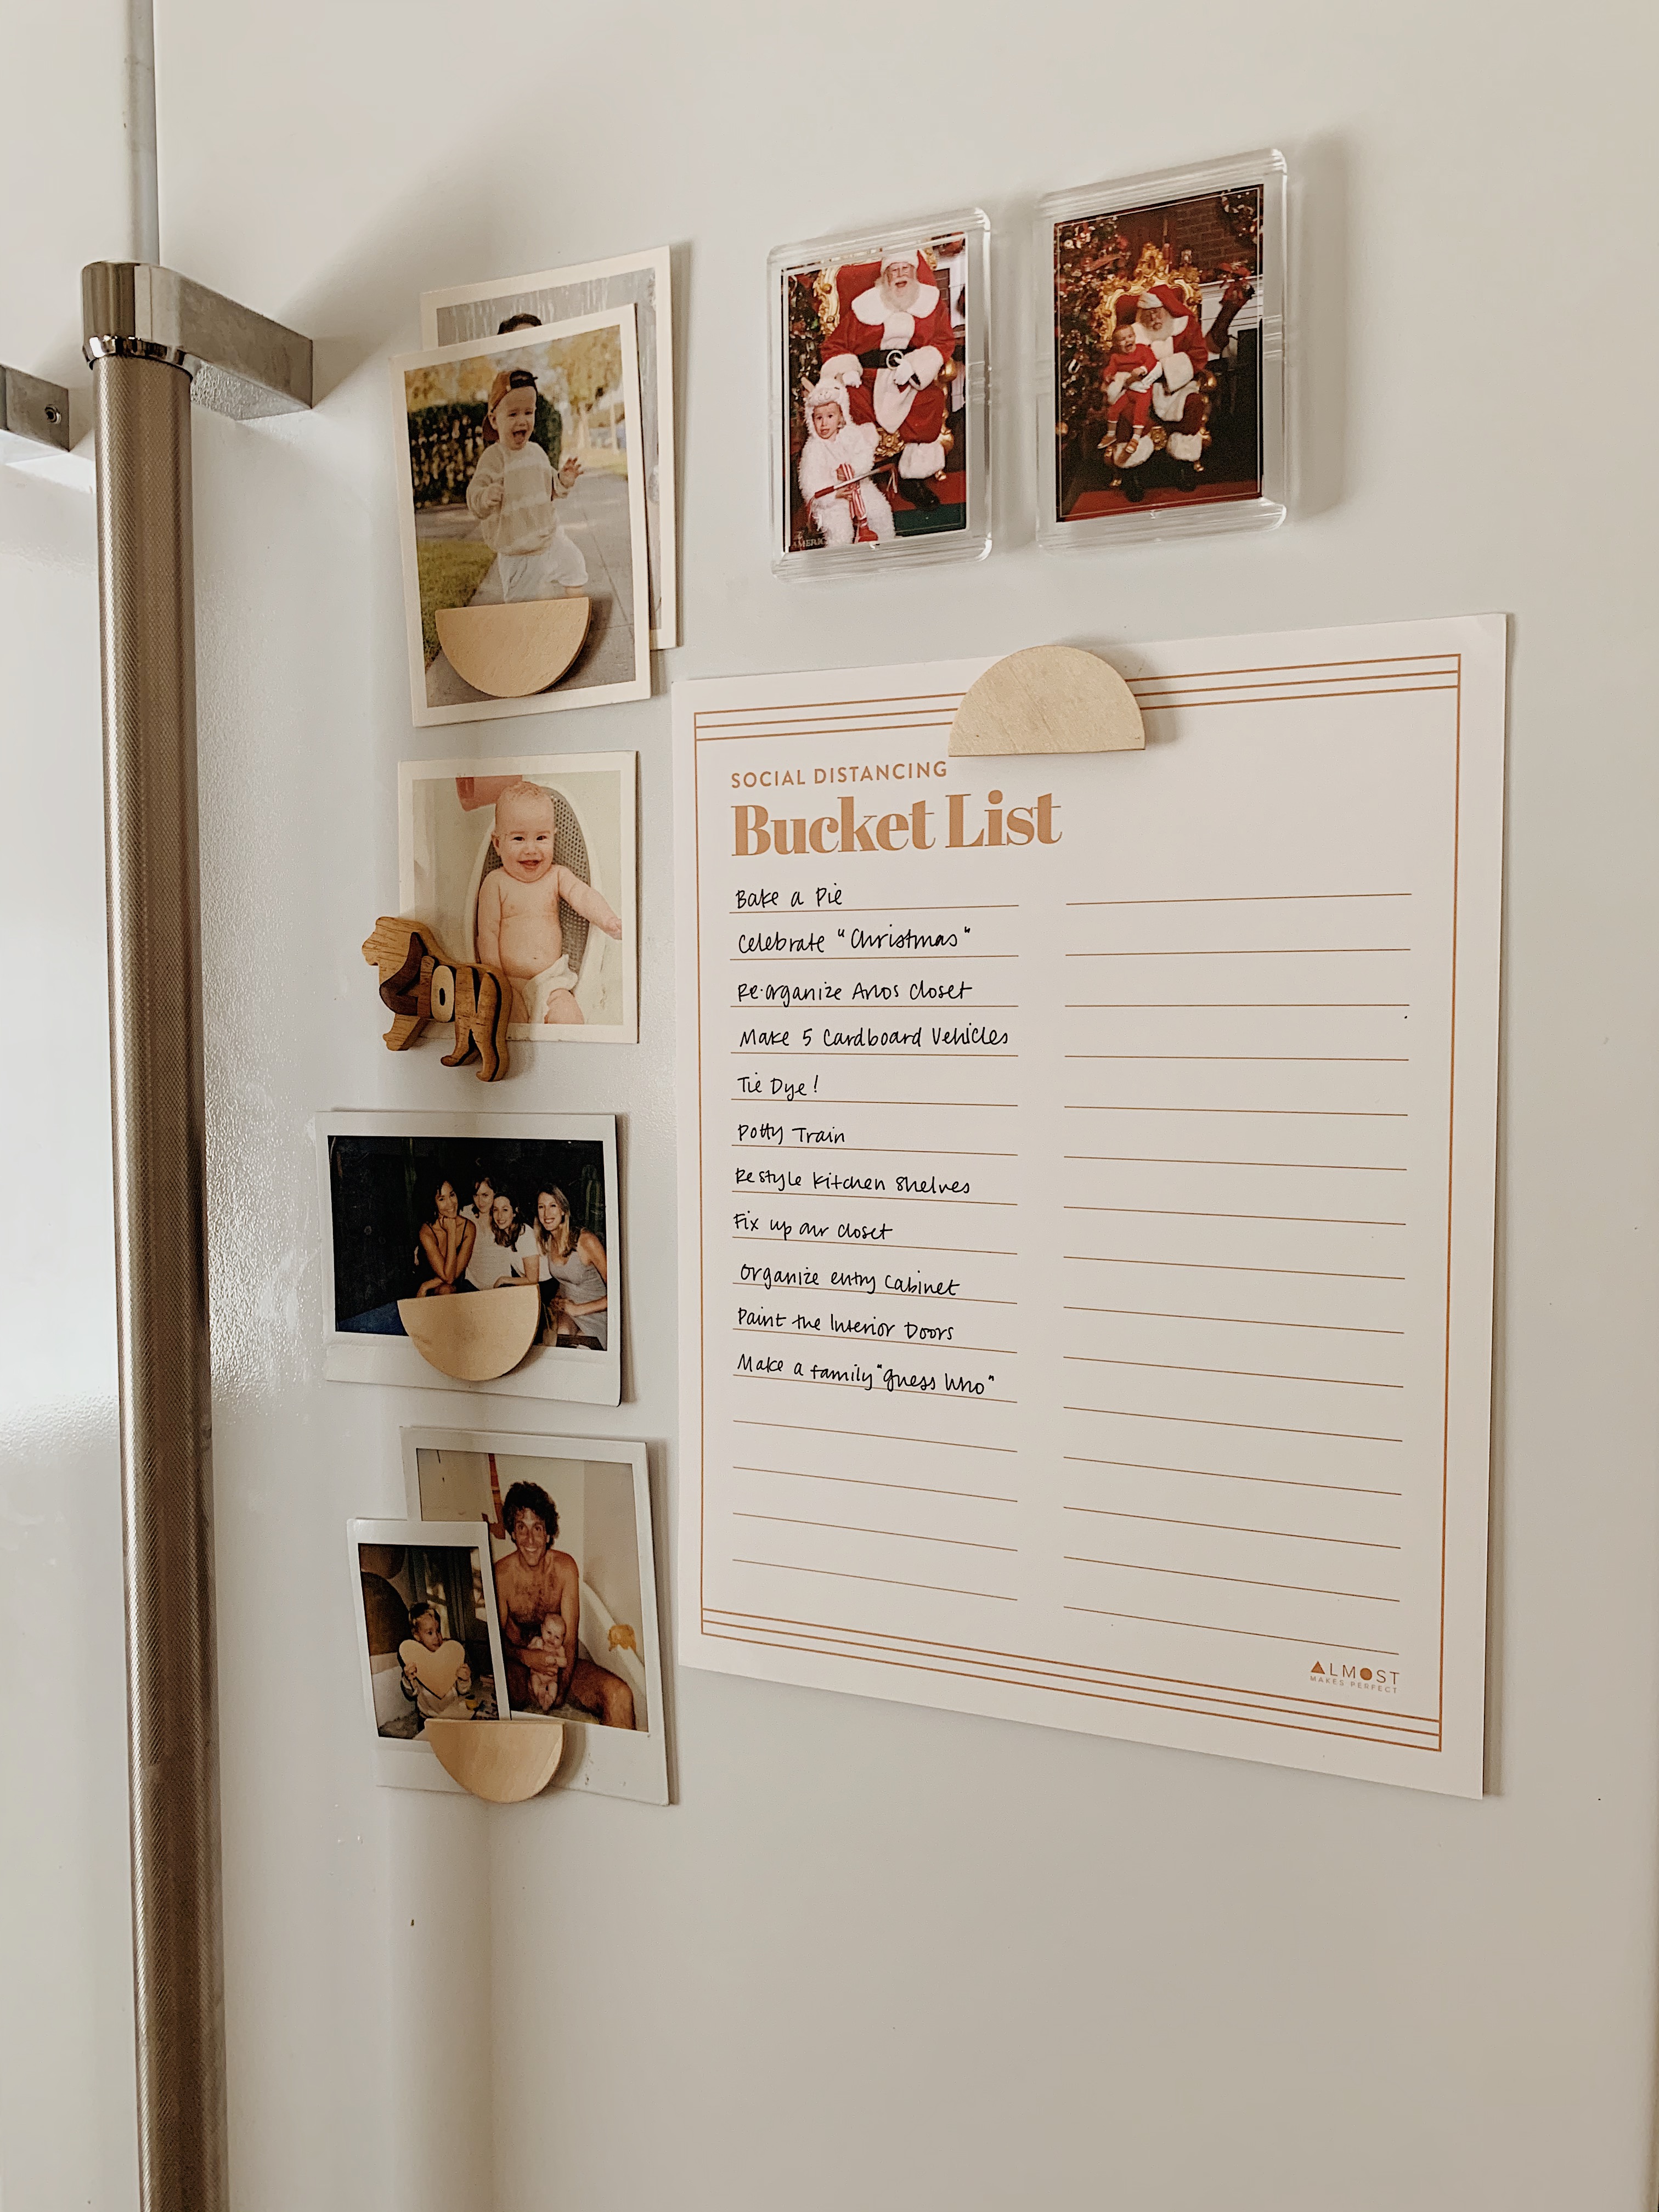
well it’s looking like we might be here at home a lot longer than any of us expected… who knows, maybe we won’t, but i’m not getting my hopes up. and if we’re here for another few months or many months, and arlo does in fact grow up at home and turn three at home, i want to make it special for him. as special as i can.
so i’m keeping track of the things i want to do during this weird, weeeird time. i figured another printable bucket list was v much in order. i added a few things to start but will be continuing to add as i think of them or if he mentions things.
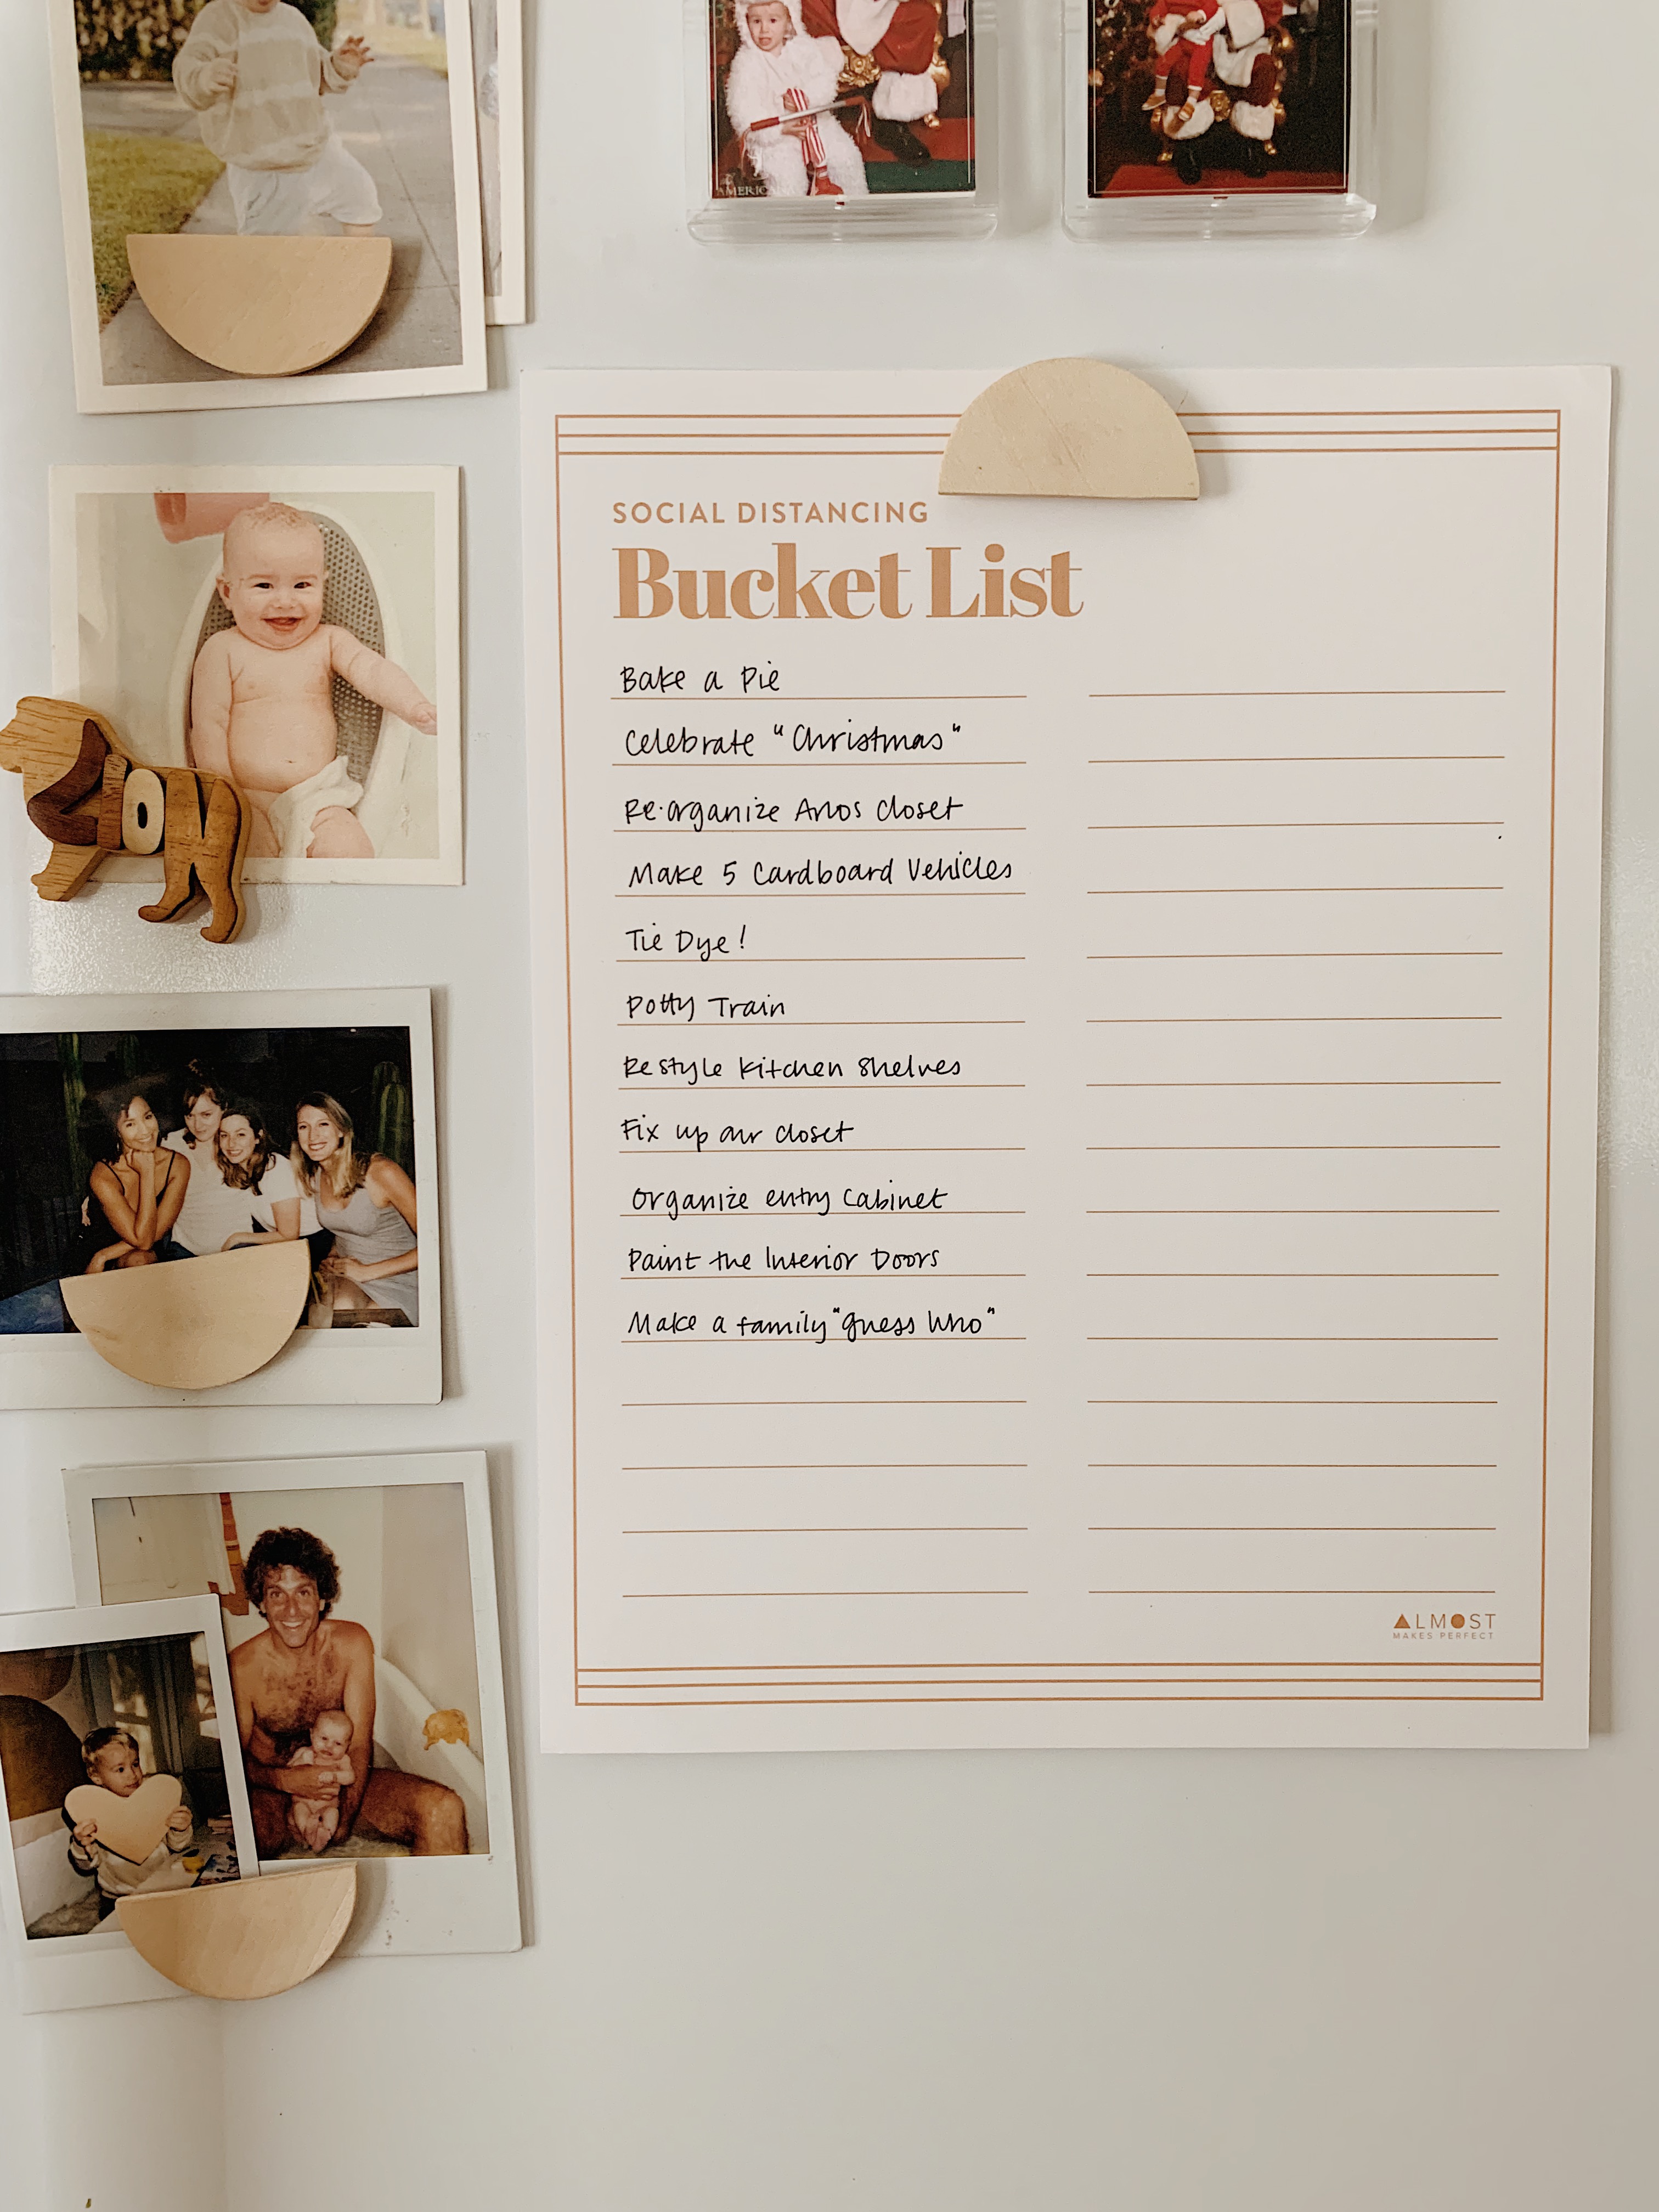
click here to print
i know there is so much fear and uncertainty looming, i’m doing my best to stay strong for arlo but it really is challenging at times. i hope that these posts are bringing a little light into such a dark situation.
ps the half moon magnets were a DIY
-
DIY super easy 2-ingredient play doh
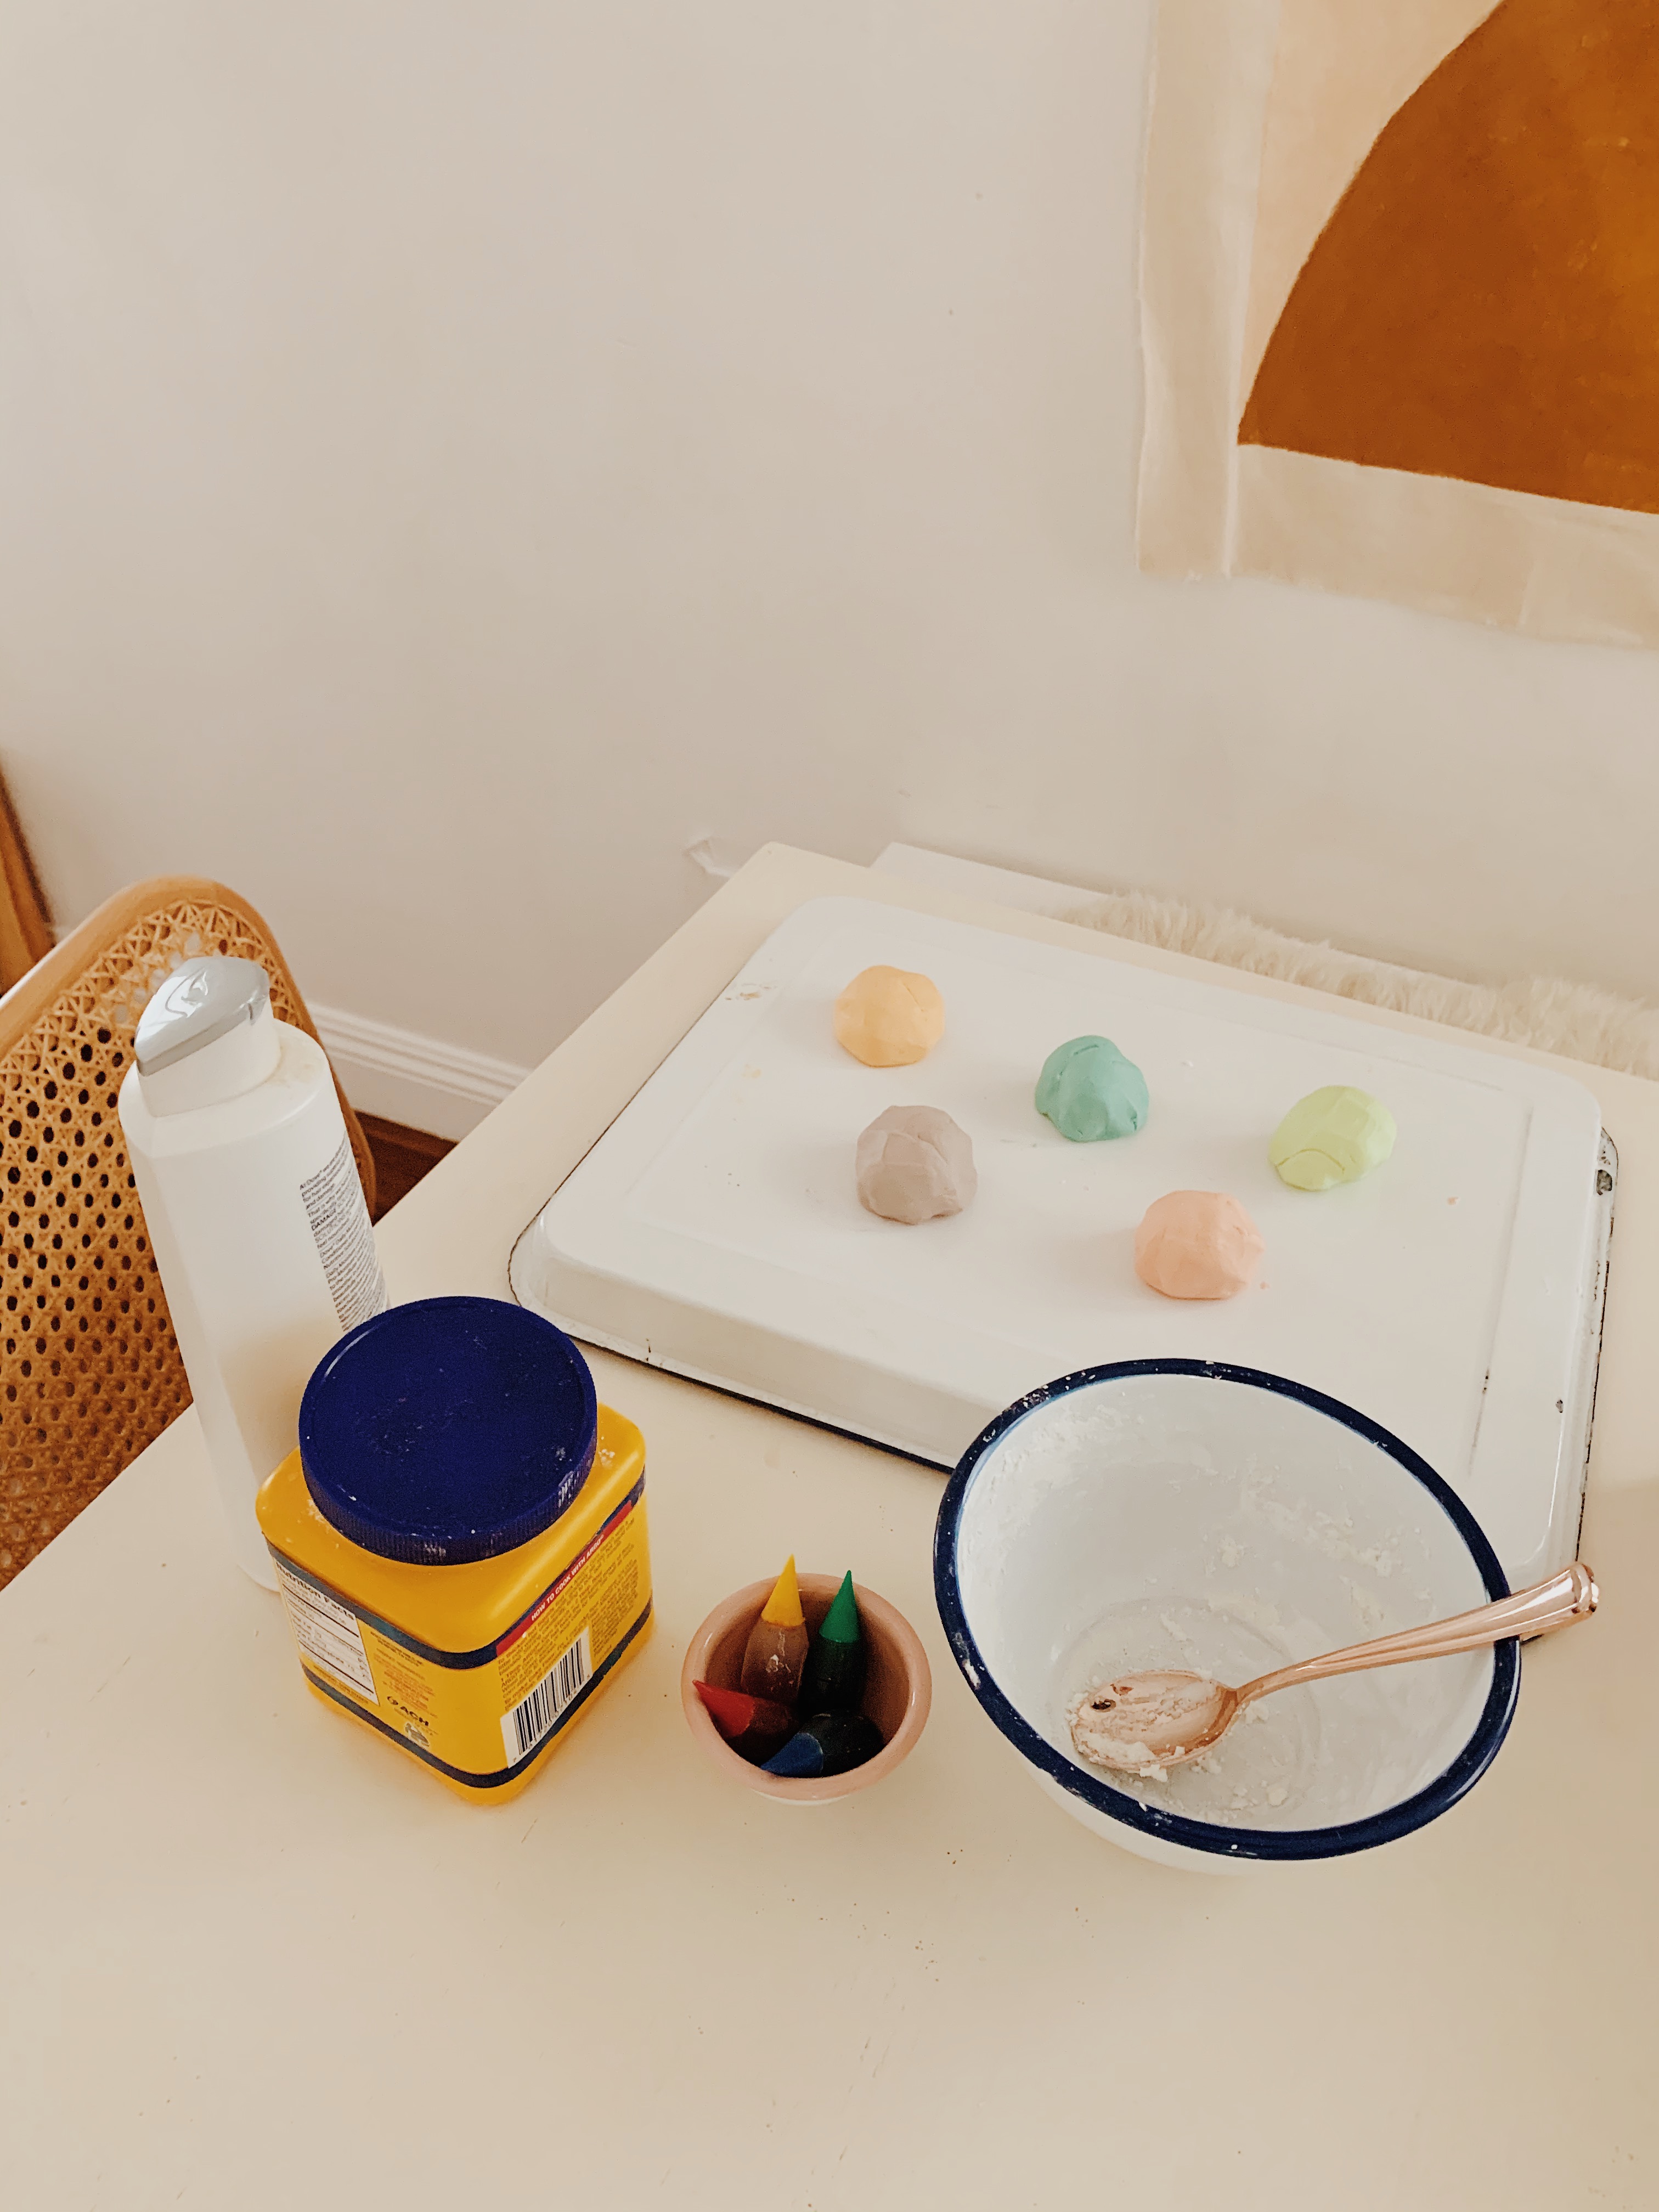
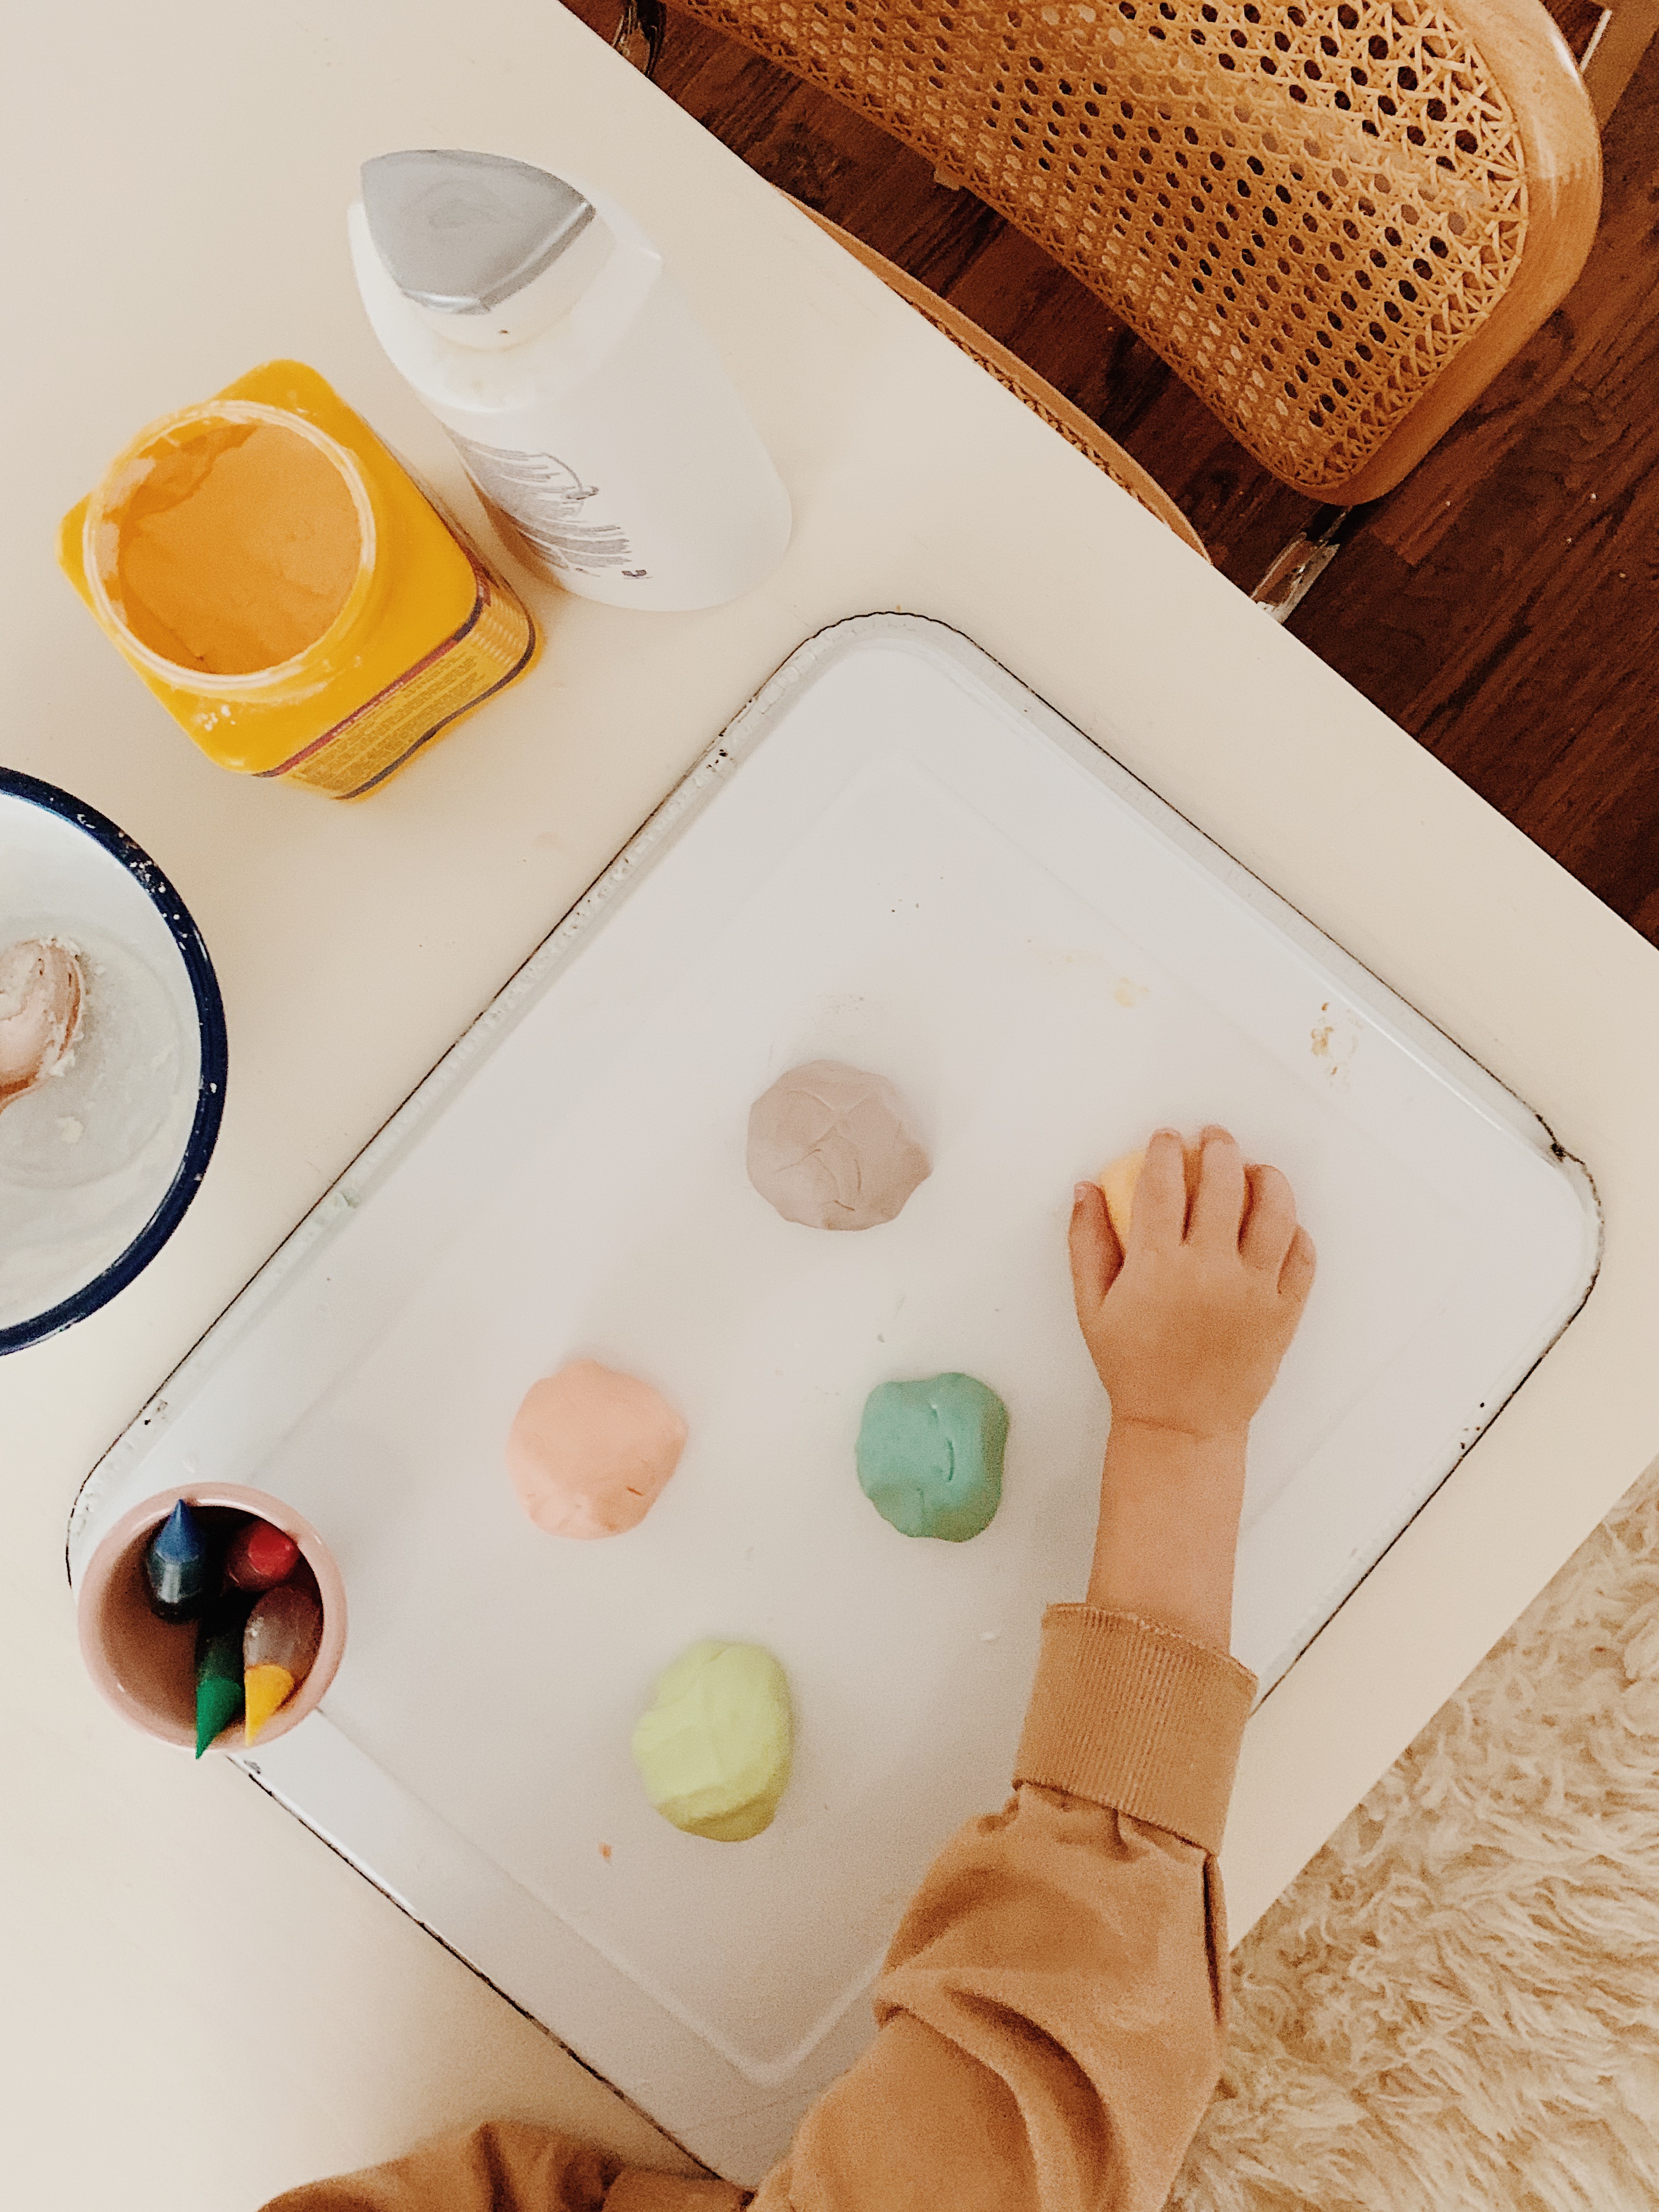
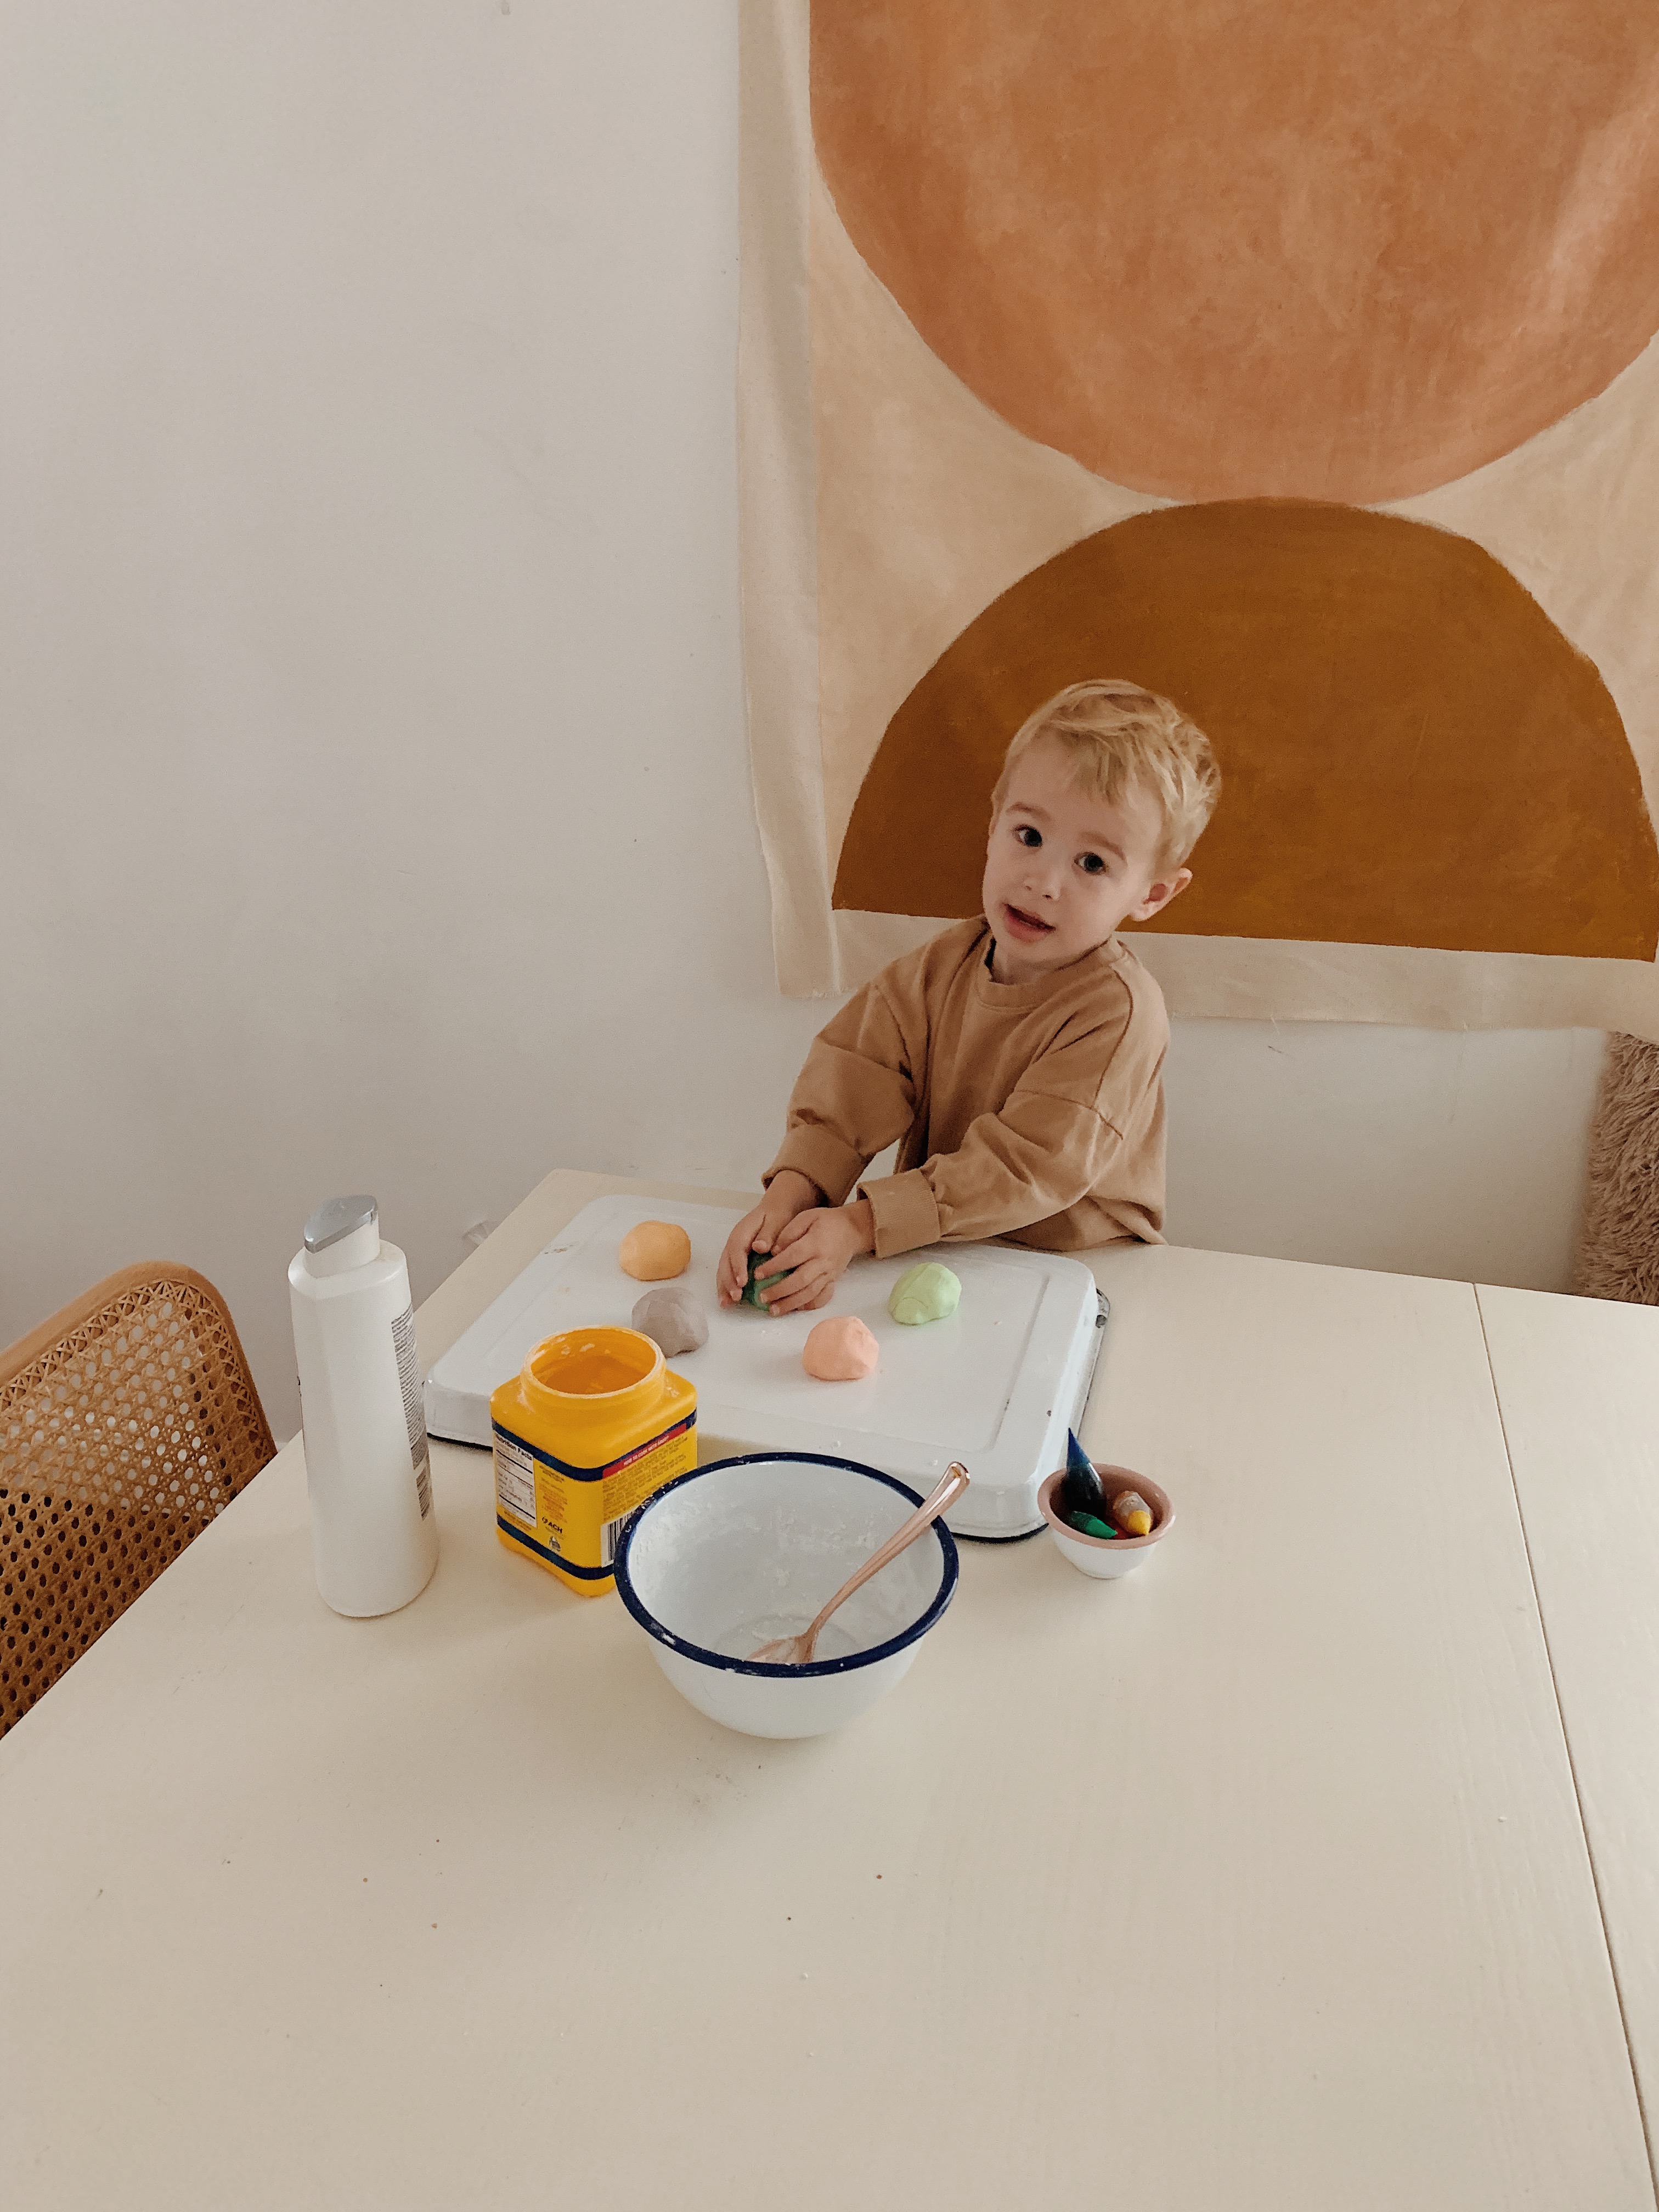
well in the spirit of keeping arlo as occupied as i can while we’re stuck at home during this weird time– trying to come up with (at least) one fun activity to do every day and this DIY play-doh was super simple and fun!! i was looking at so many recipes and was having trouble finding one where i actually had all the ingredients on hand. Read More
-
35+ things to do while you’re stuck at home with kids
with the plan to stay home the next few weeks, i’ve hopefully gotten through the worst of my panic mode about the fact that i forgot to buy any cauliflower WHATSOEVER lol. seriously woke up at 3am last night because of it.
it’s gonna be a long few weeks, but “social distancing” is the only thing to do (if you’re able to). while self-quarantining would be actually super appealing if arlo didn’t live here (i would probably just watch every reality show in existence), arlo does in fact live here, so it’s not as chill a situation. i’ve put together a ton of things to do at home — including some adult ones that you can just do during nap time, if needed.
make a schedule
whether it’s a new one every day or general routine to follow, it always helps us pass the time having a list of what’s on tap for the day. also helps keep me productive and arlo more aware of what is happening all day.
facetime your family and friends, religiously
ok so we already do this everyday — but it’s gonna be the only way to stay sane and feel like you’re still in touch with your loved ones without any actual face time.
make a giant pillow fort
destroying your entire living room is sort of worth the 12 minutes of entertainment.
make slow cooker meals
i’m not one of those people who sets up slow cooker dinners hours ahead of time, but since i’m home– i’m totally going to be one of those people!
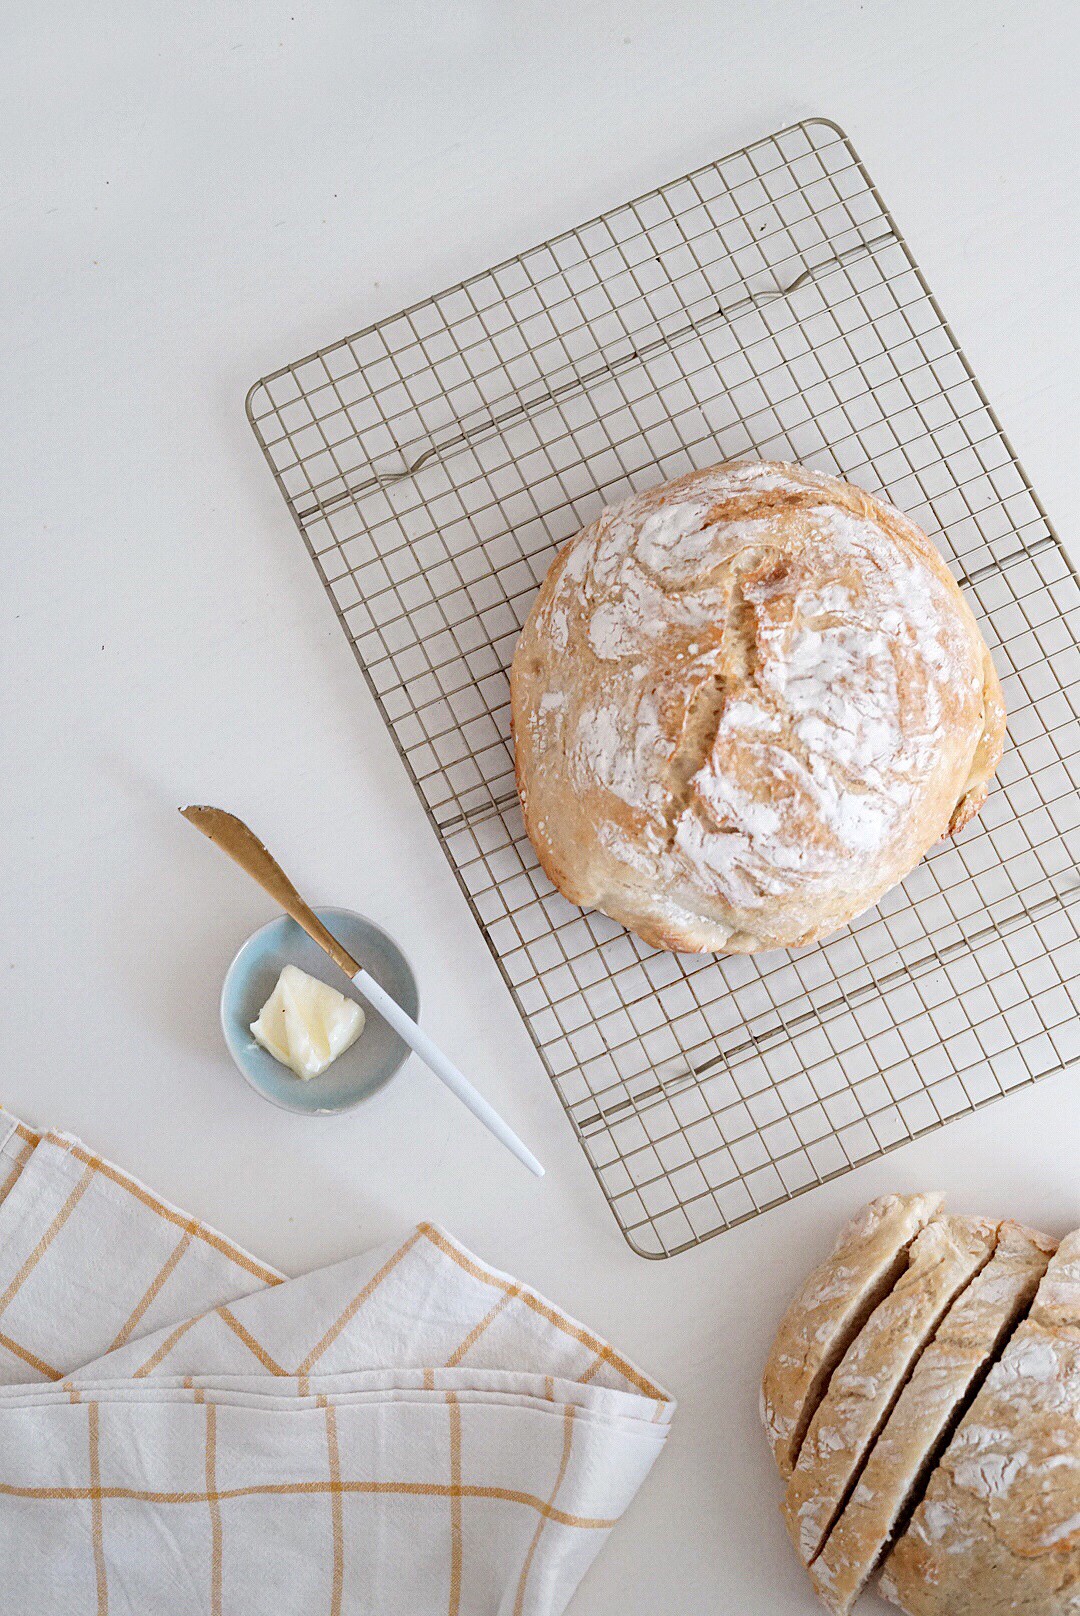
make bread
another thing i don’t do as often as i’d like because of the time commitment. but i love making bread and arlo hasn’t been old enough to enjoy it till now! and the best part is it won’t go bad. we can just sit and eat it for days! here’s my super easy recipe.
-
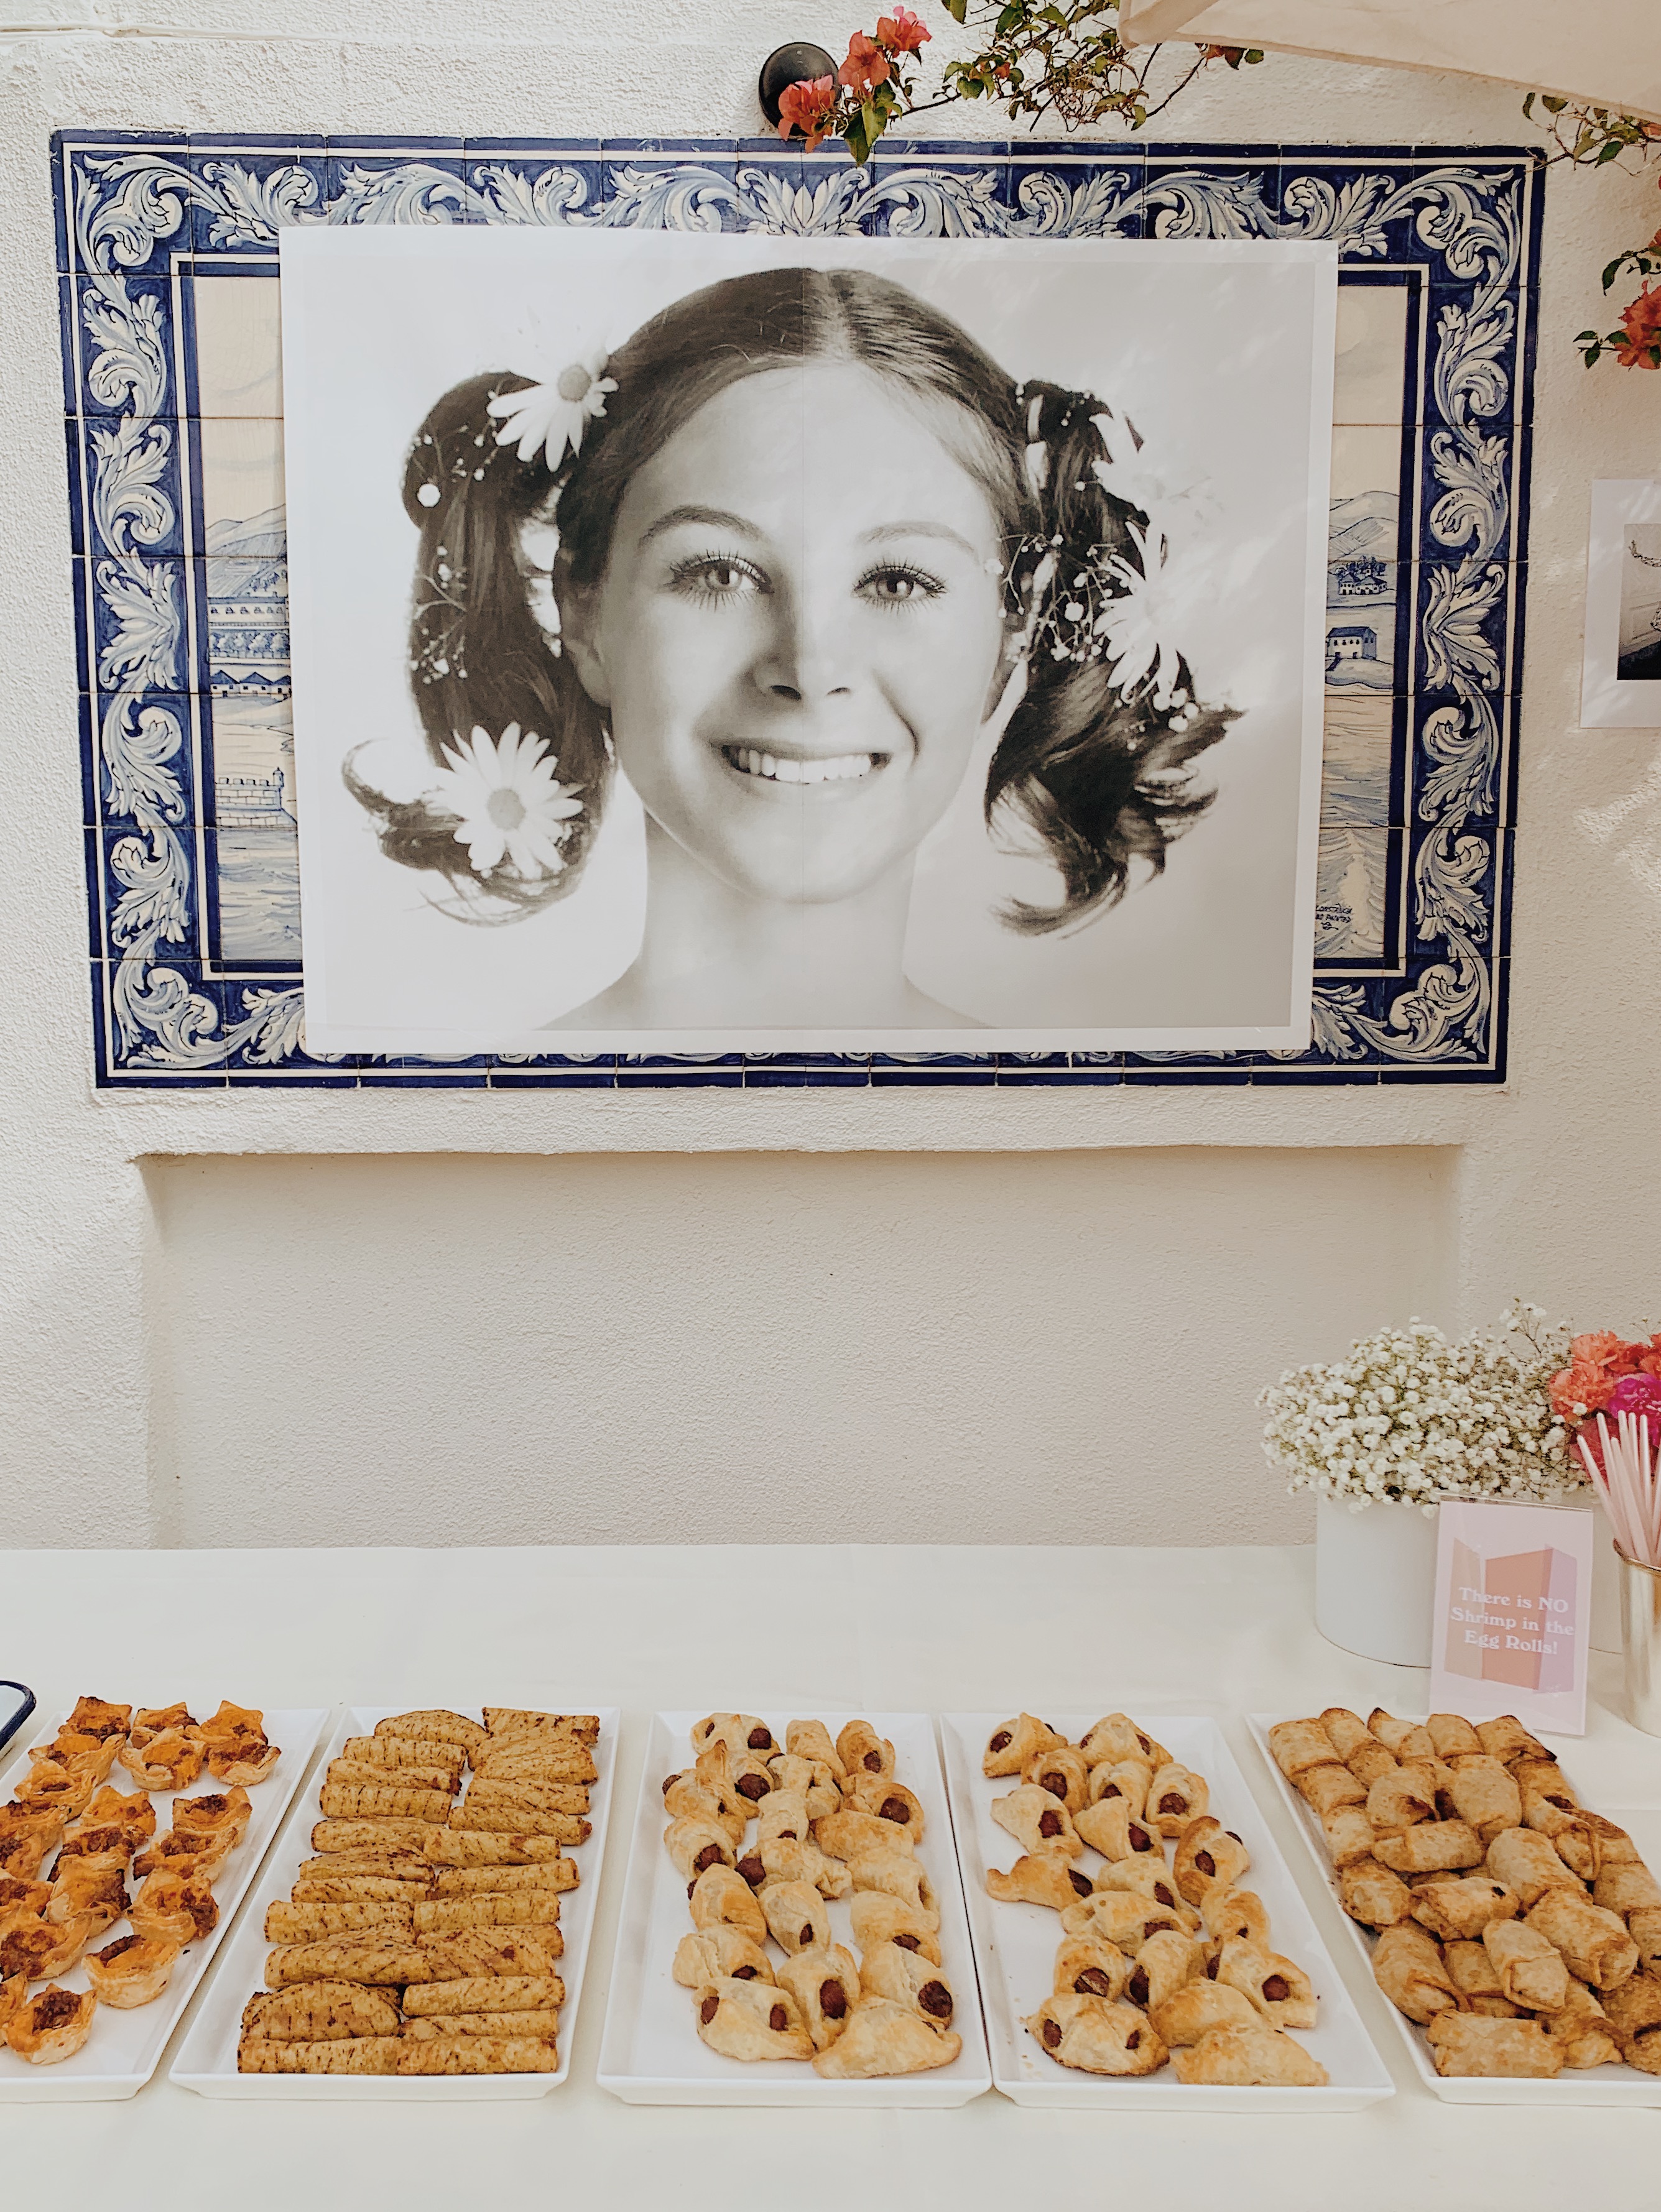
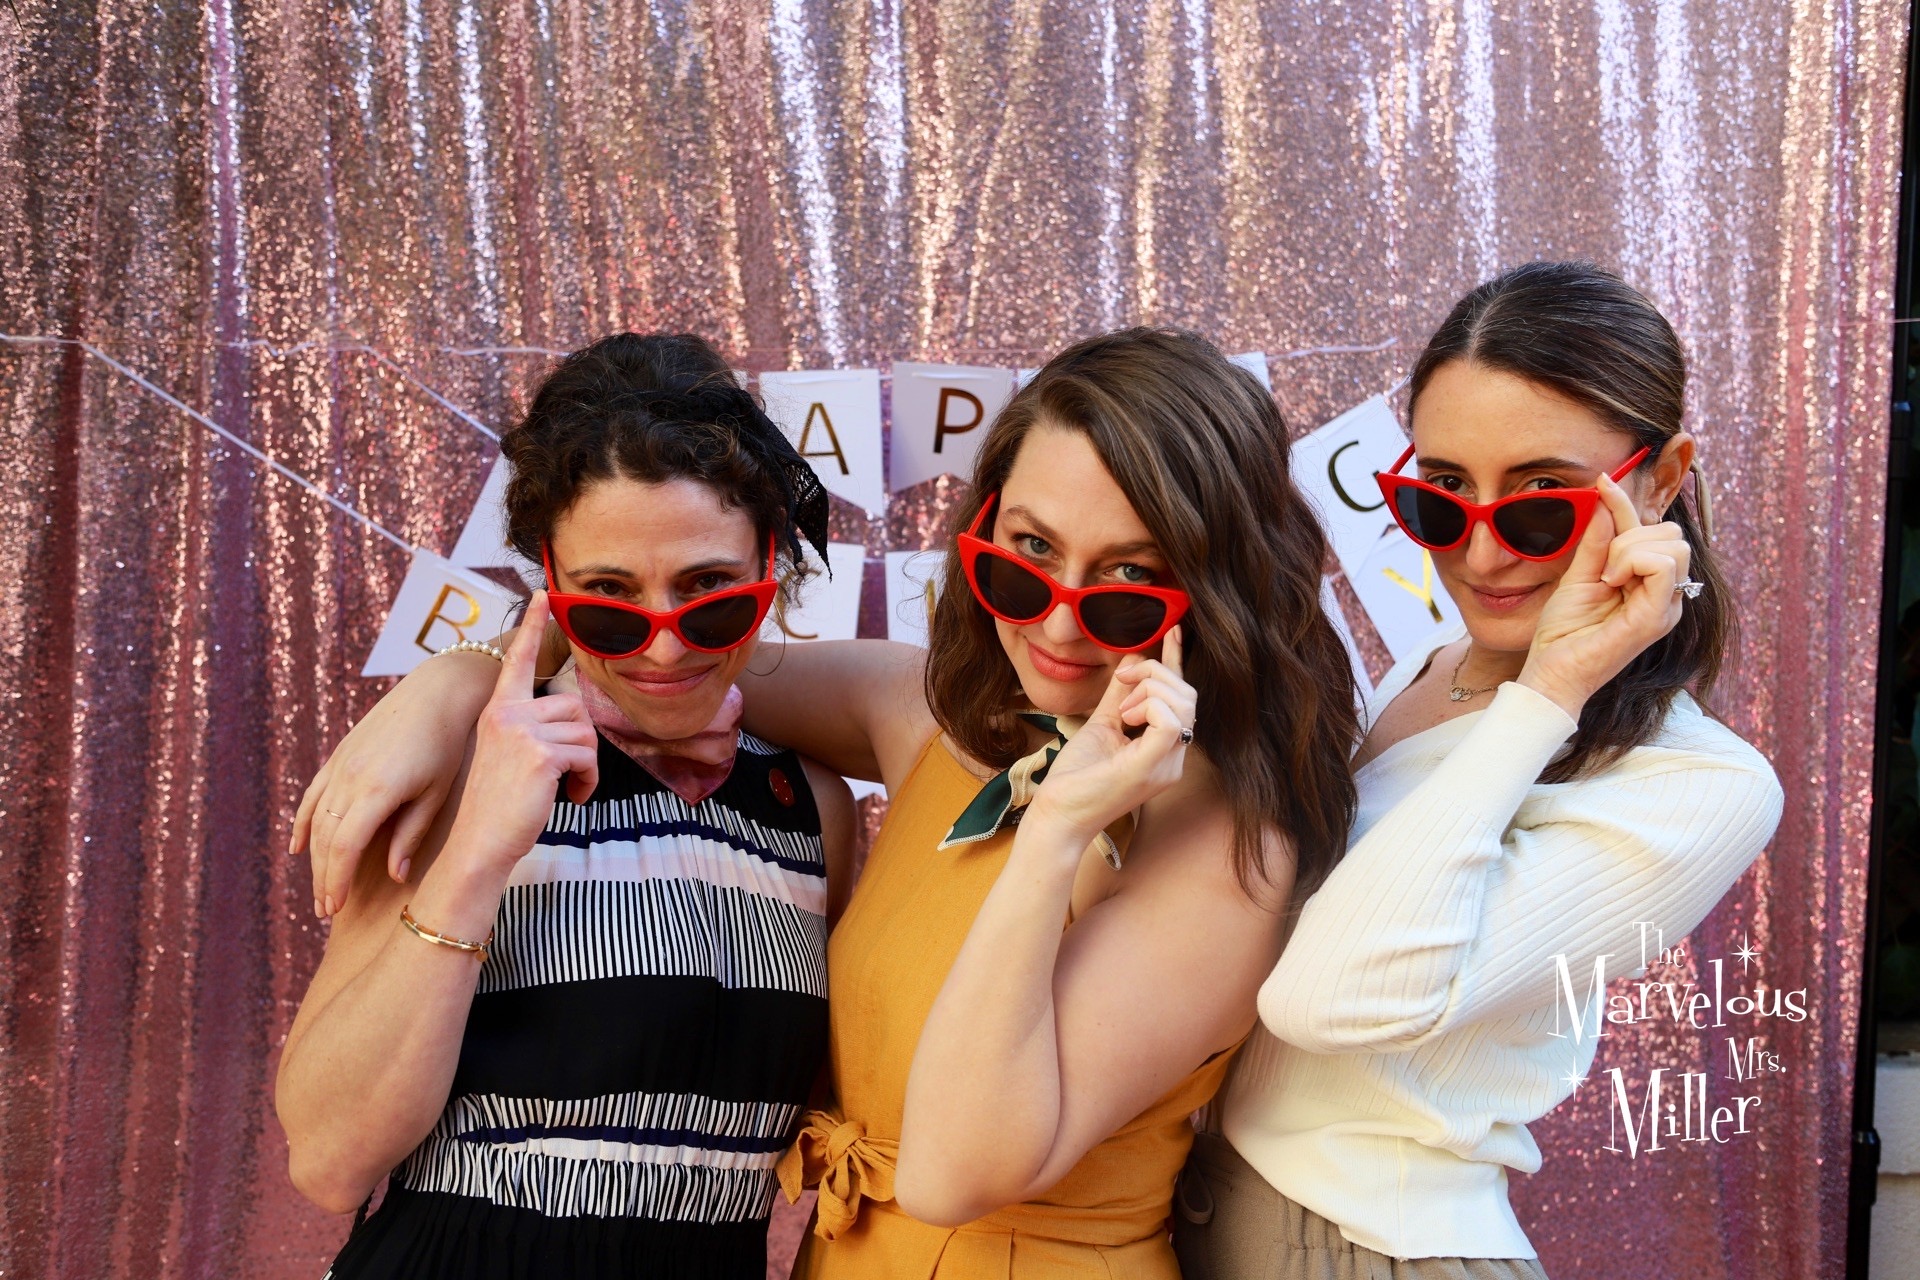
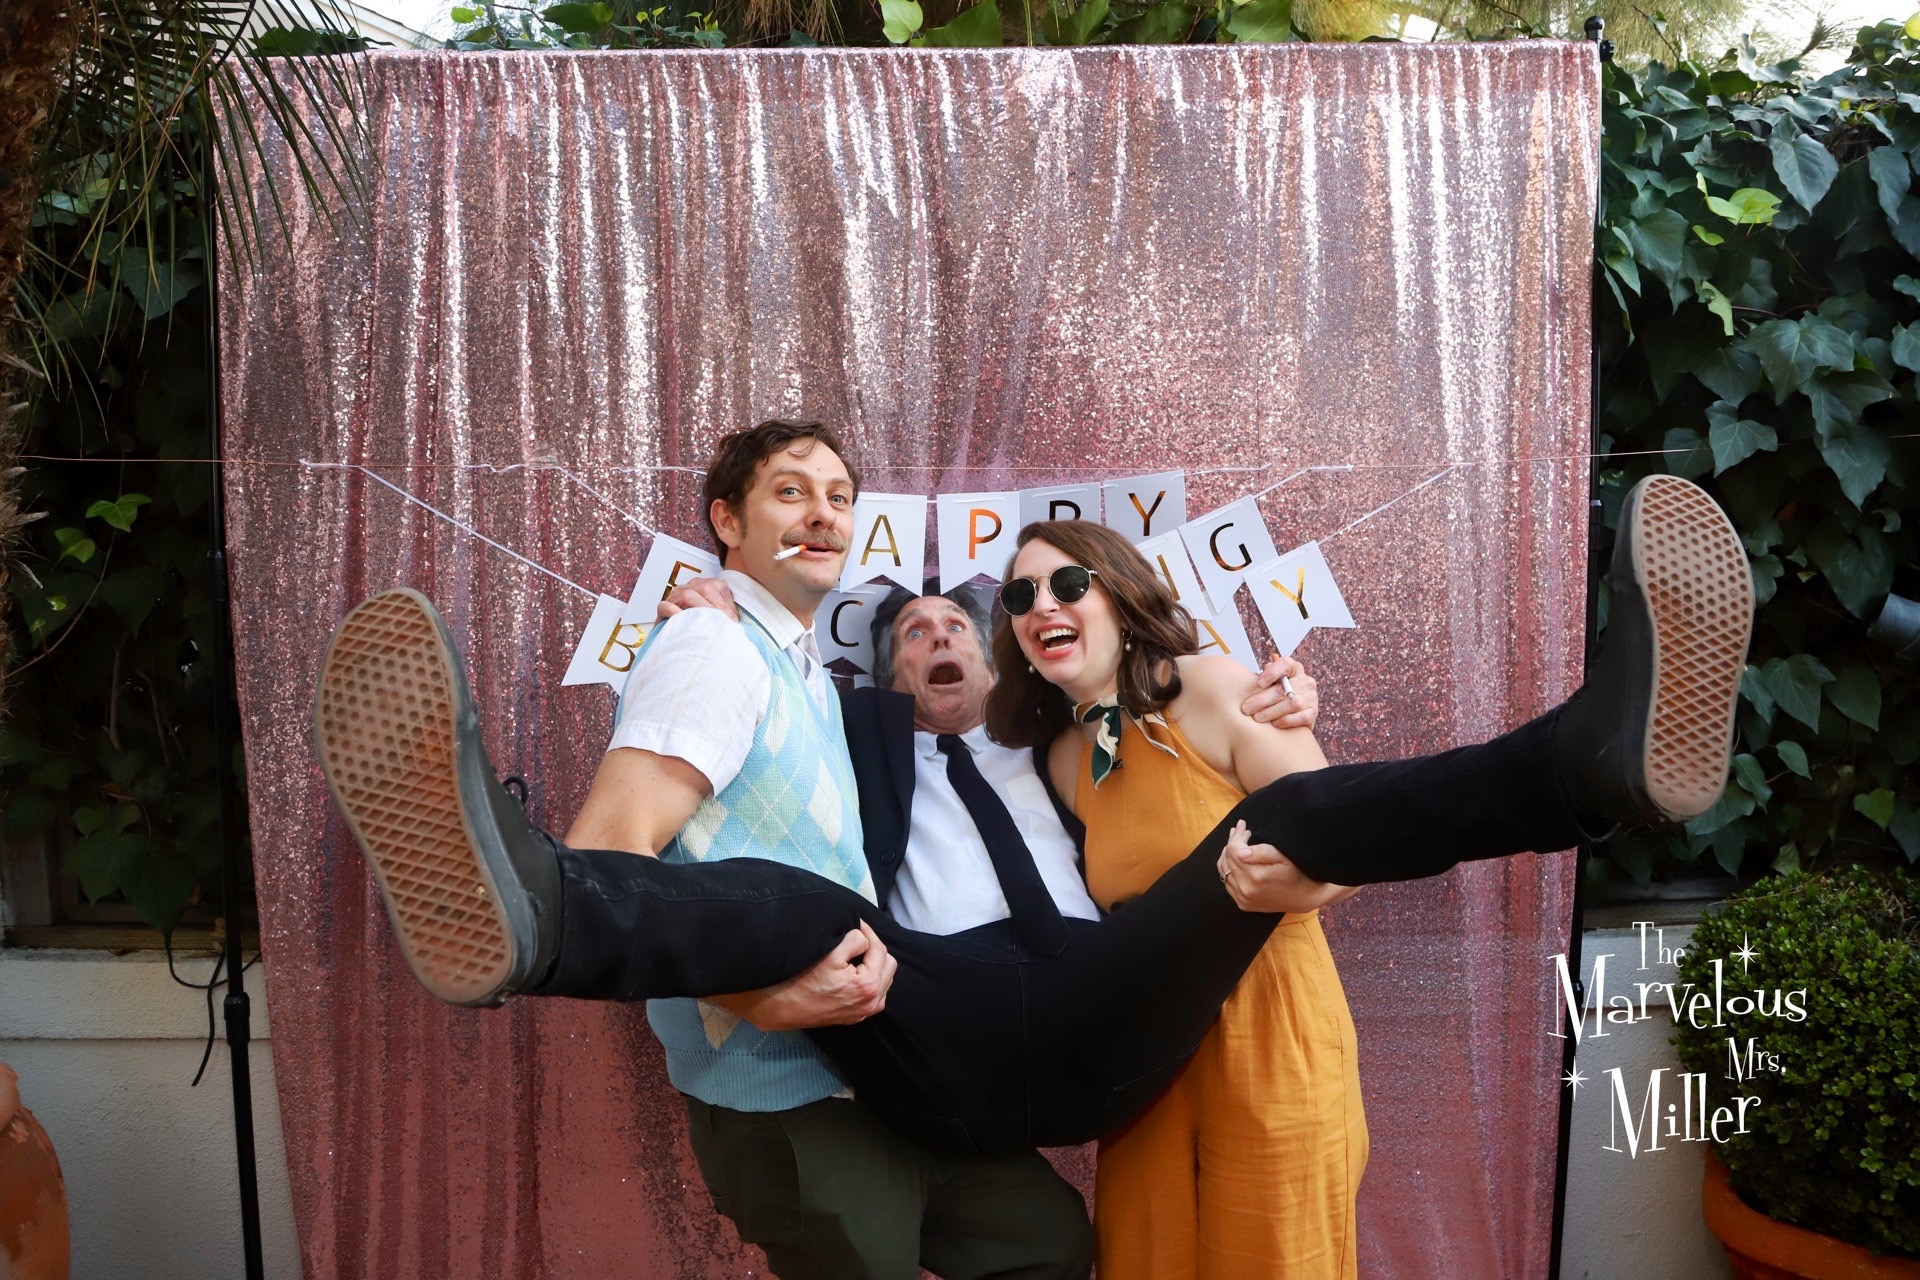
mrs maisel themed 70th birthday party
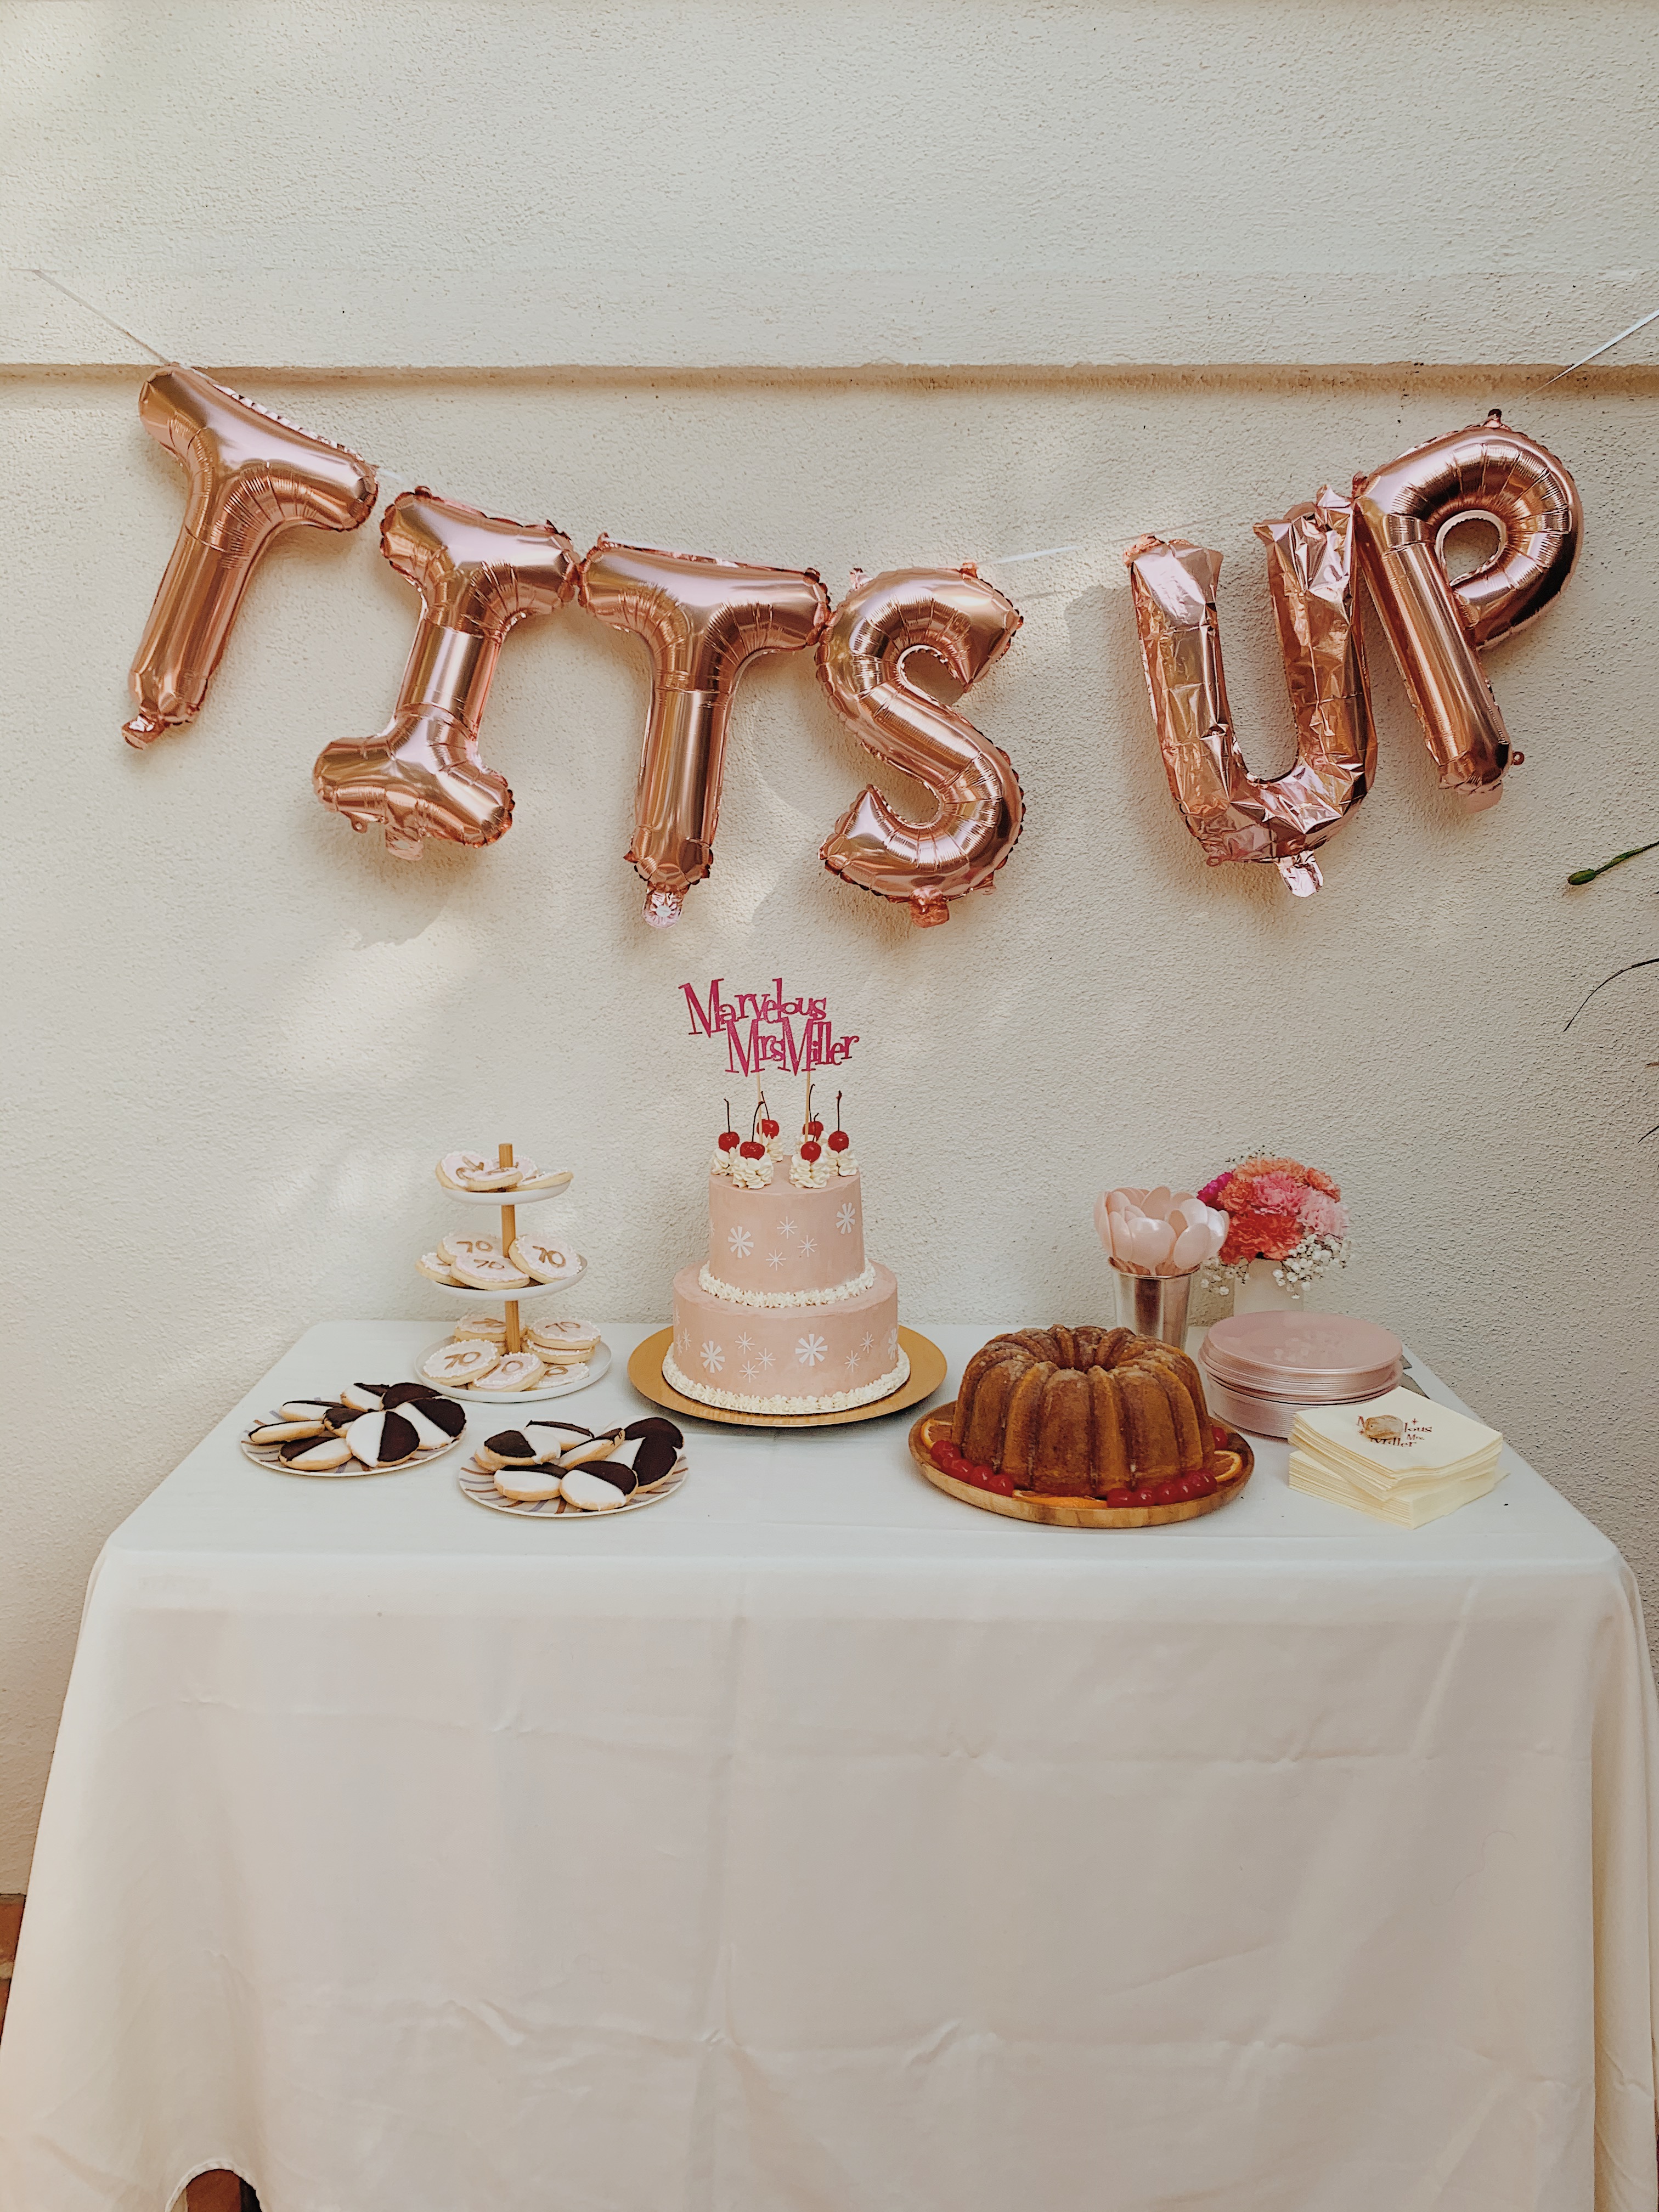


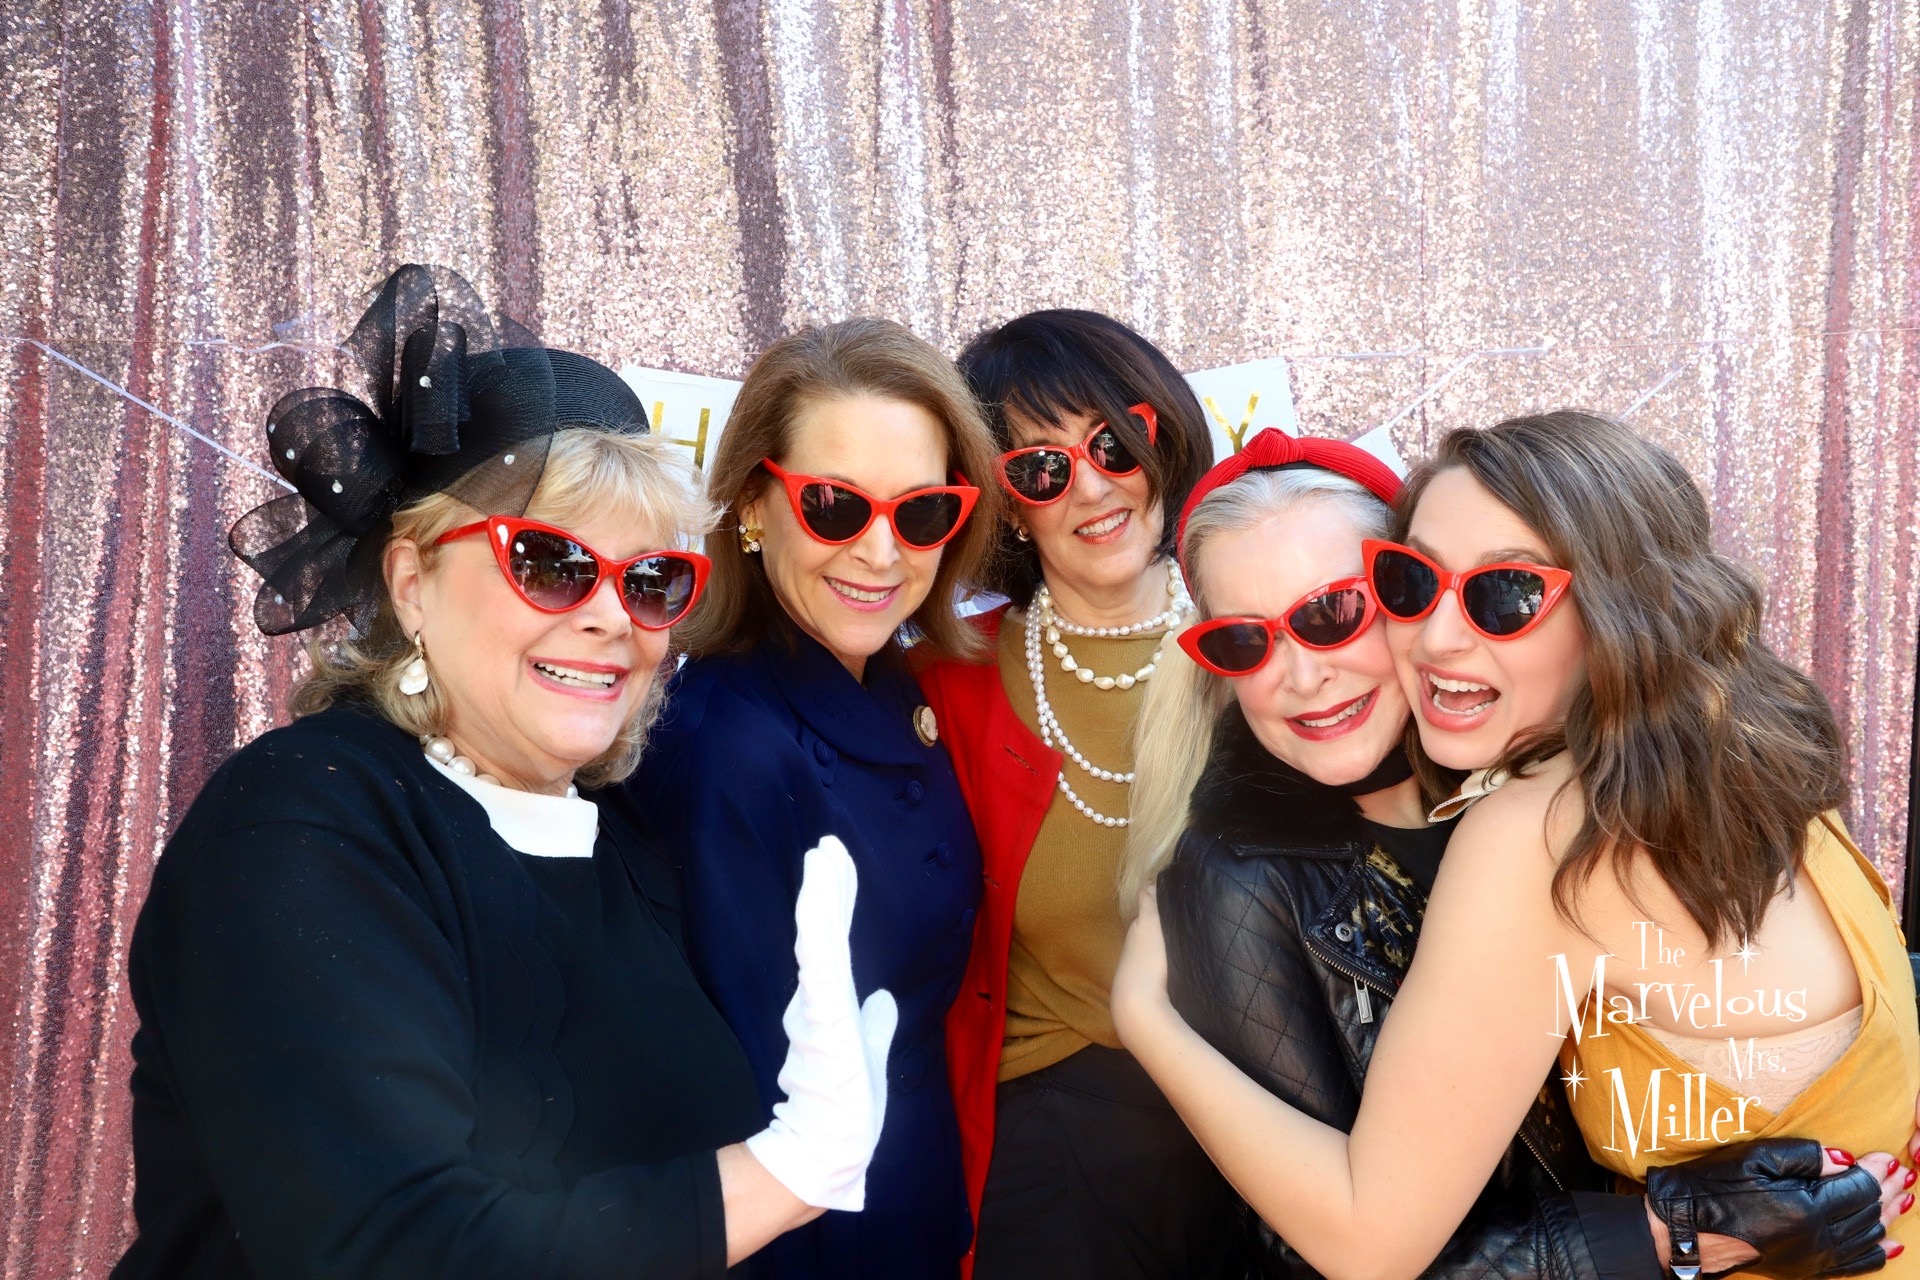
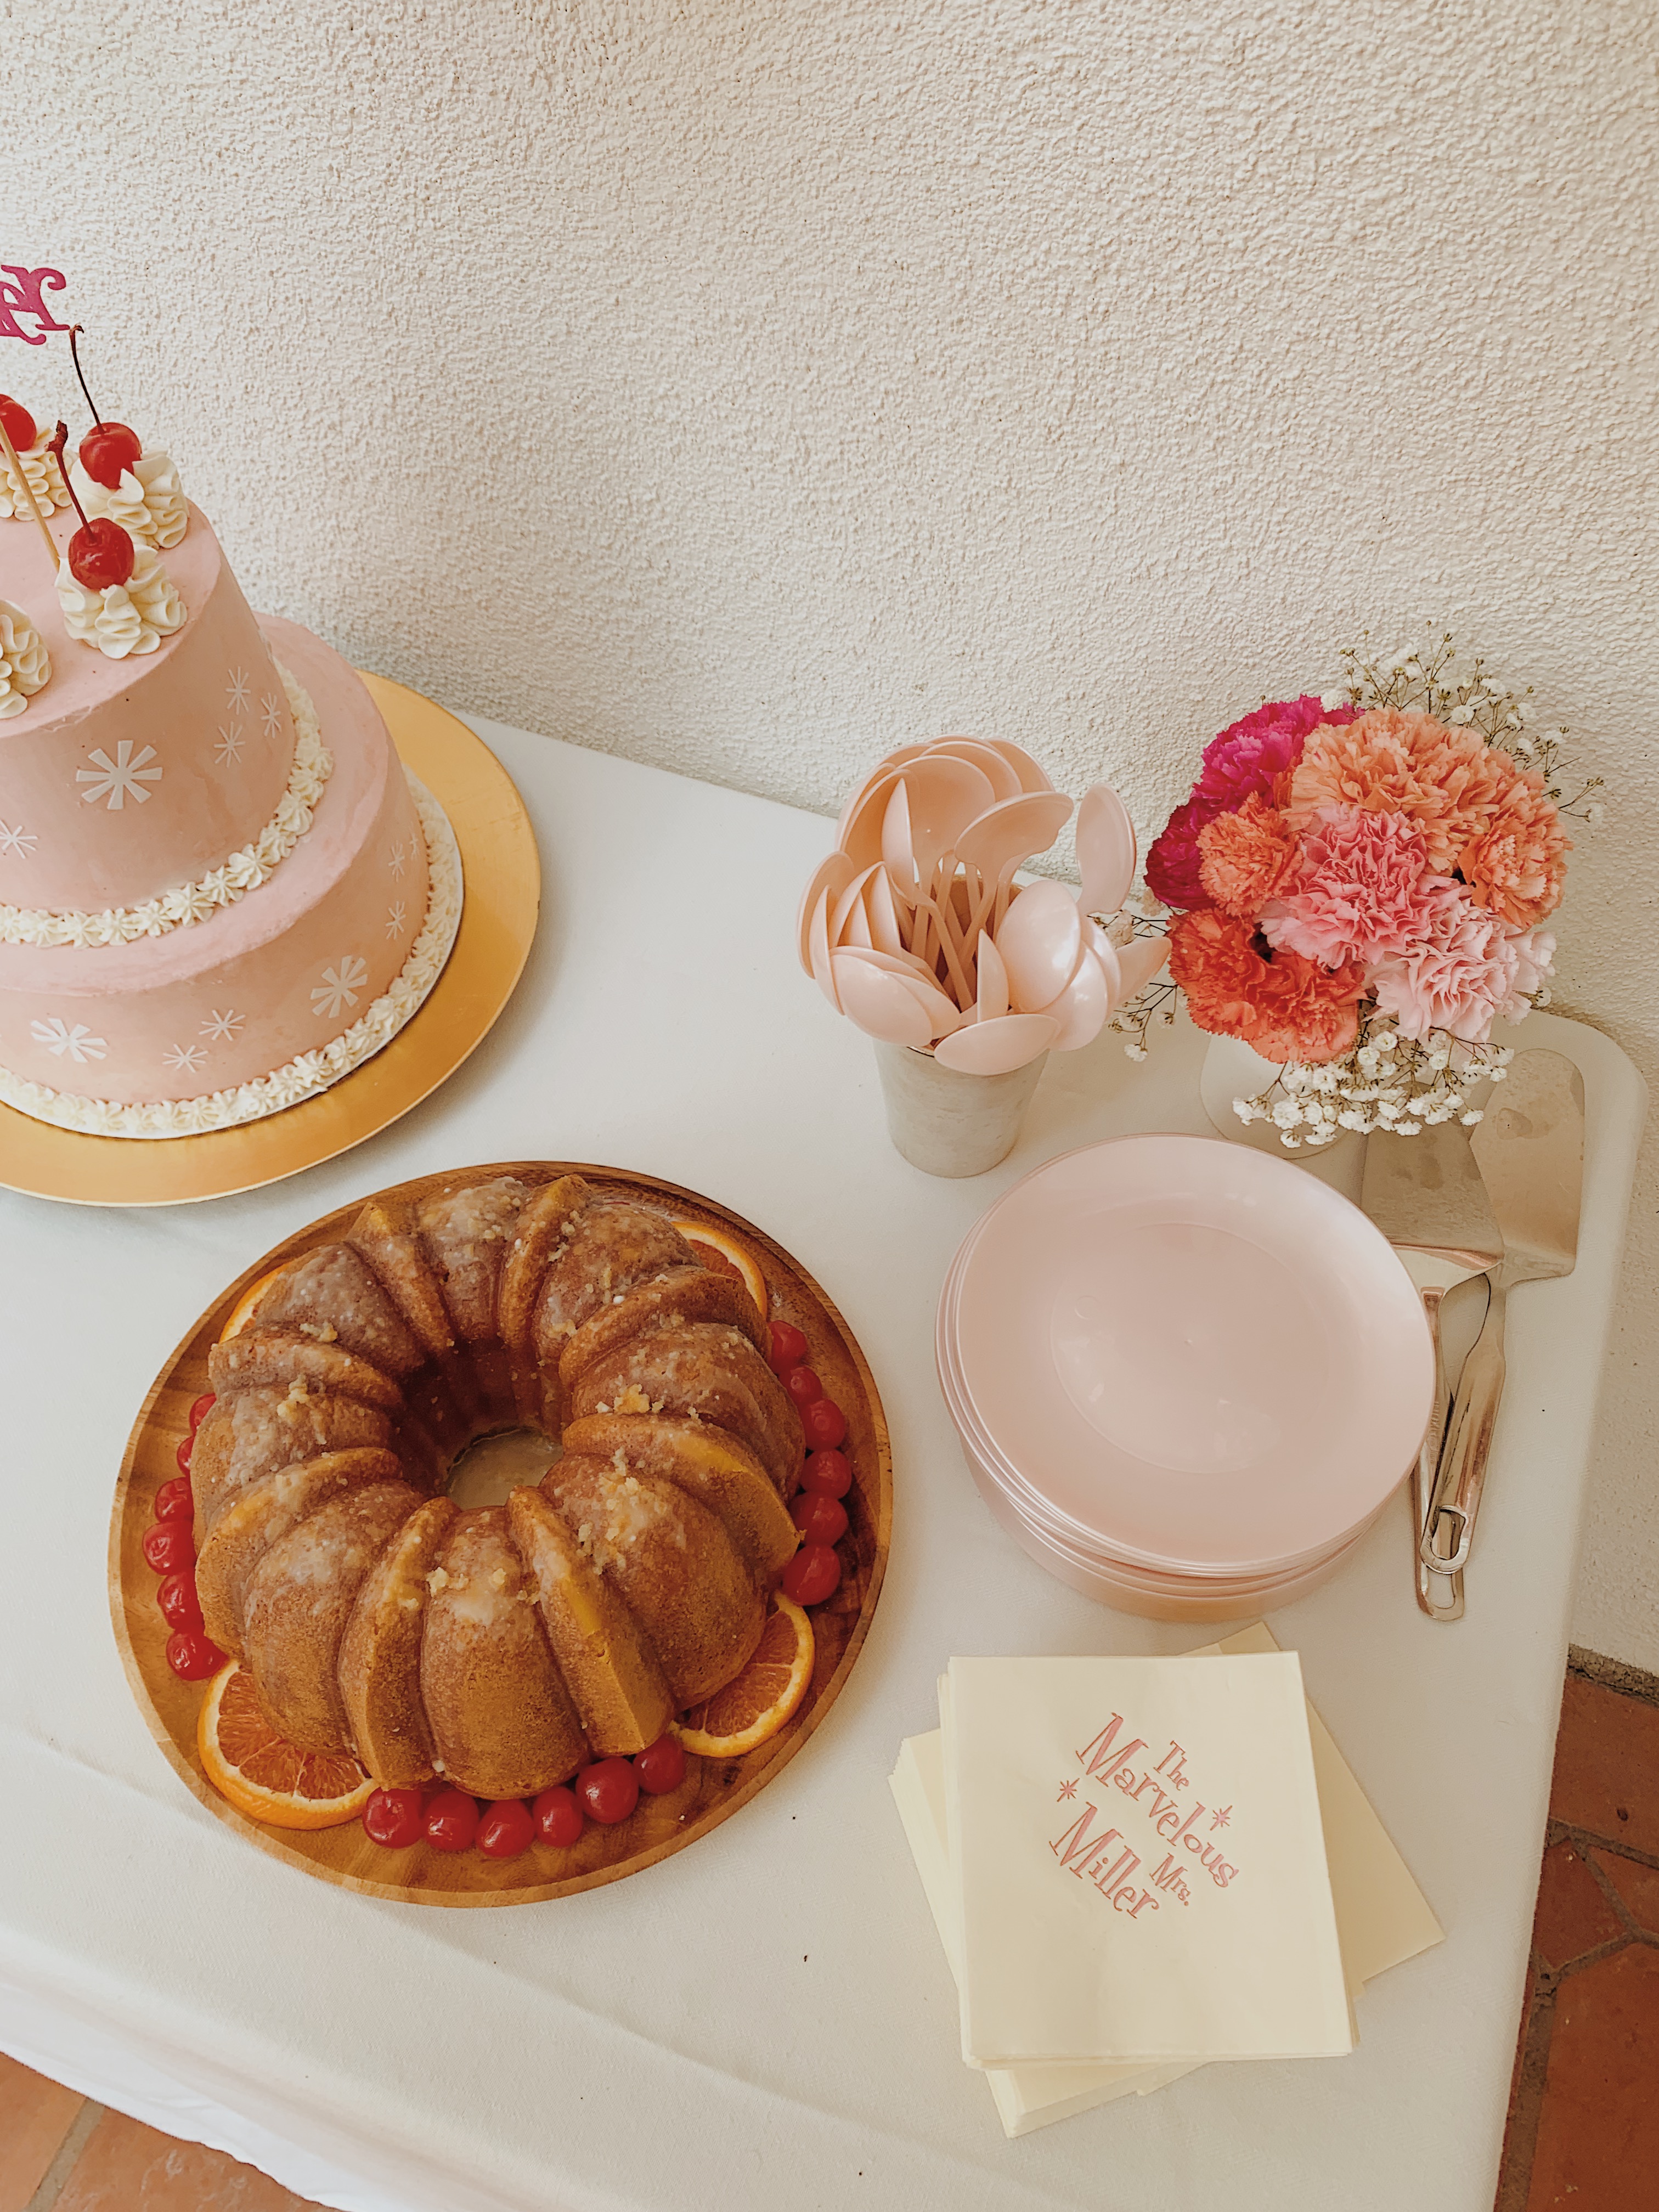
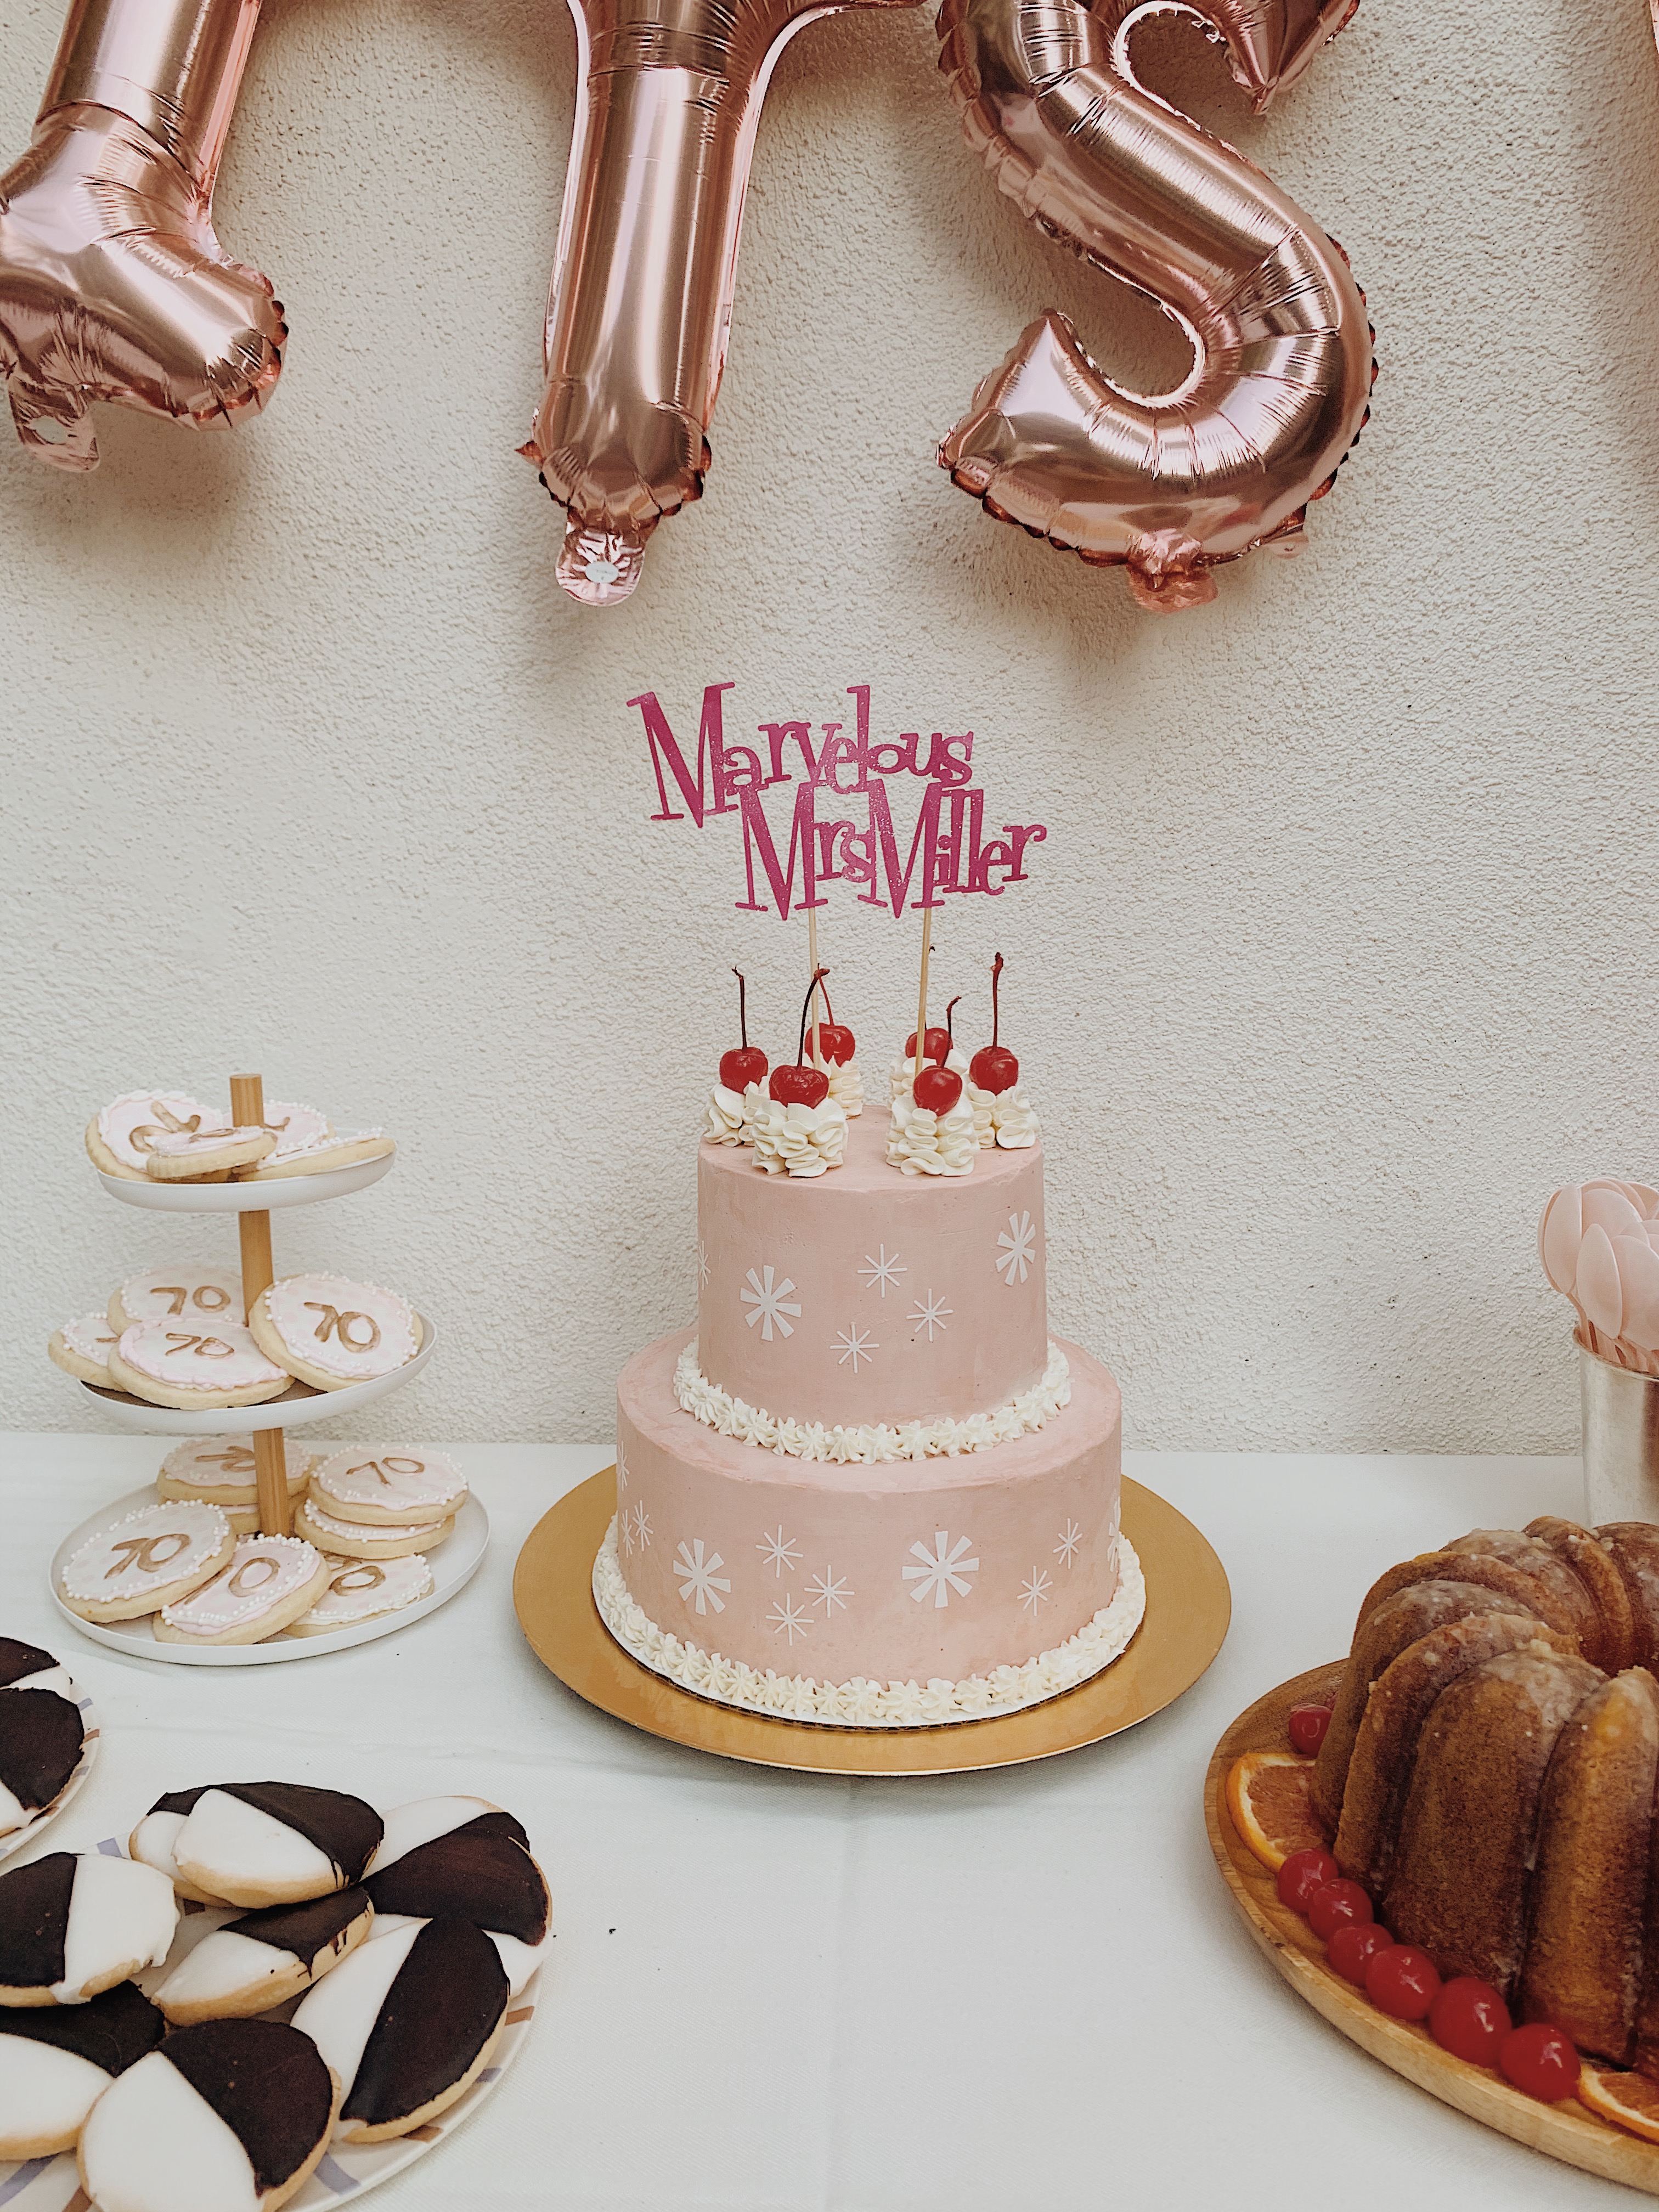
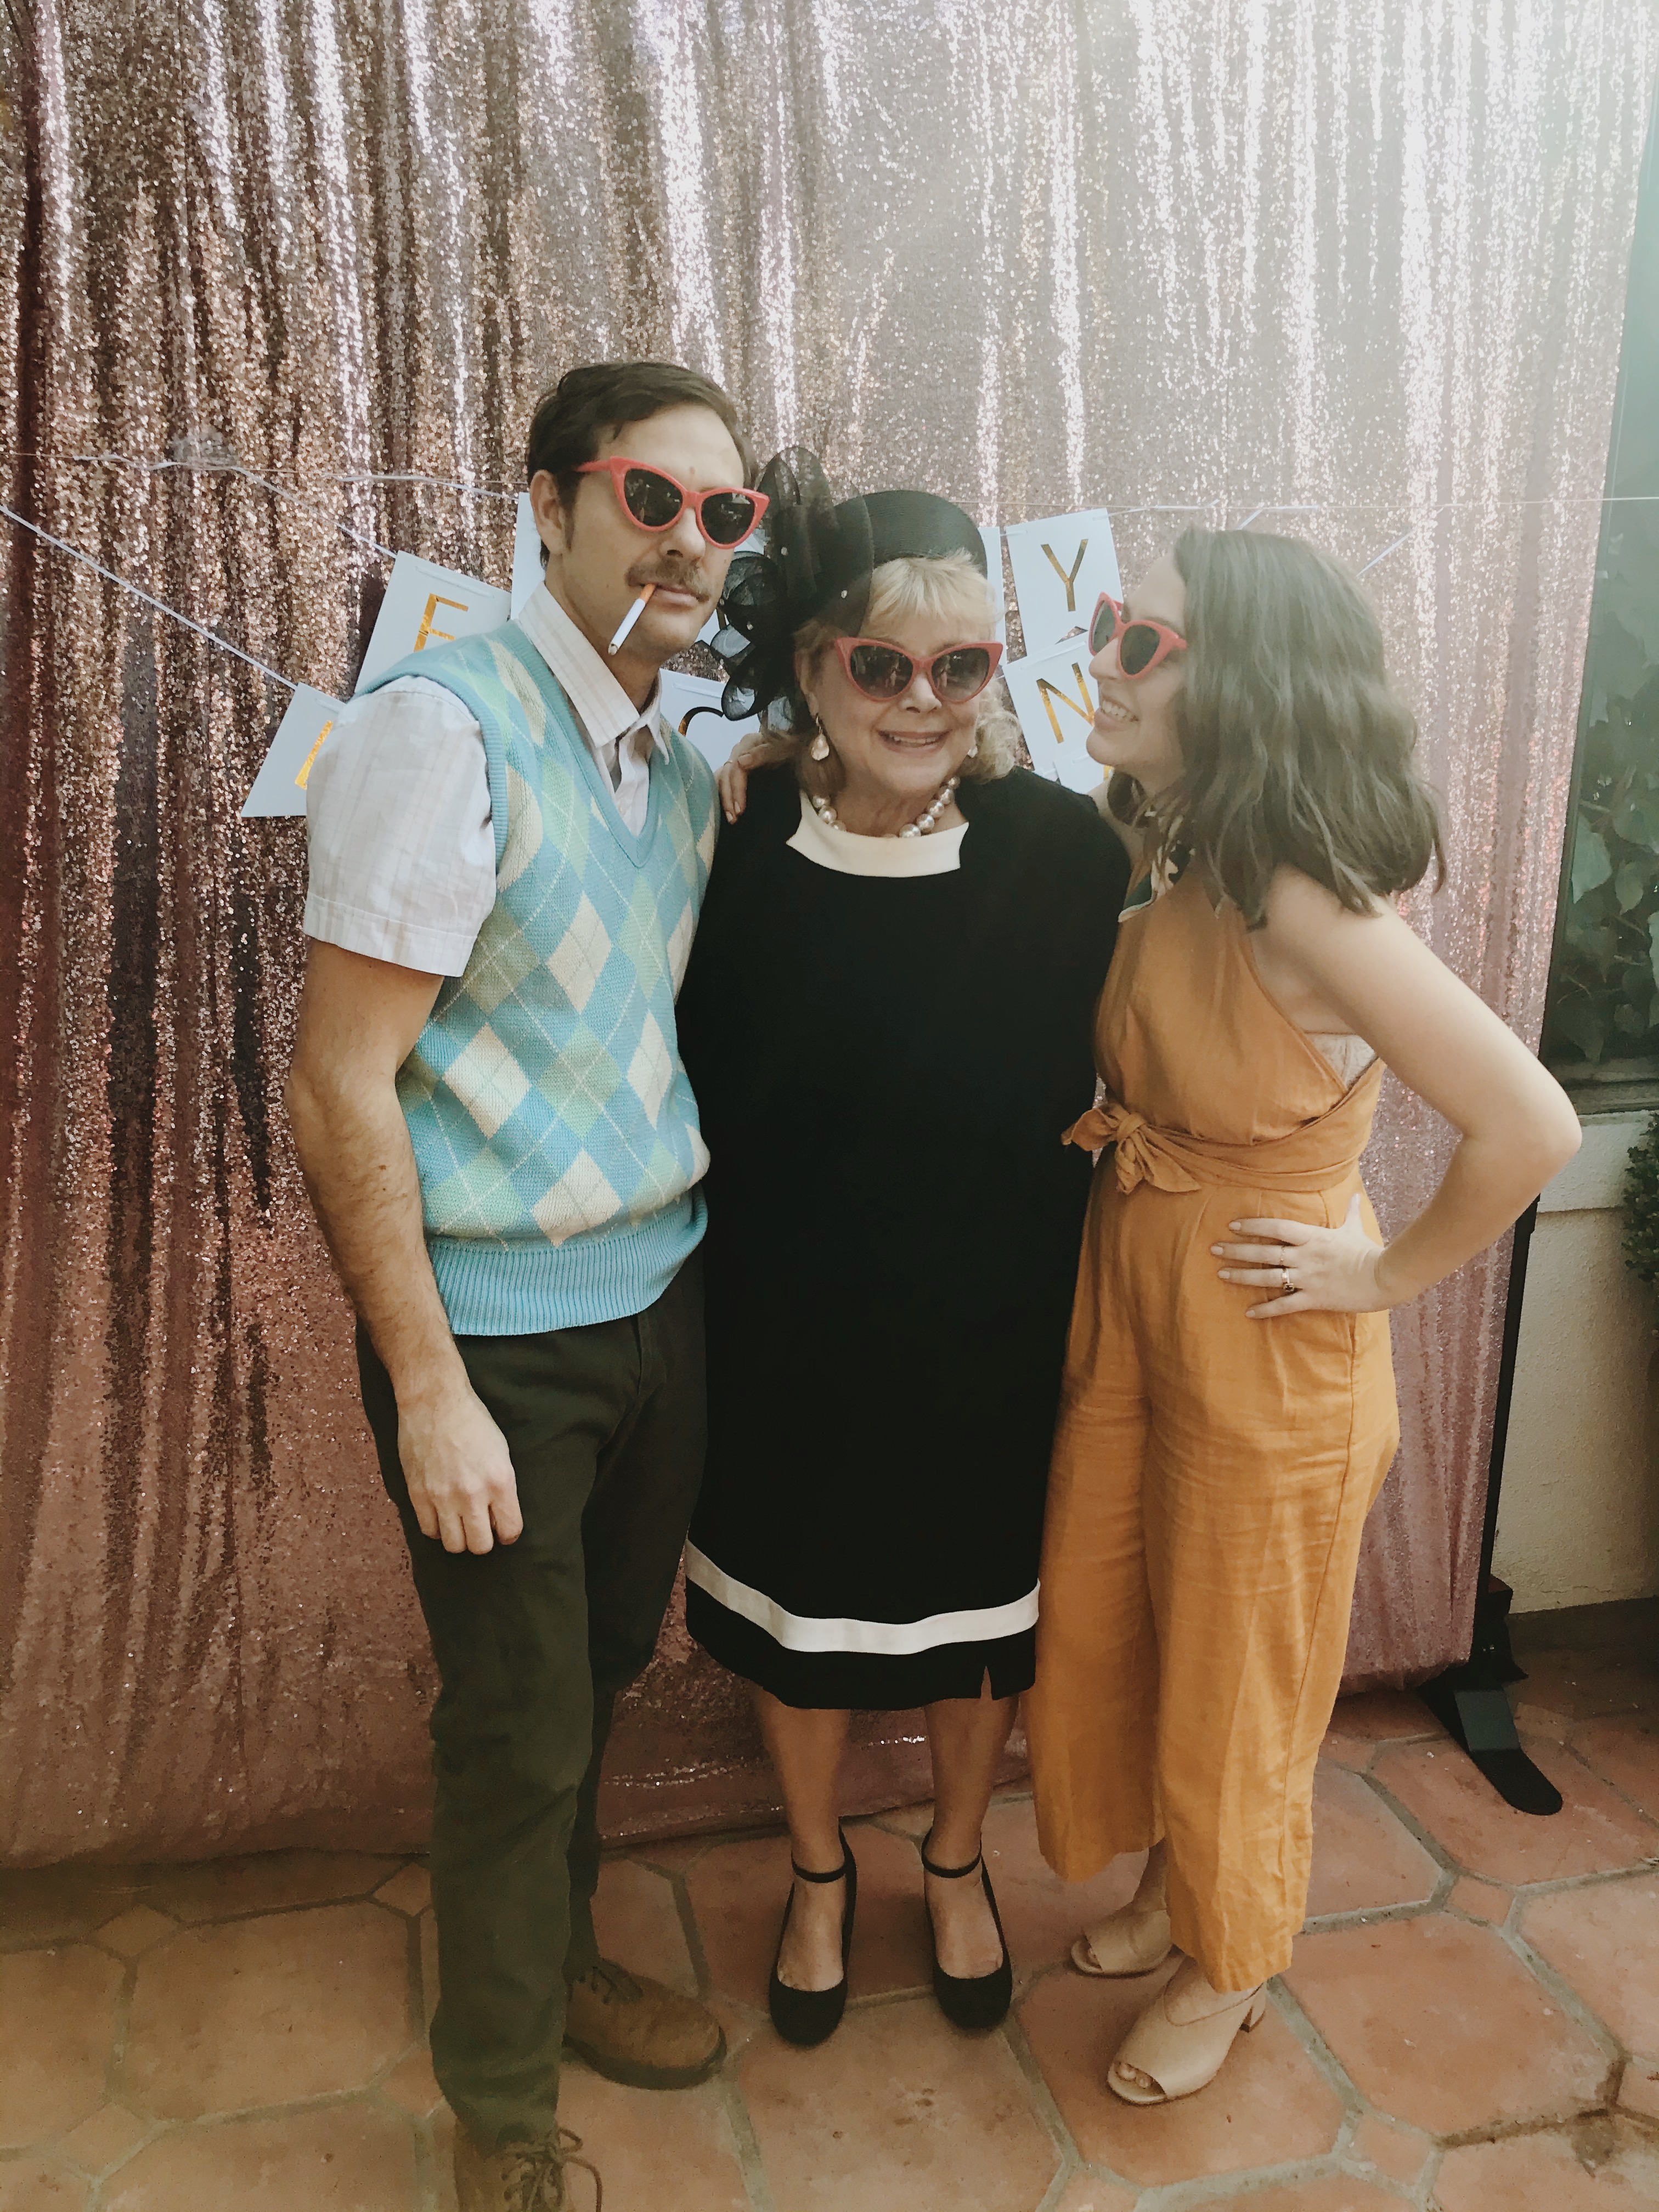
my moms 70th bday party was such a huge success!! if i do say so myself, the party turned out beautiful and the energy was so high and everyone seemed so happy. i think that is always partly because people love a theme party and dressing up in costumes, and the photo booth!! except for arlo, apparently he hates dressing on theme because i had a cute jean jacket all picked out for him but he staunchly refused it.
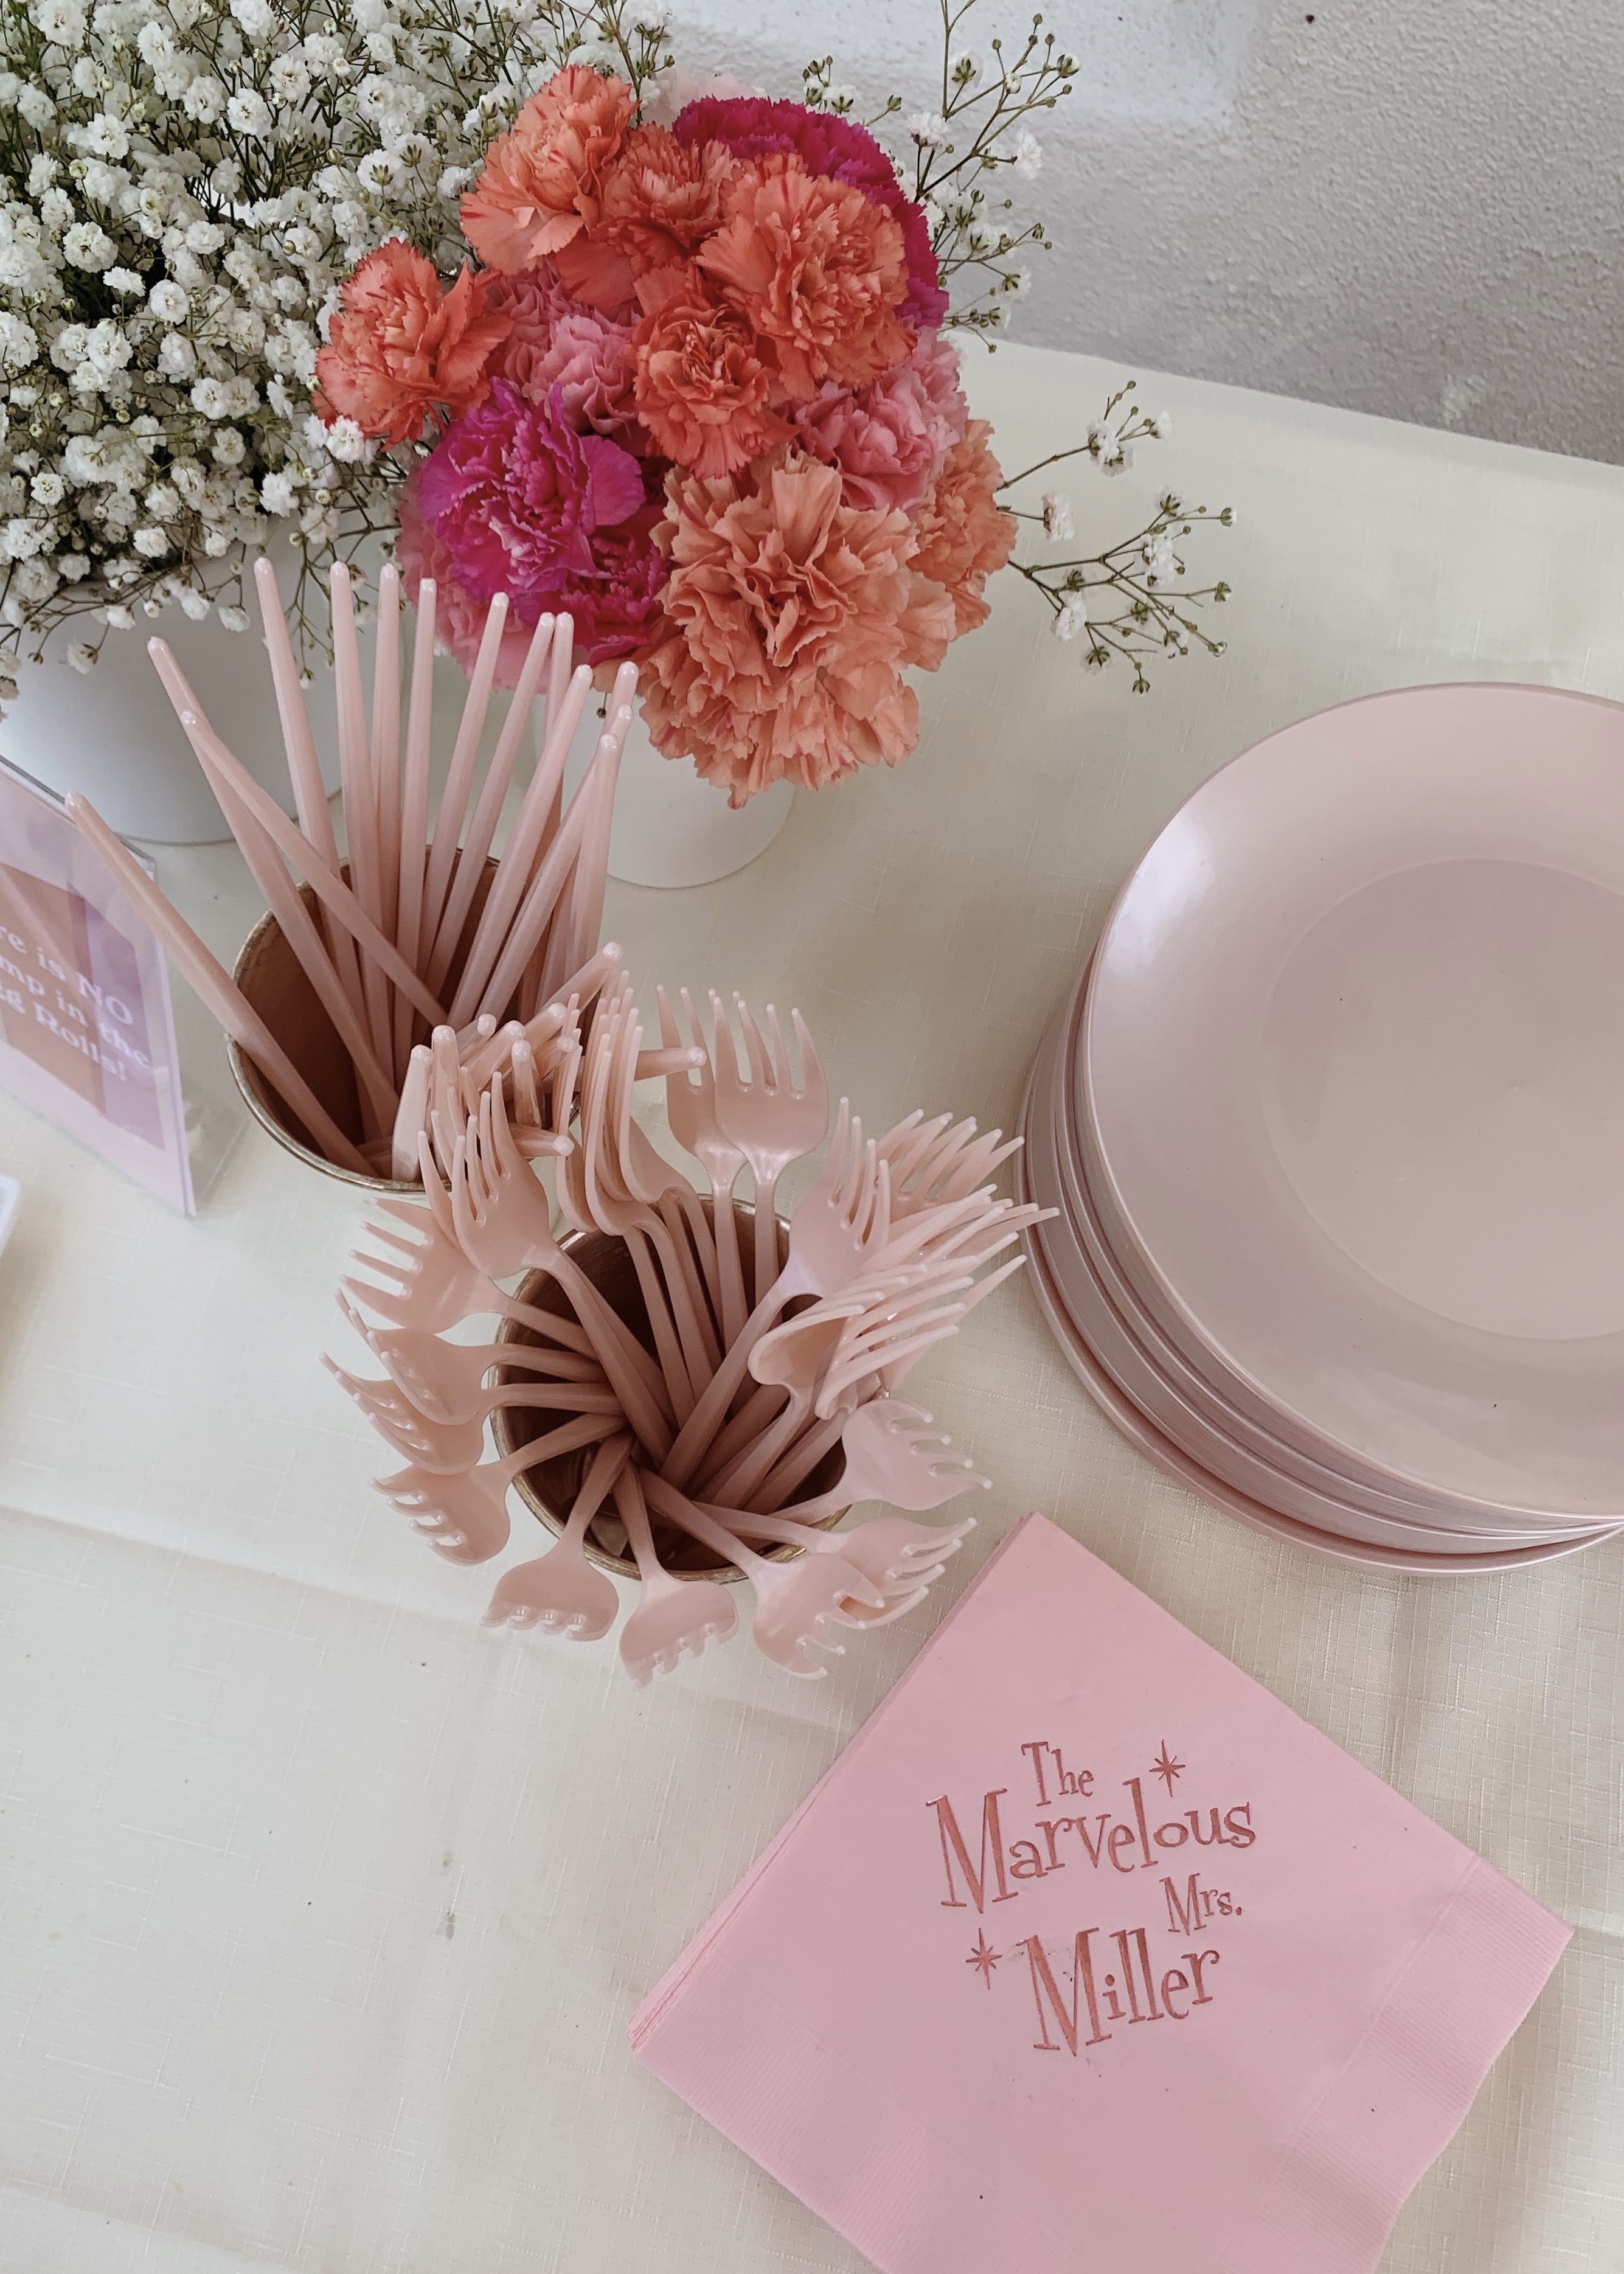
as i’ve said many times now, i’ve only seen one episode of mrs maisel so the theme was a bit difficult but that kind of made it more fun — i love a creative challenge (don’t forget arlos mamma mia party last year)! i focused on the 50s element the most, and lots of pink. i went simple with the decorations, we did some pink balloons scattered around, and for flowers i got every shade of pink carnation from the grocery store and babys breath! i spent $35 on all the flowers and made a ton of arrangements for each table.
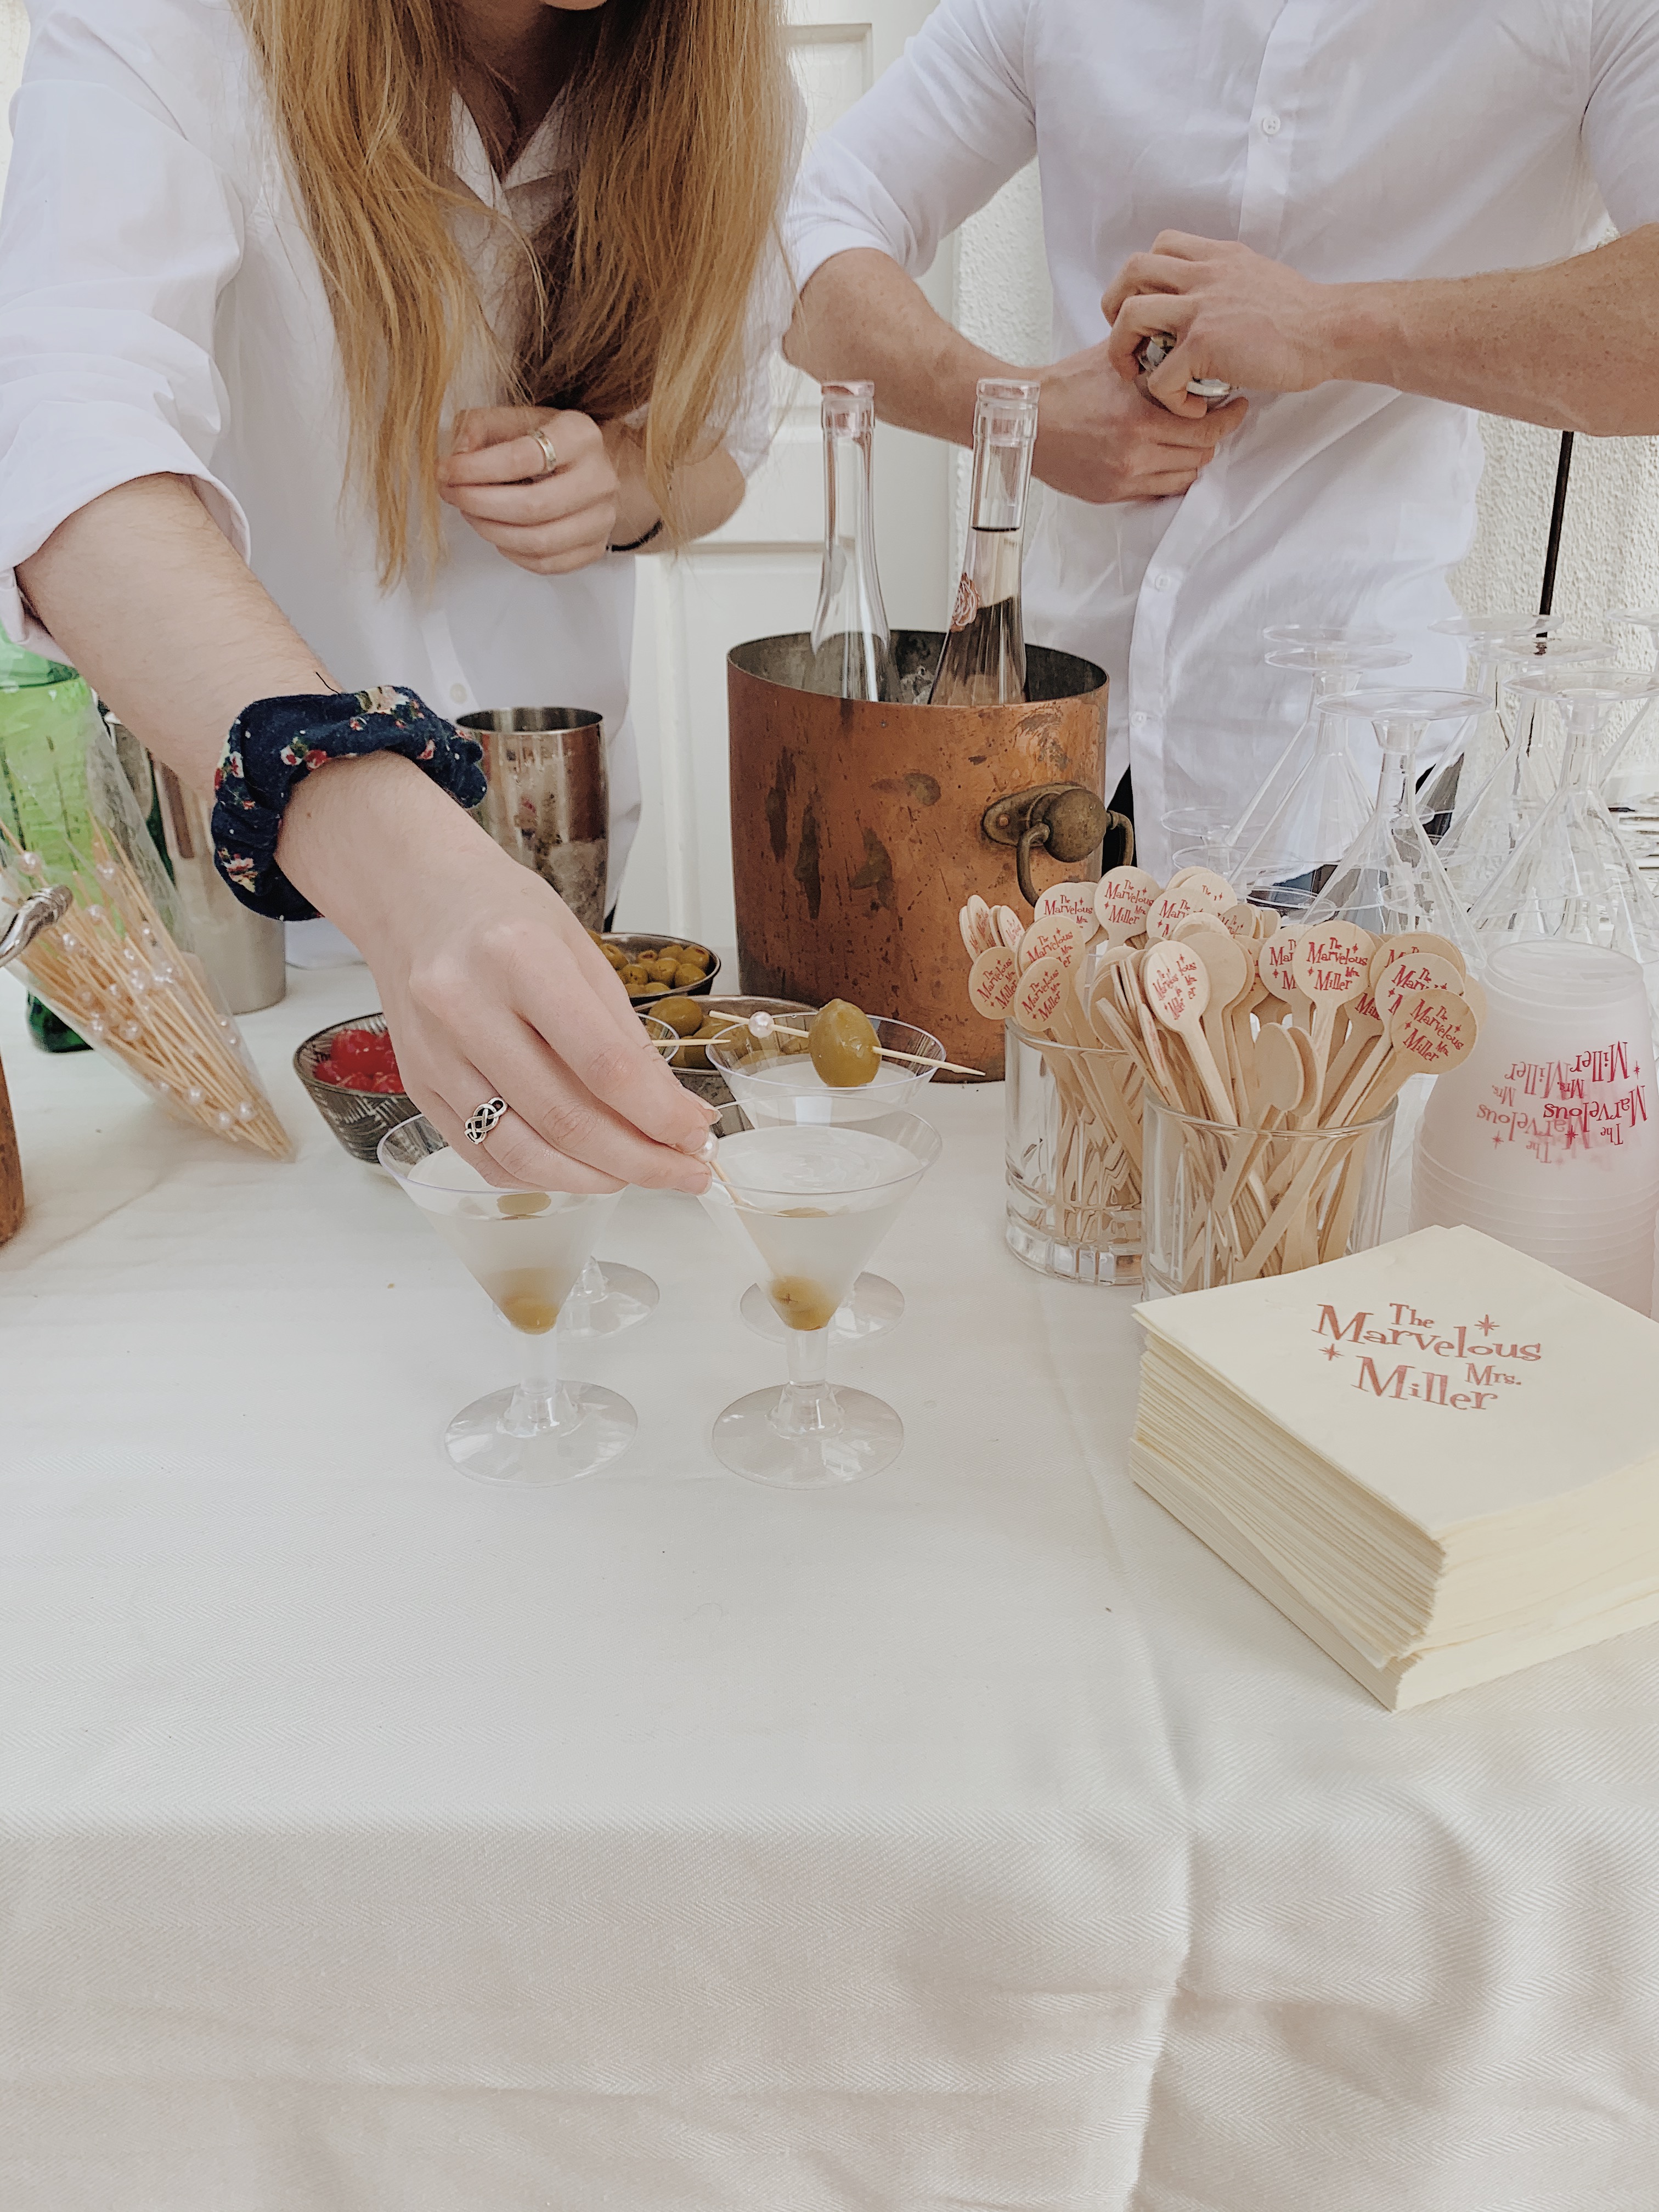
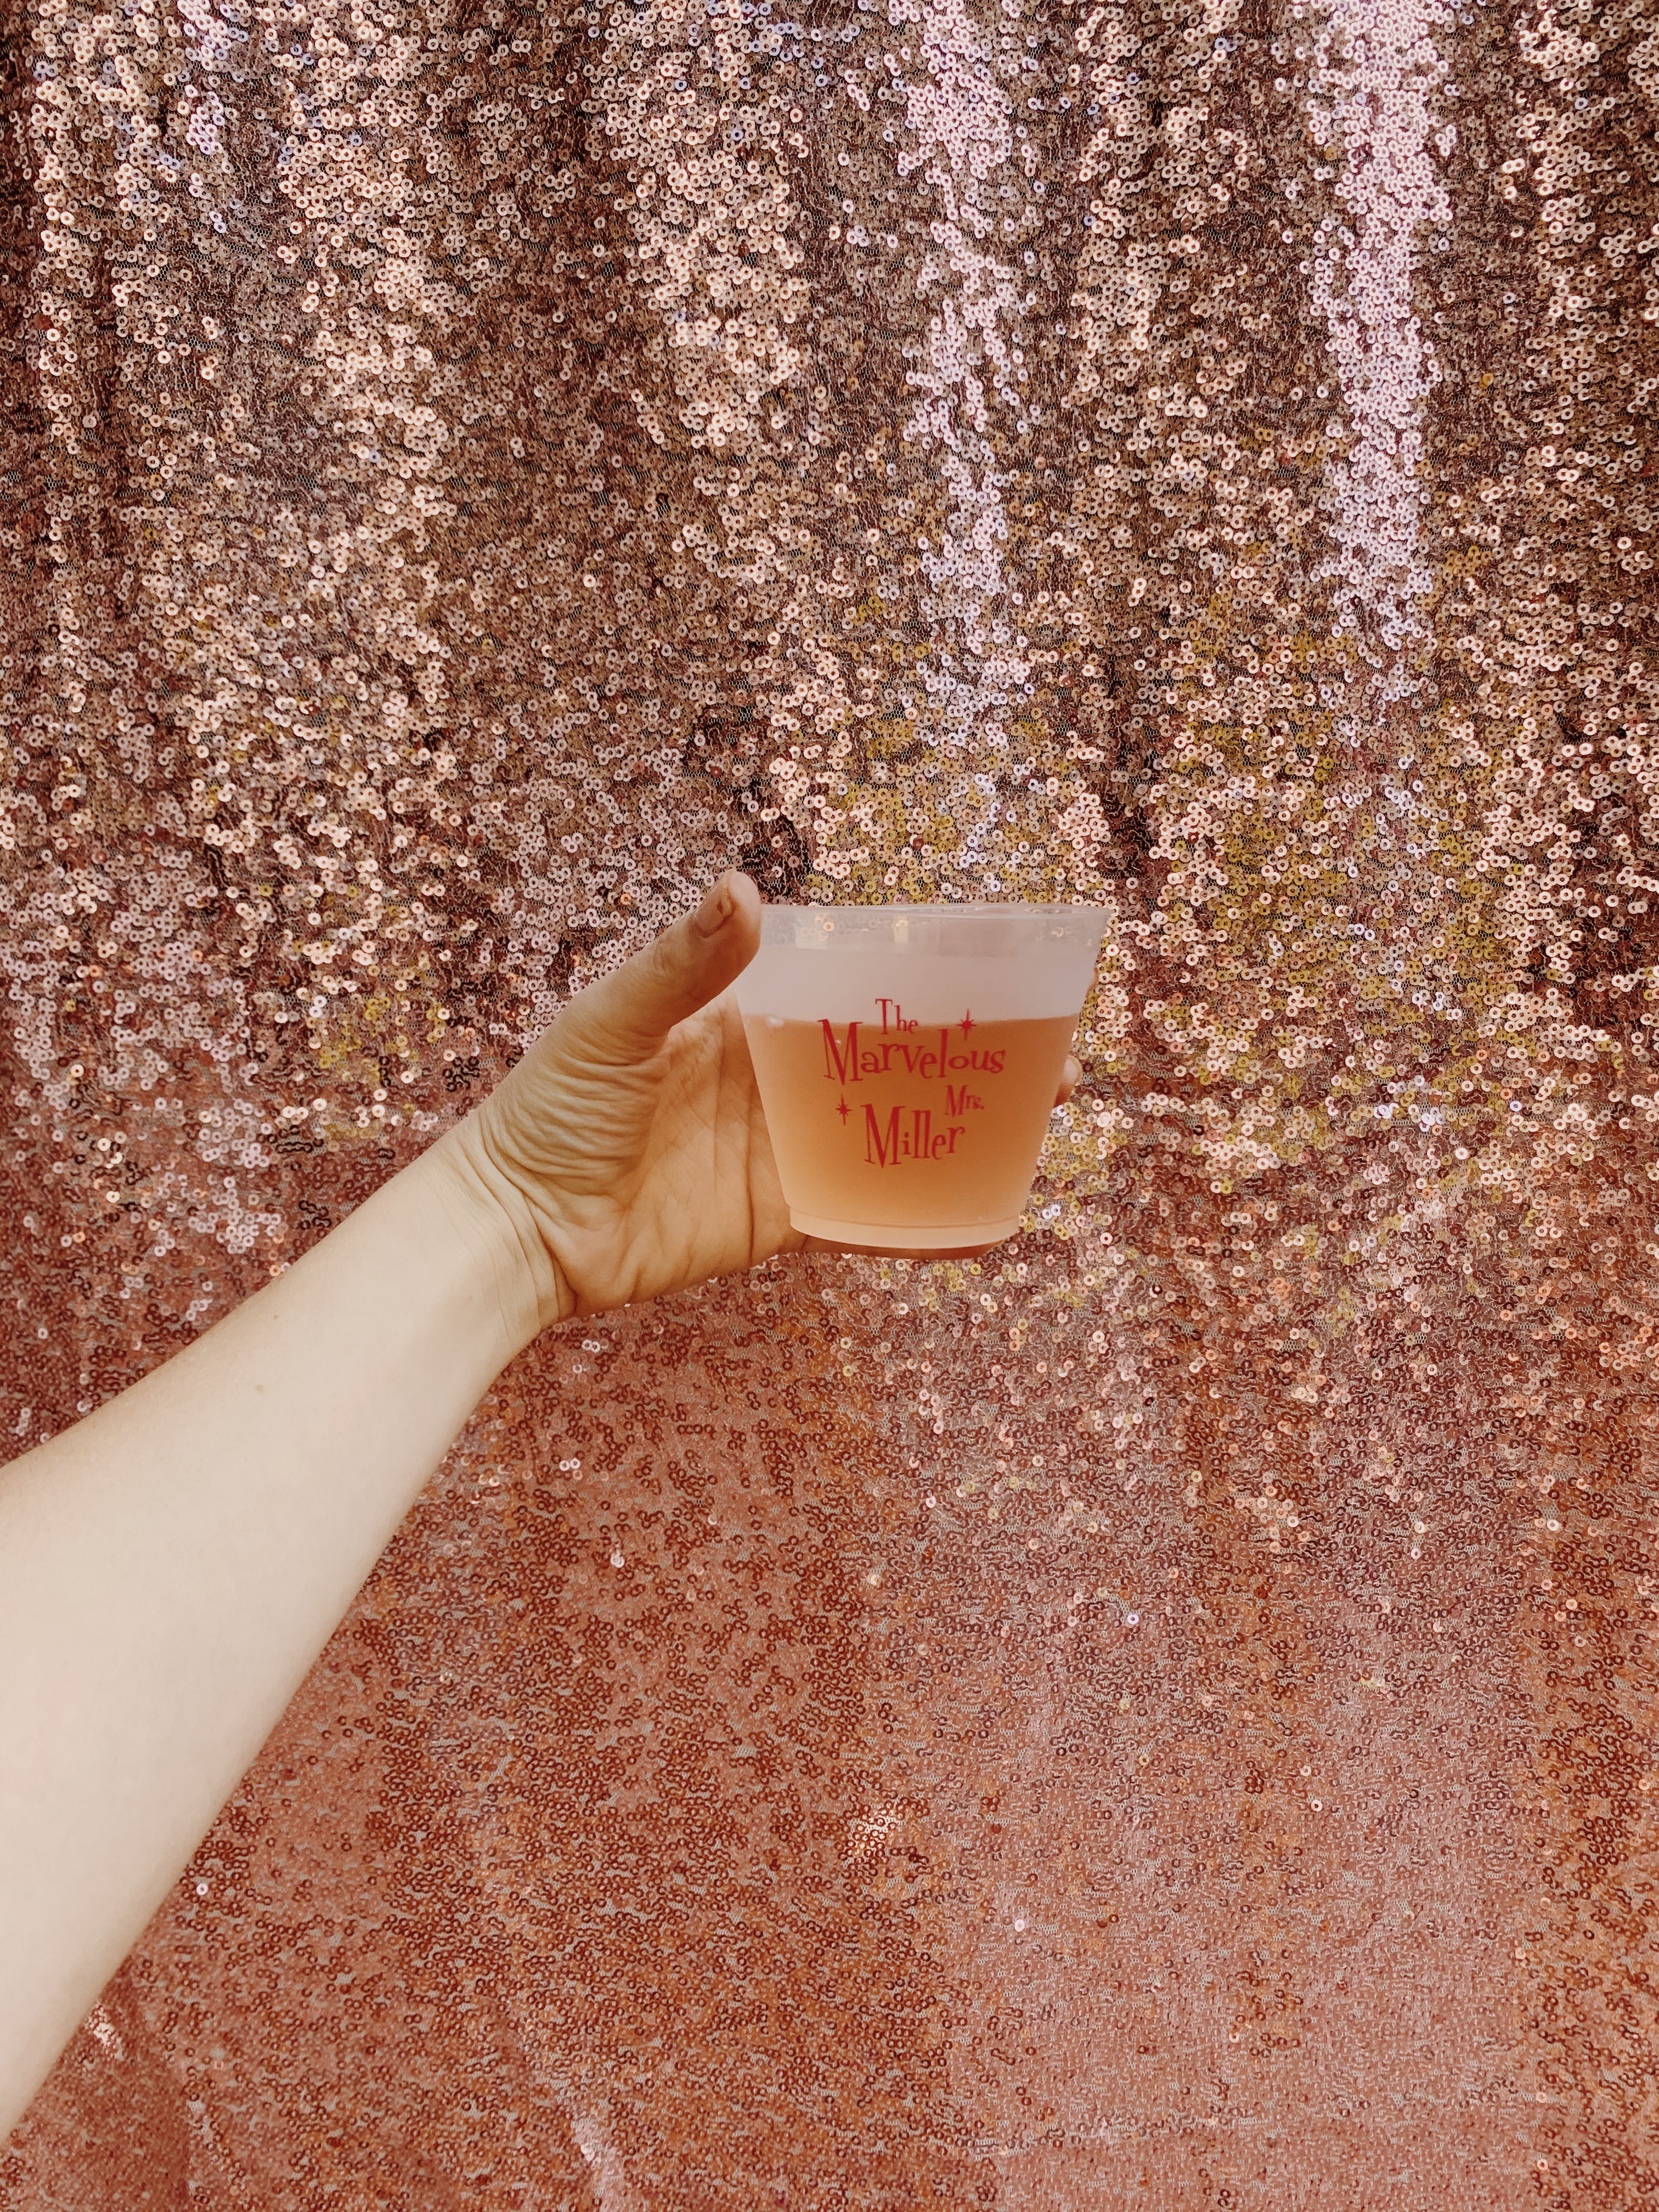
i’m obsessed with making custom stuff for all our parties, they are fun mementos that make the party extra special and keepsakes for all the sentimental people too! i love the quality of everything from for your party. we had napkins, stir sticks and cups made for the bar! because my mom invited 60+ people, we decided to hire family friends to bartend and it was so worth it. we served punch and martinis. to “fifties” up the punch, my SIL made a fruity ice ring in a bundt pan, so cute. and a confusing sign that says “punch so stiff you could blow it” because the punch was actually non-alcoholic but you know i gotta go hard with the theme.

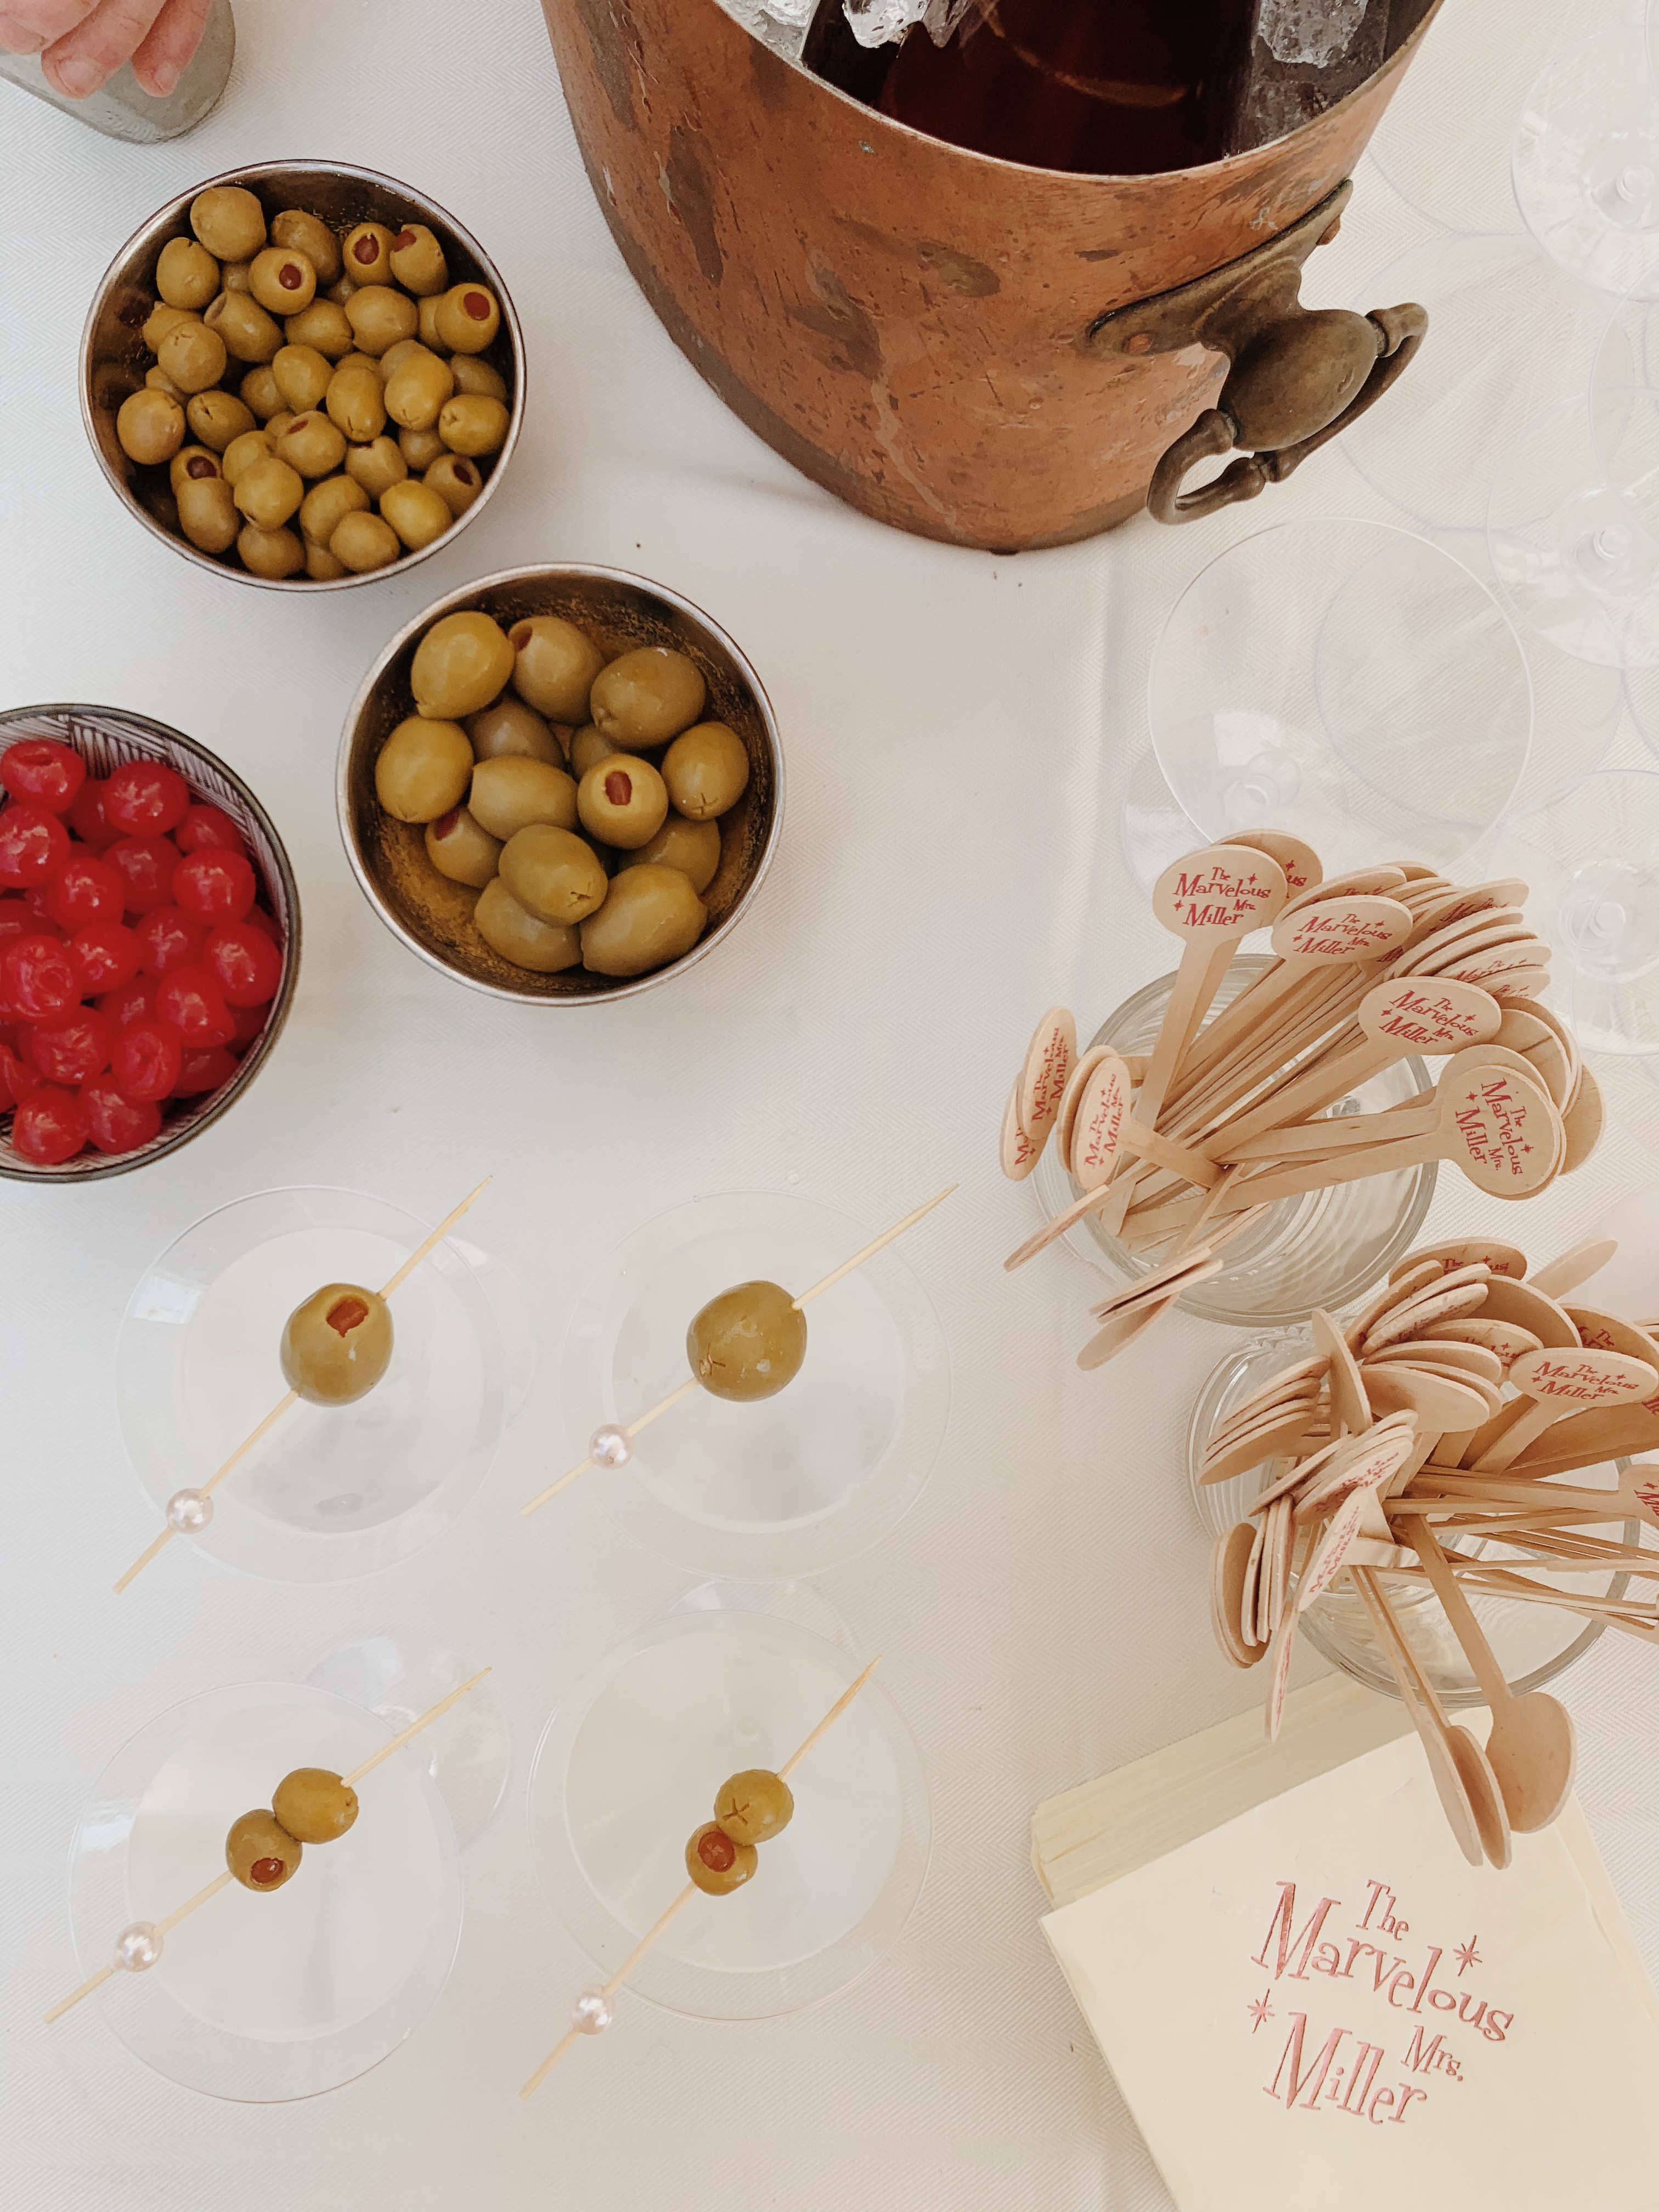
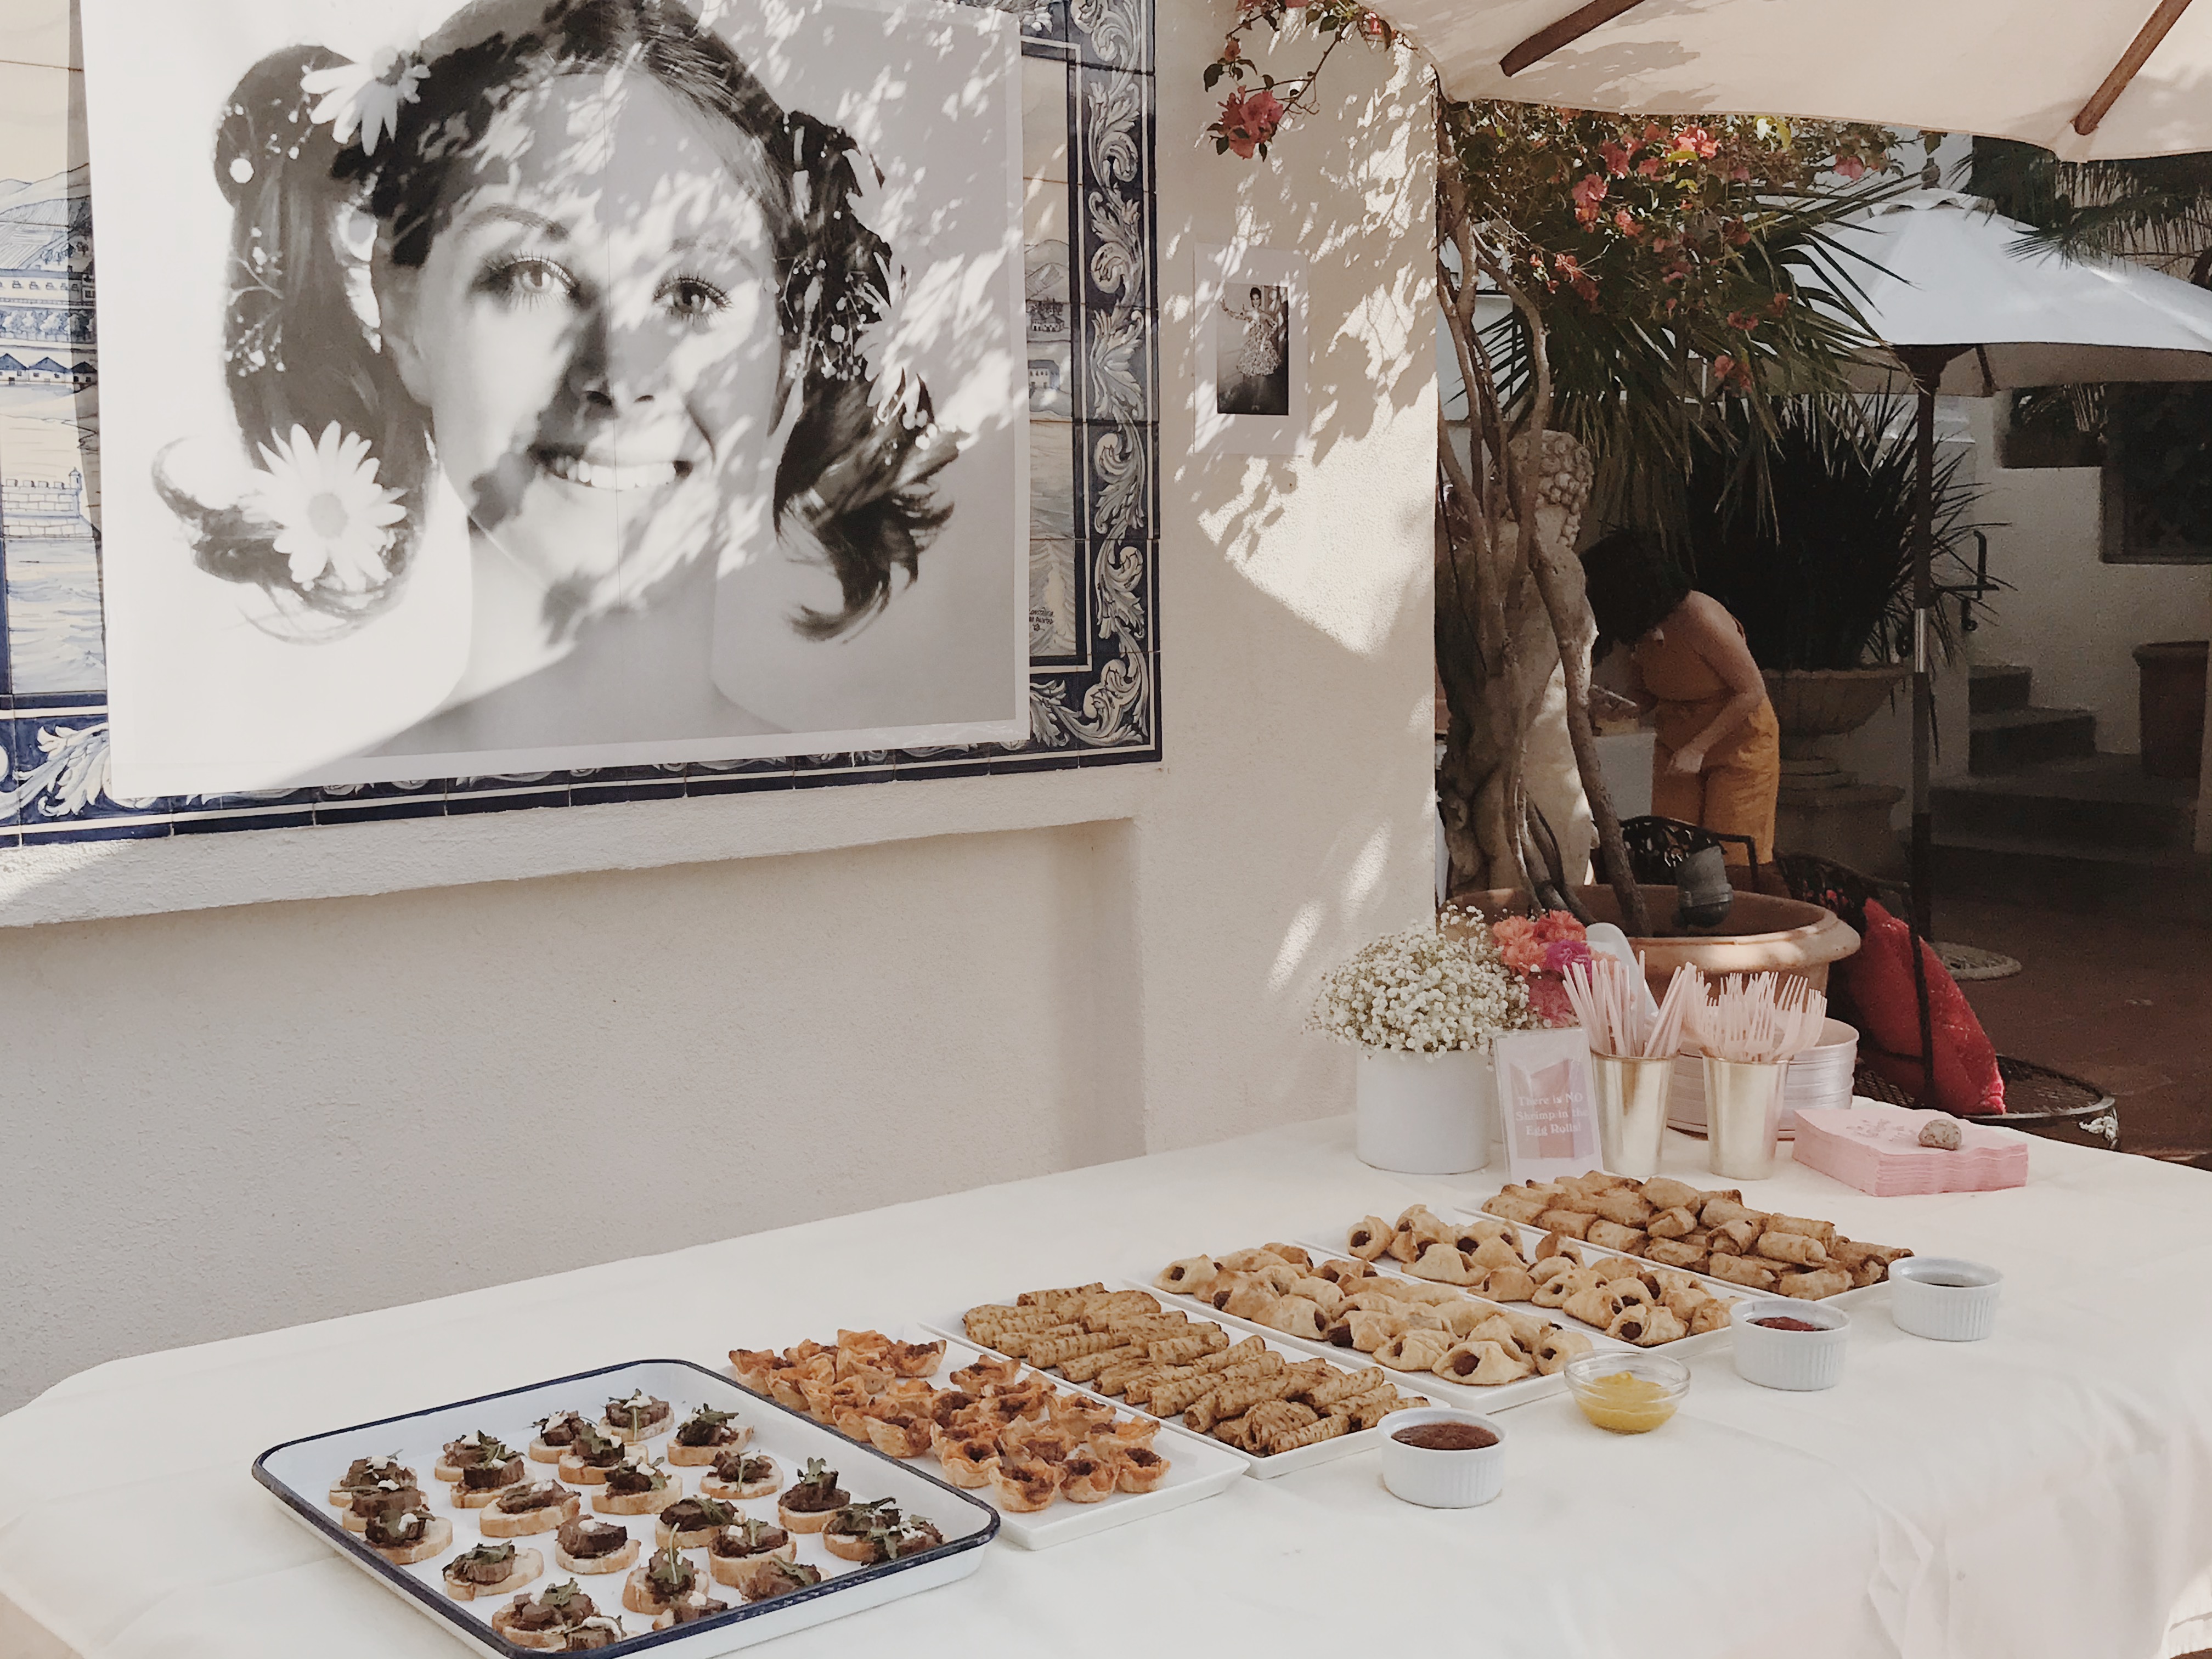
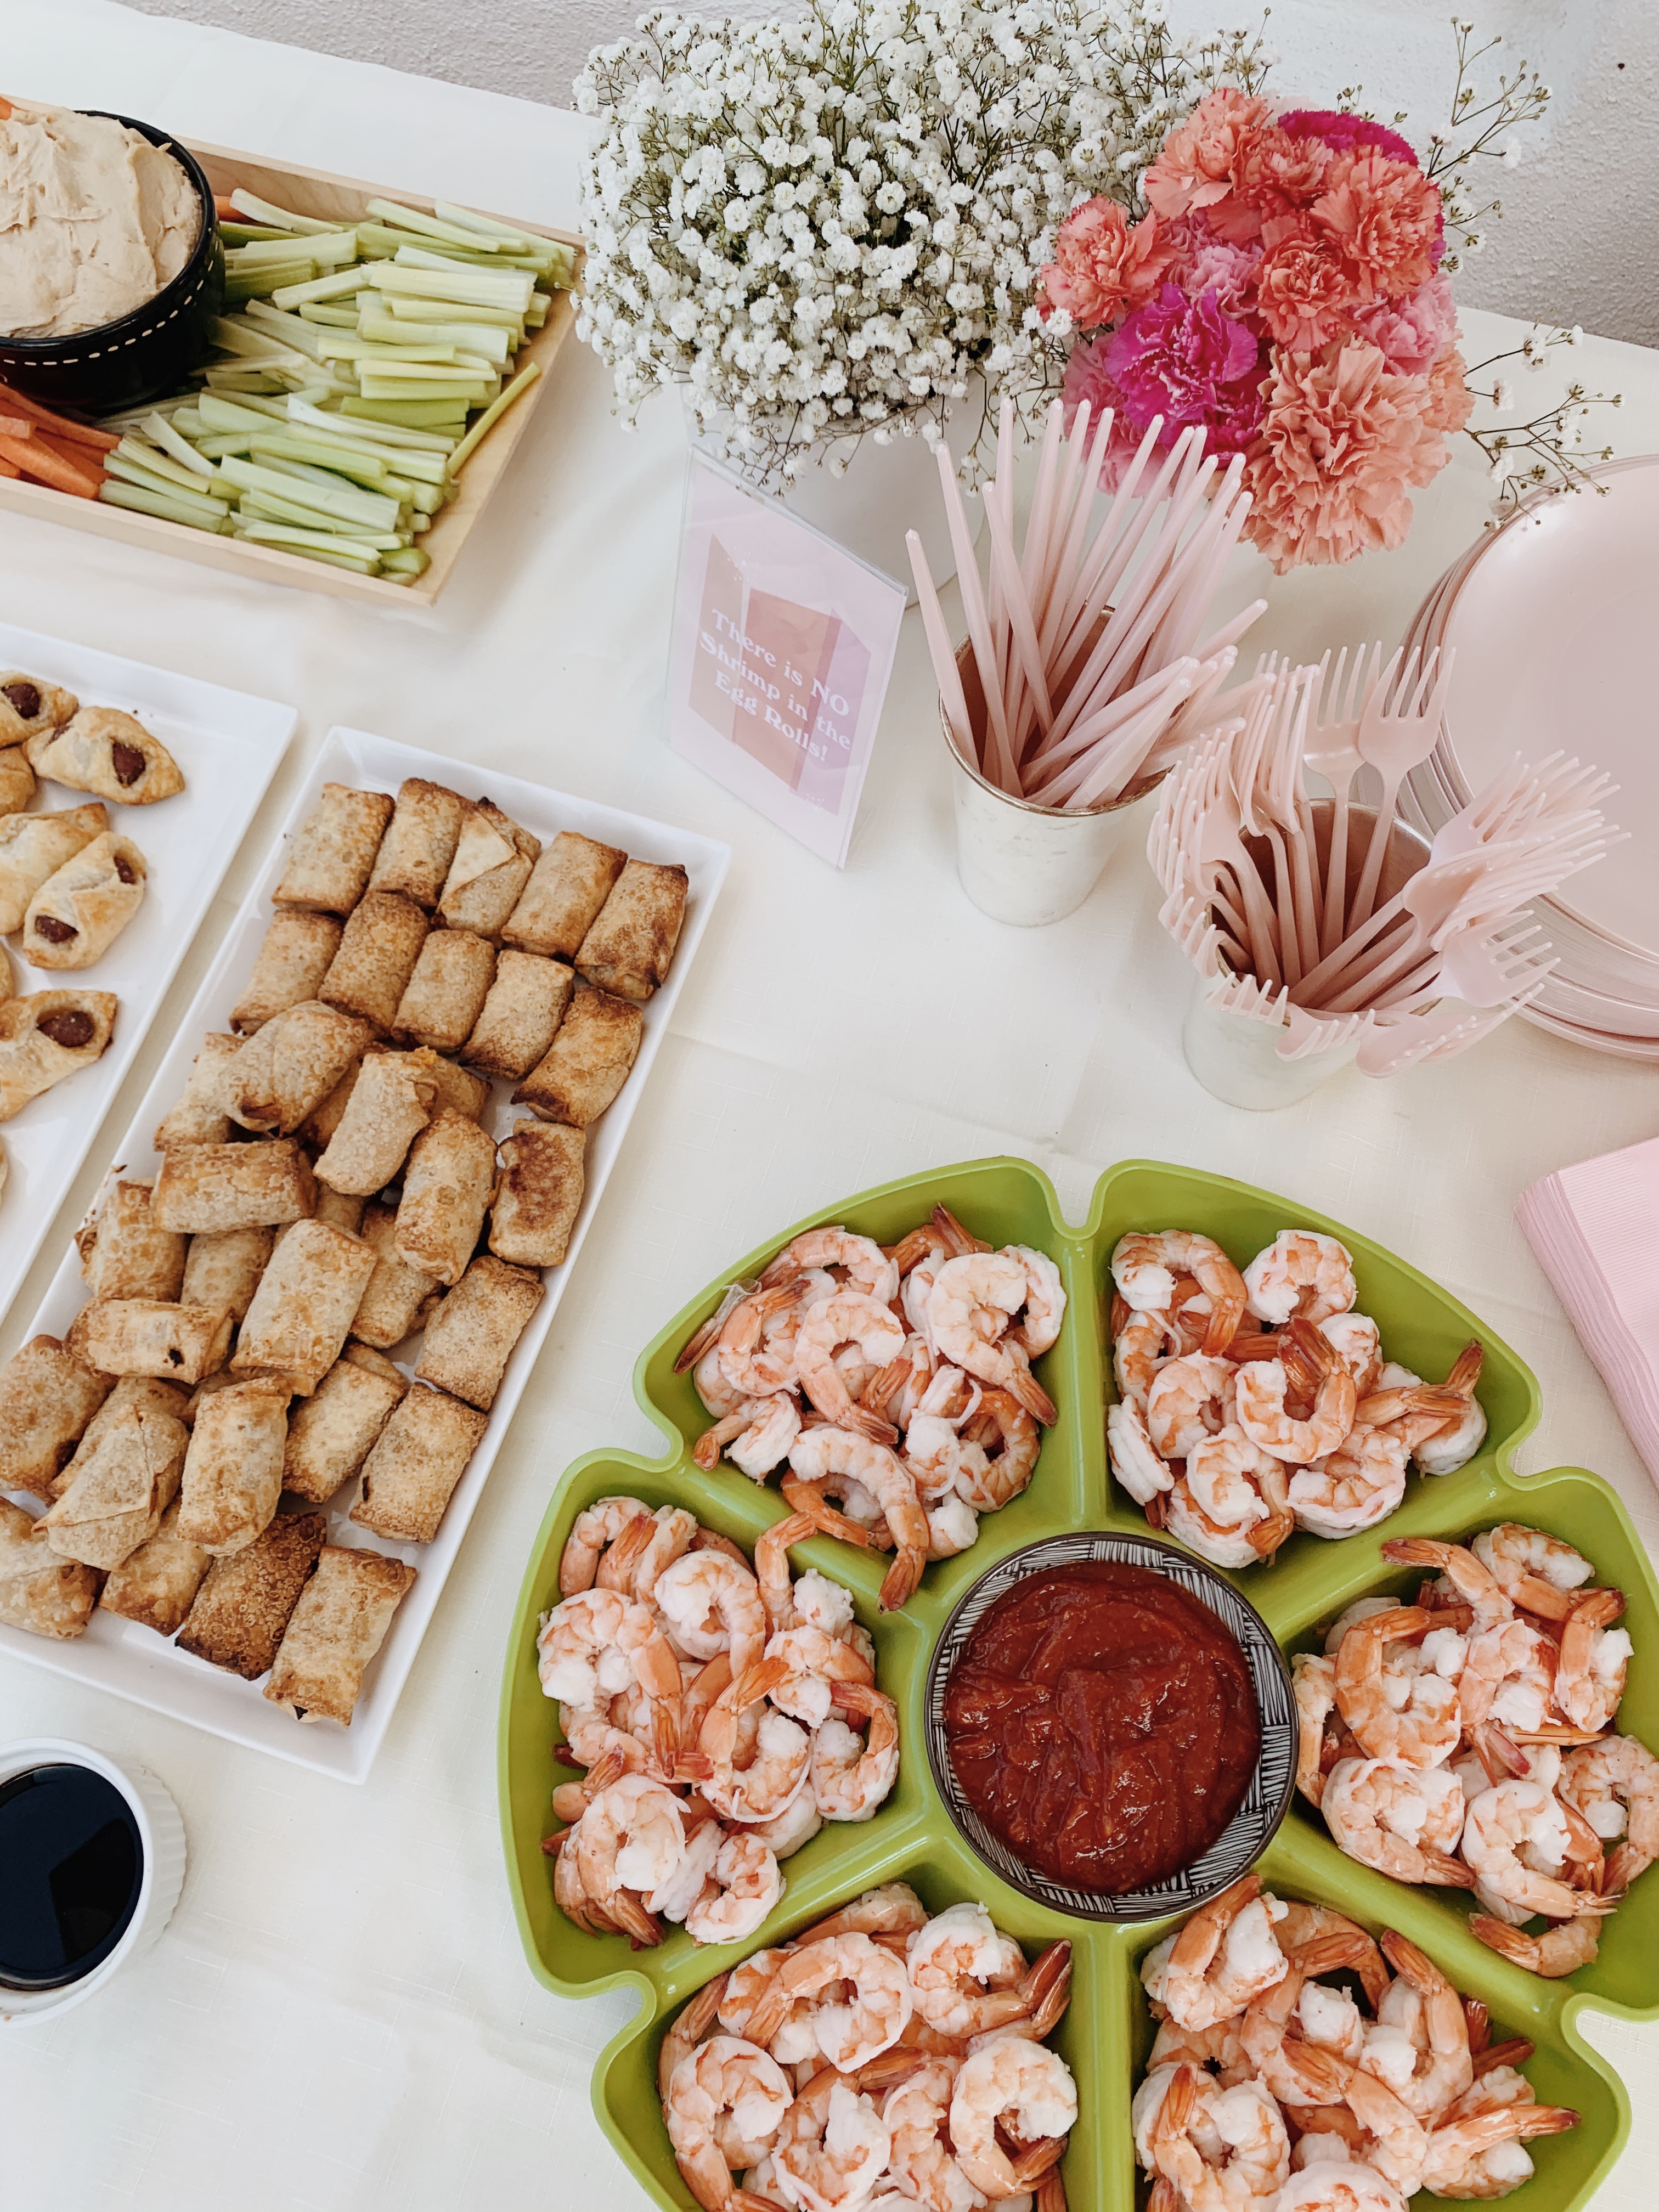
for the food, we pretty much only served 50s appetizers — shrimp cocktail, pigs in blankets, egg rolls (so i could make a little sign to reference the show), deviled eggs, and brisket crostinis.
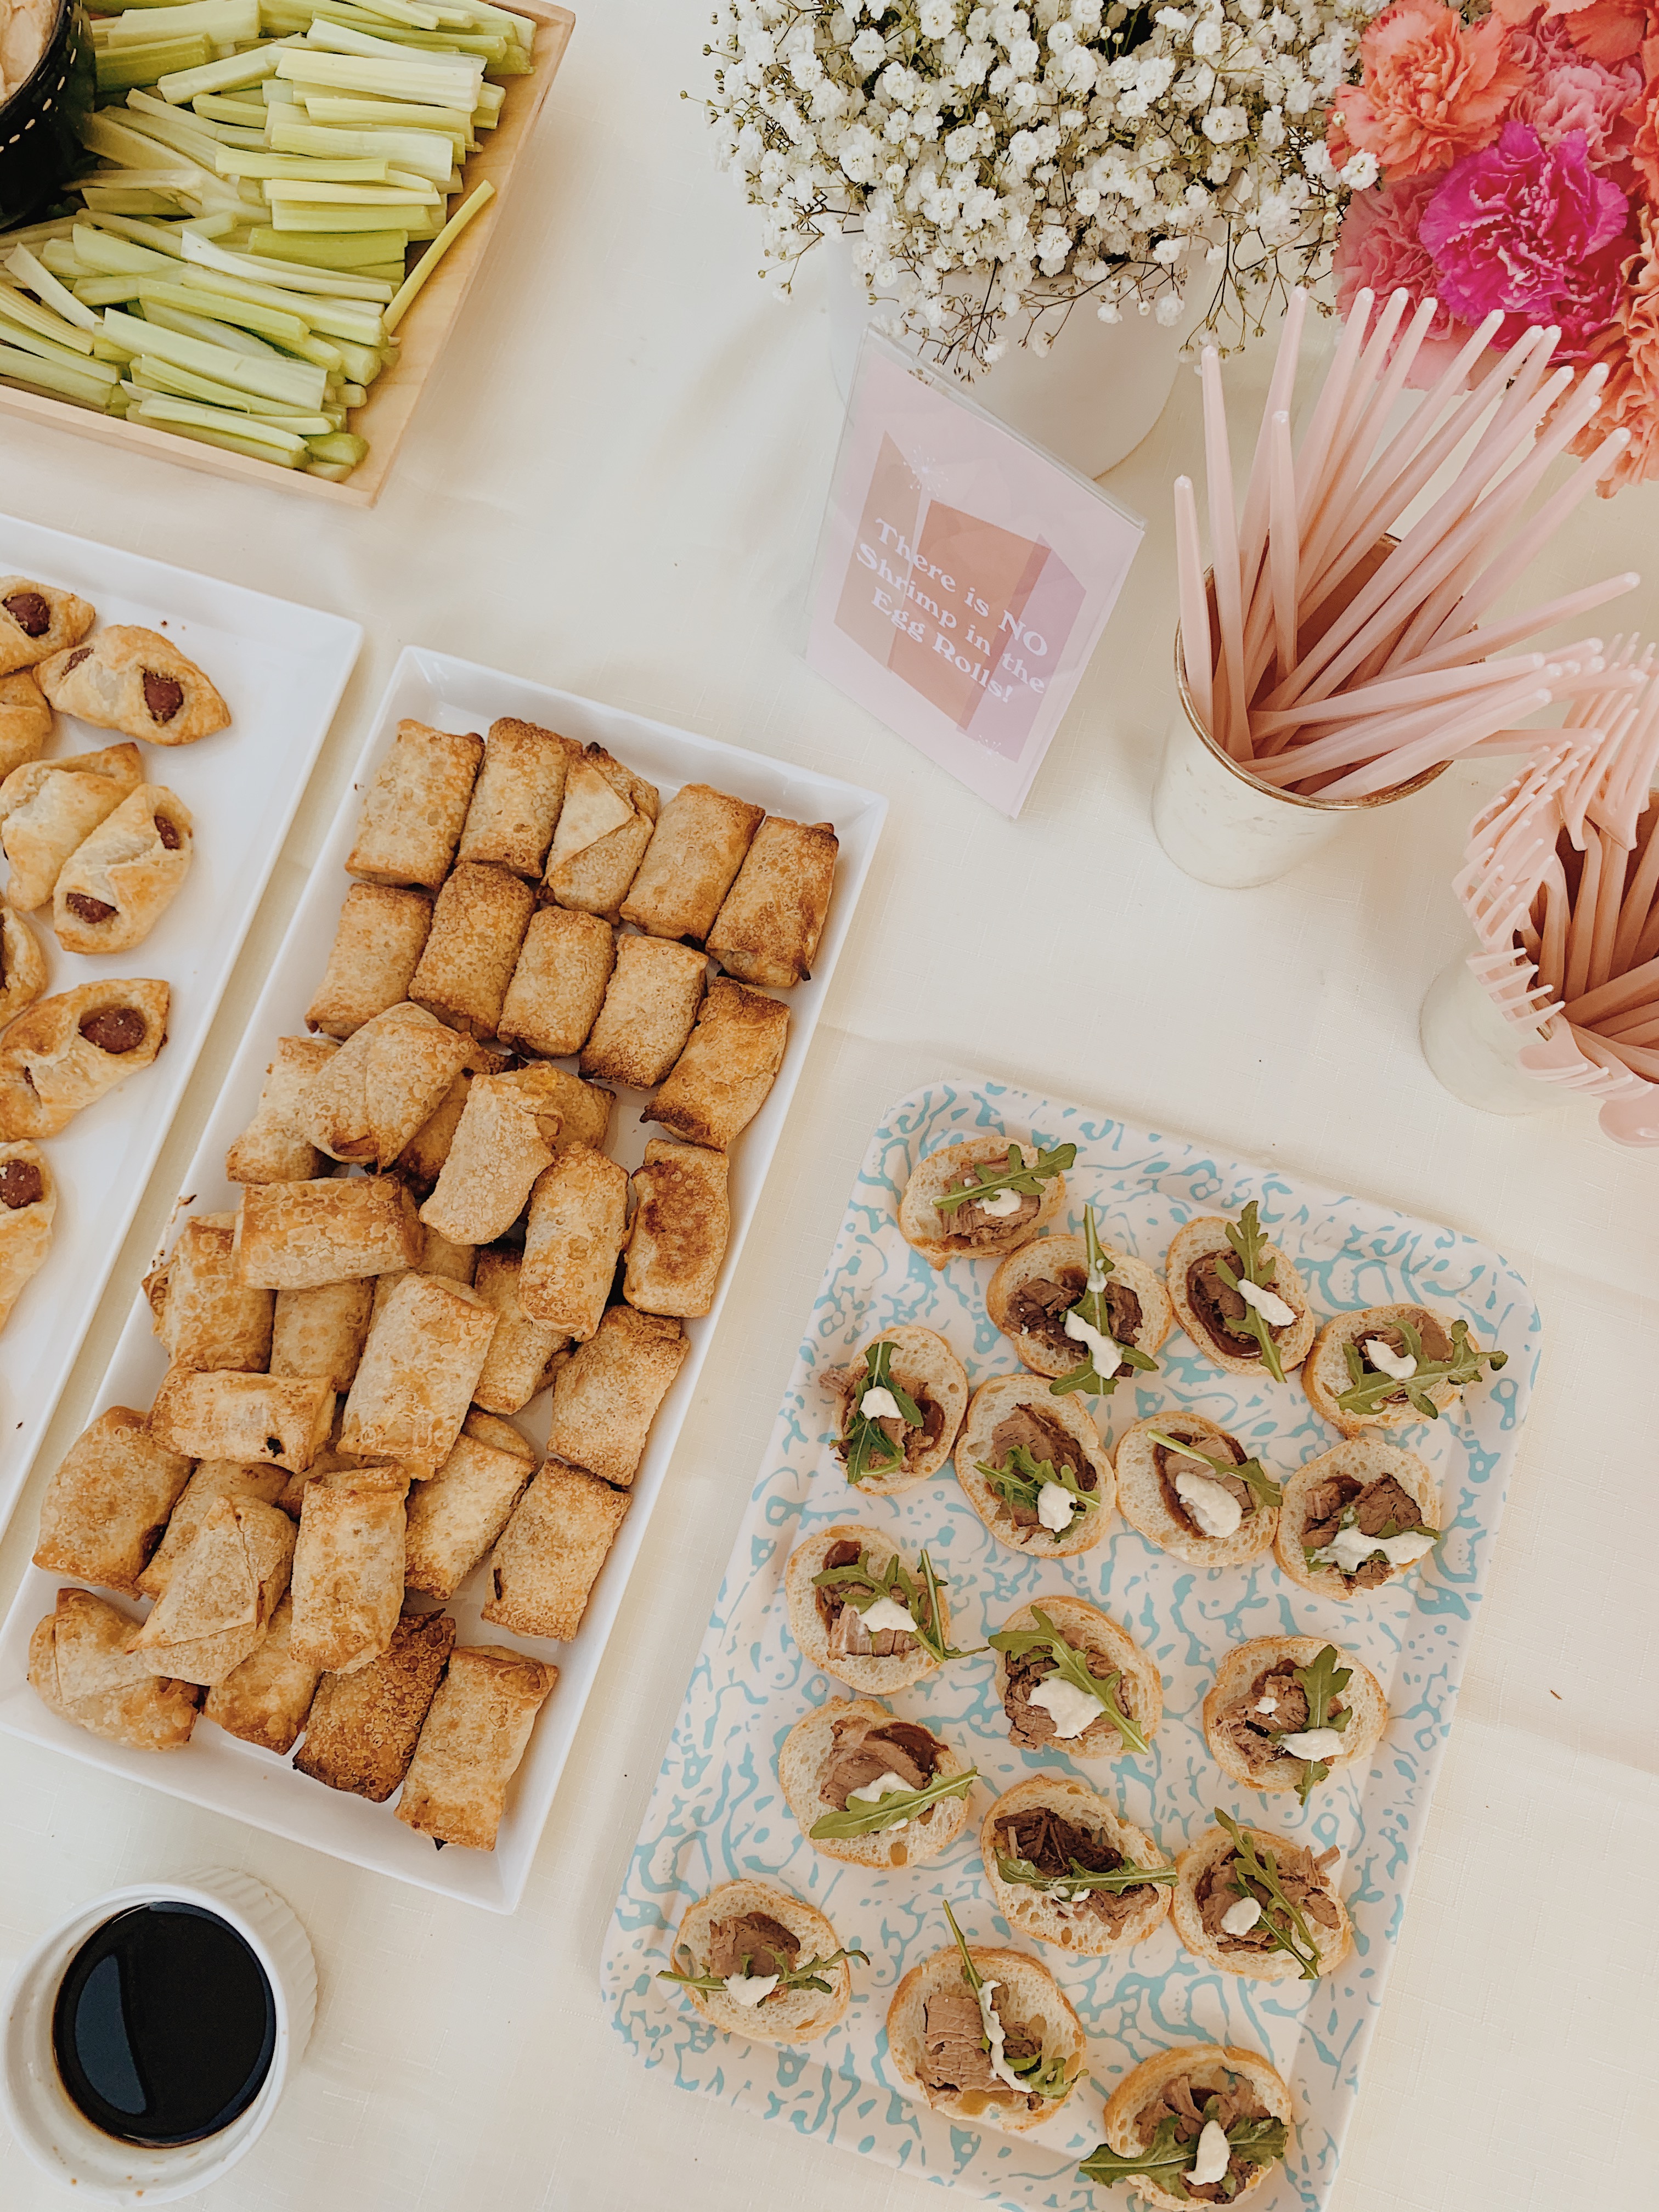
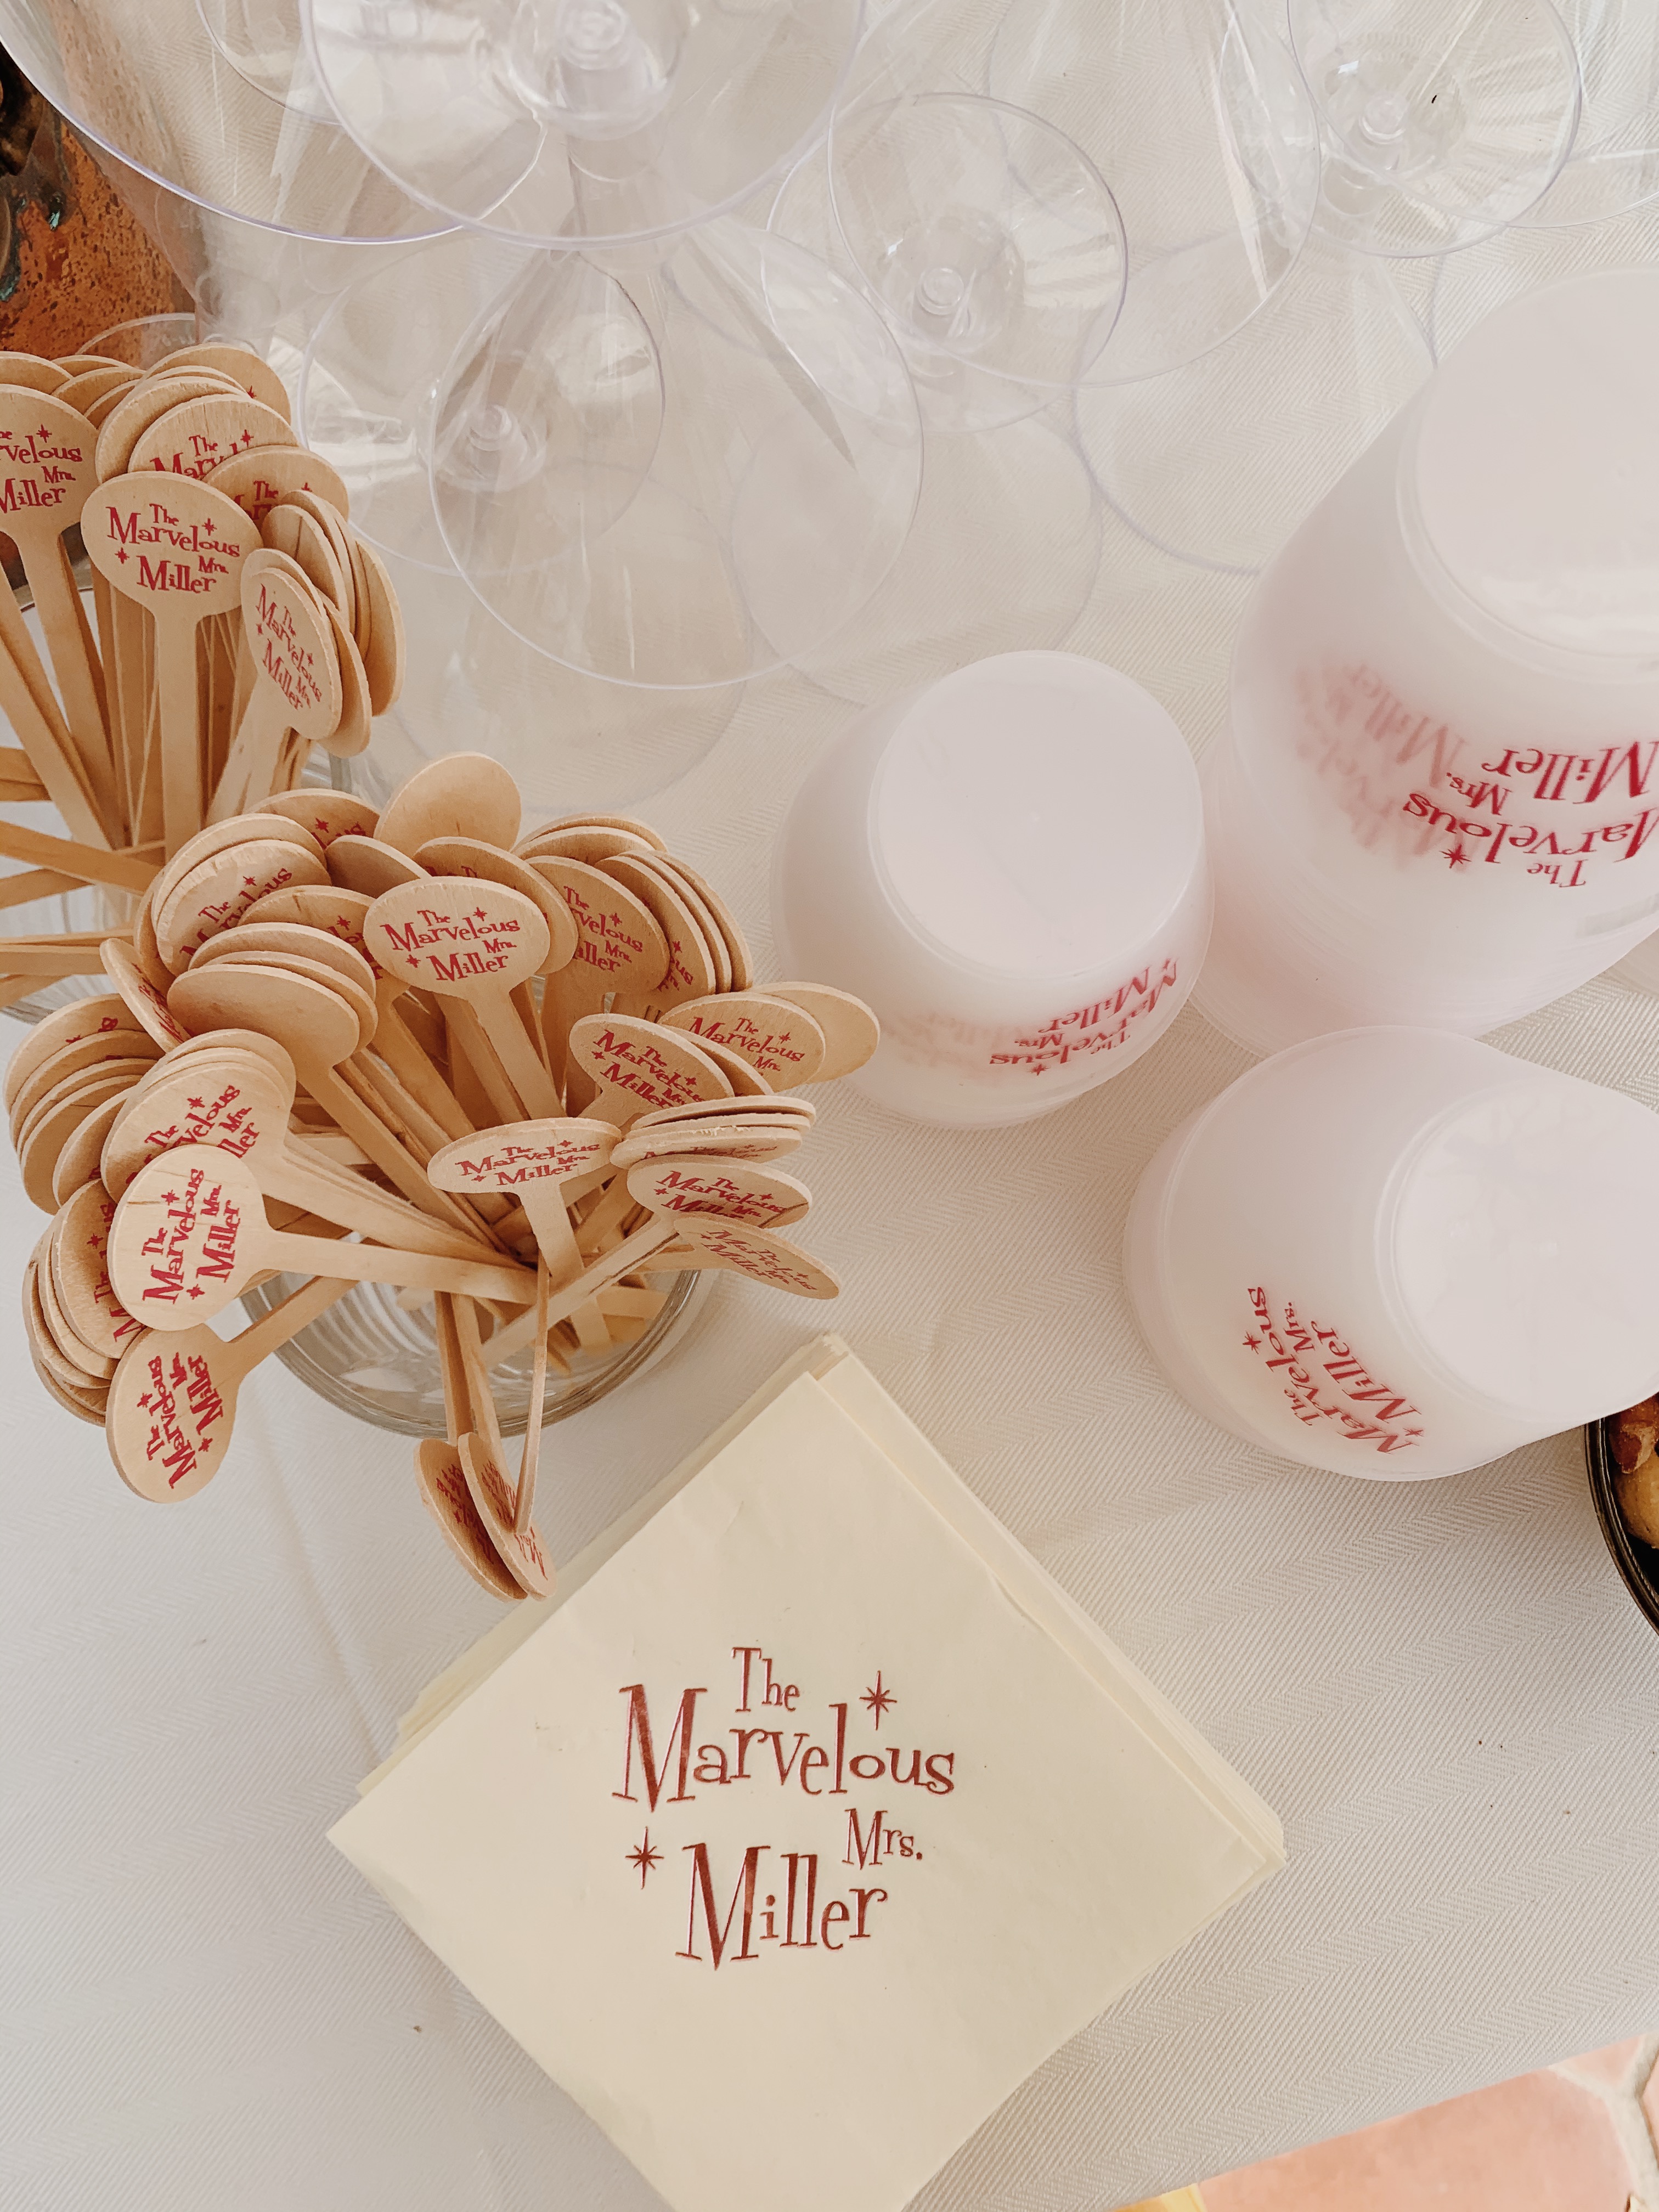
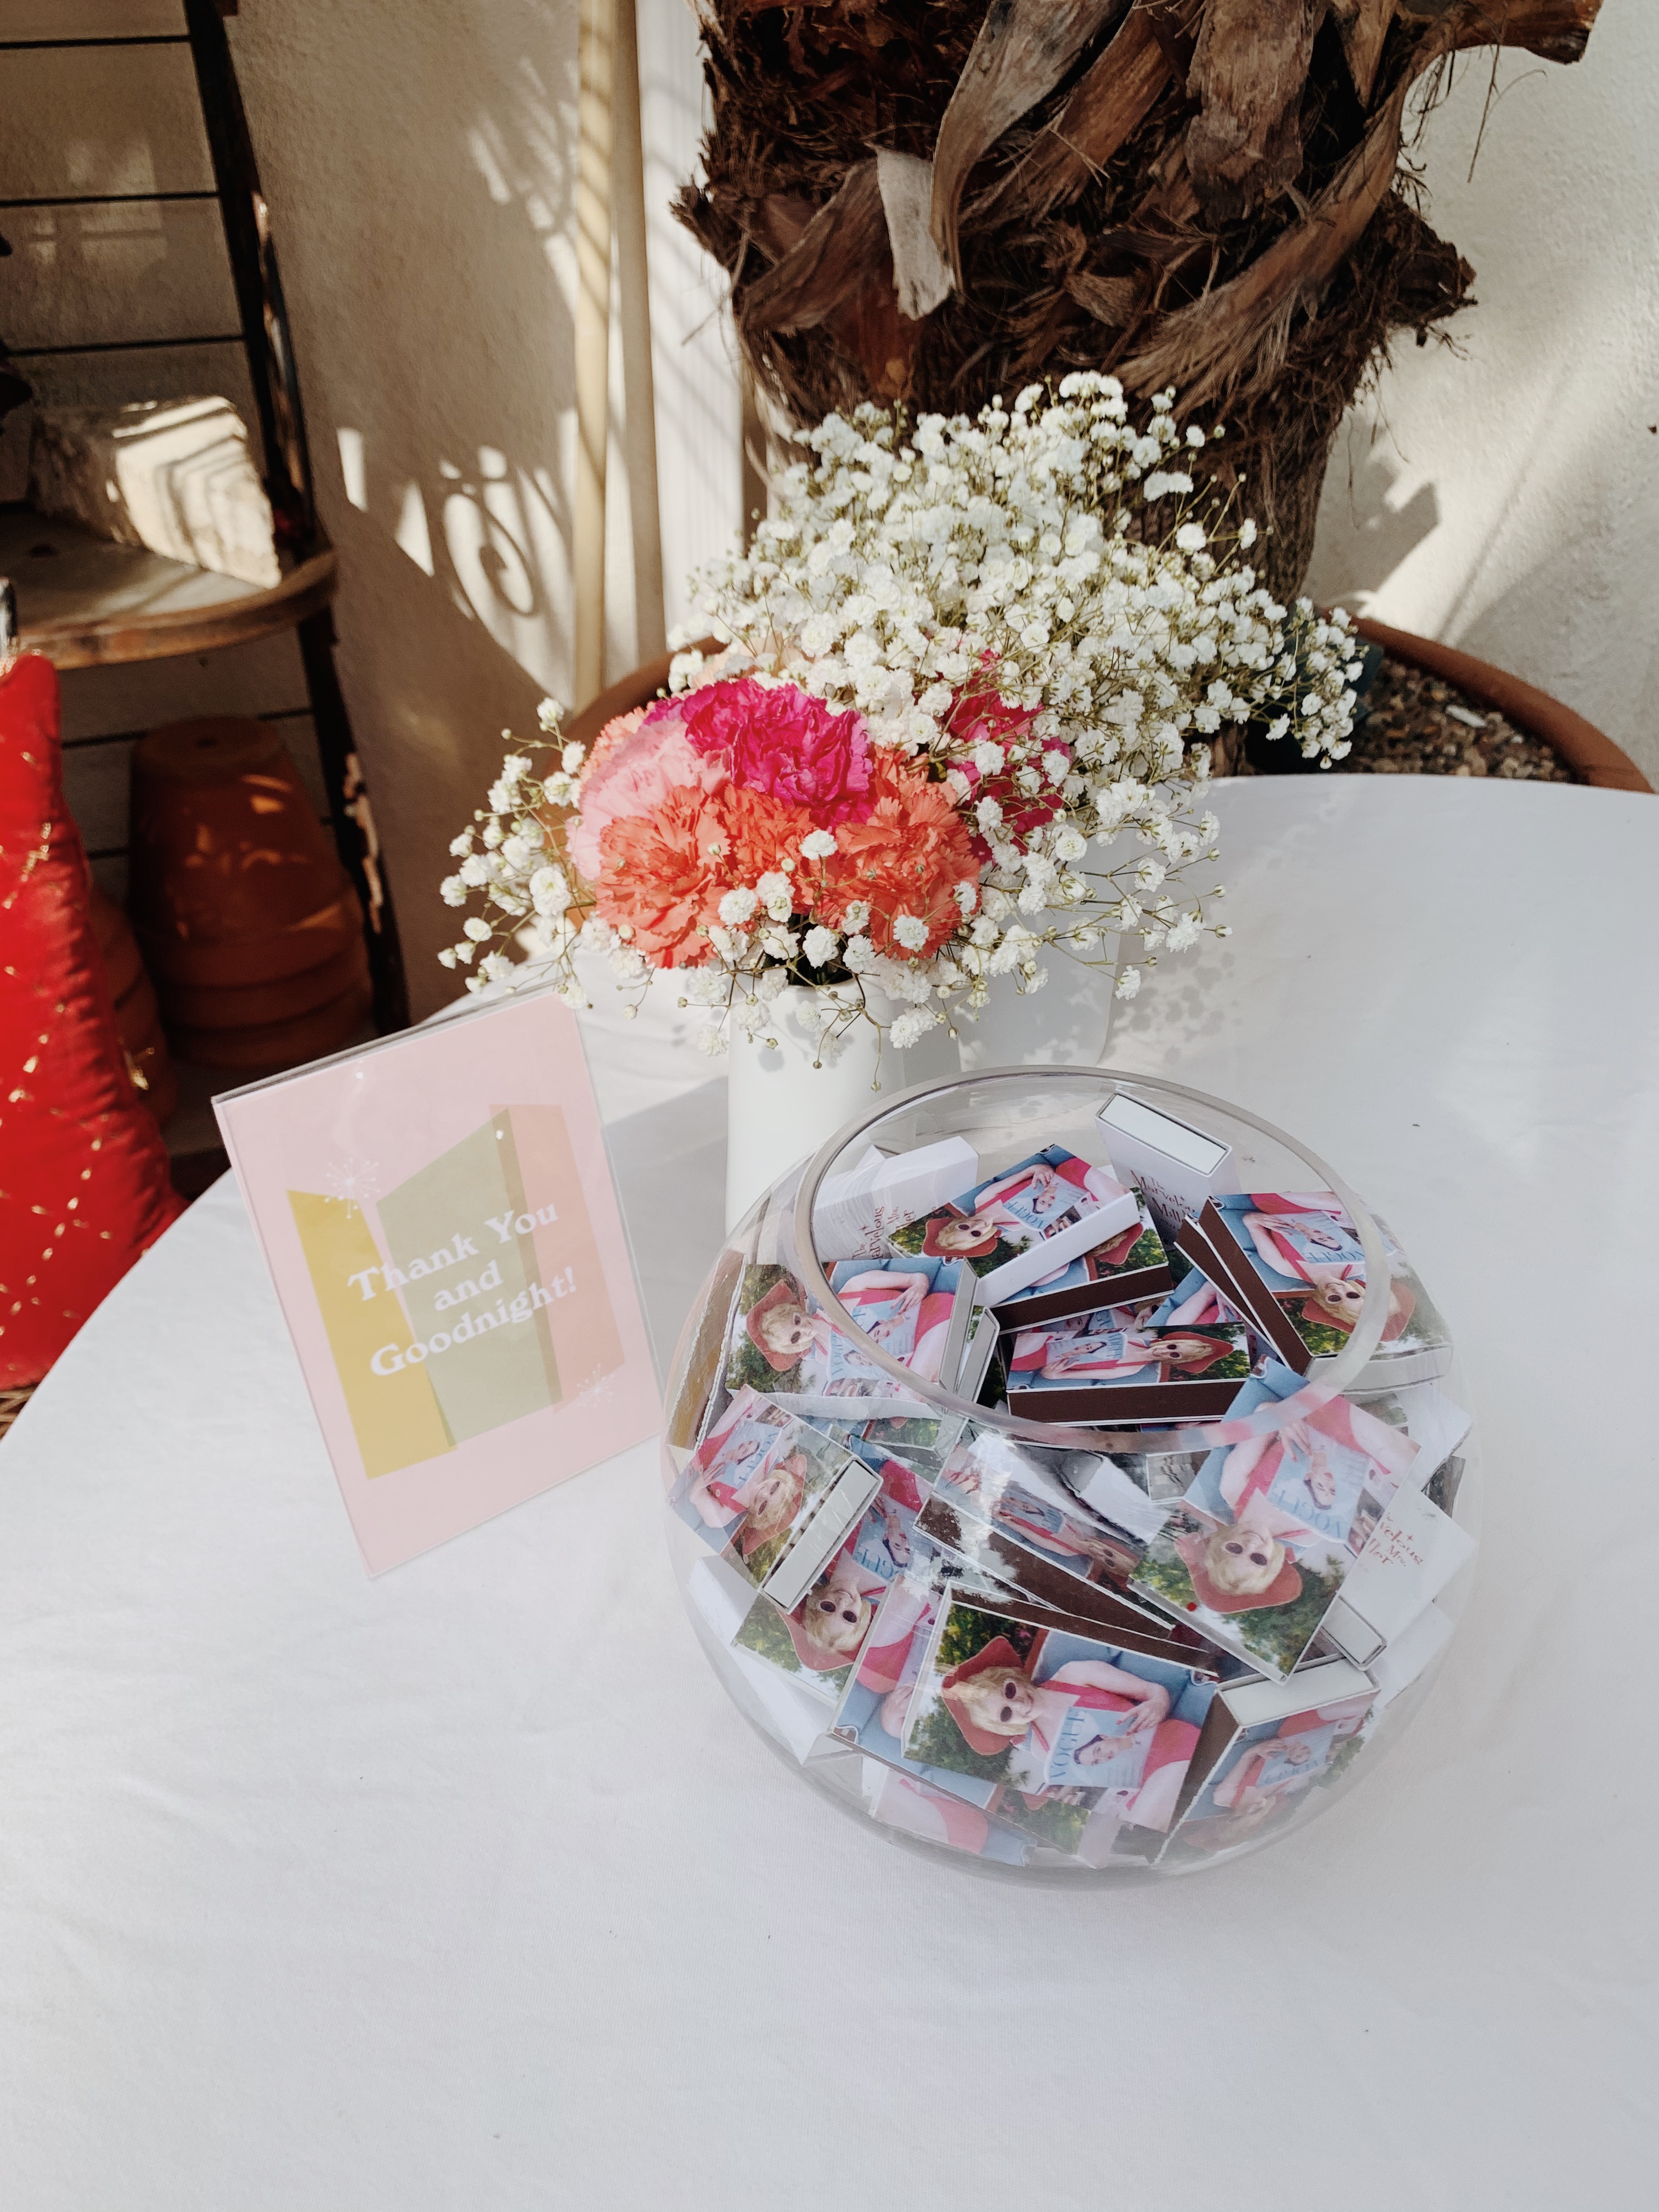
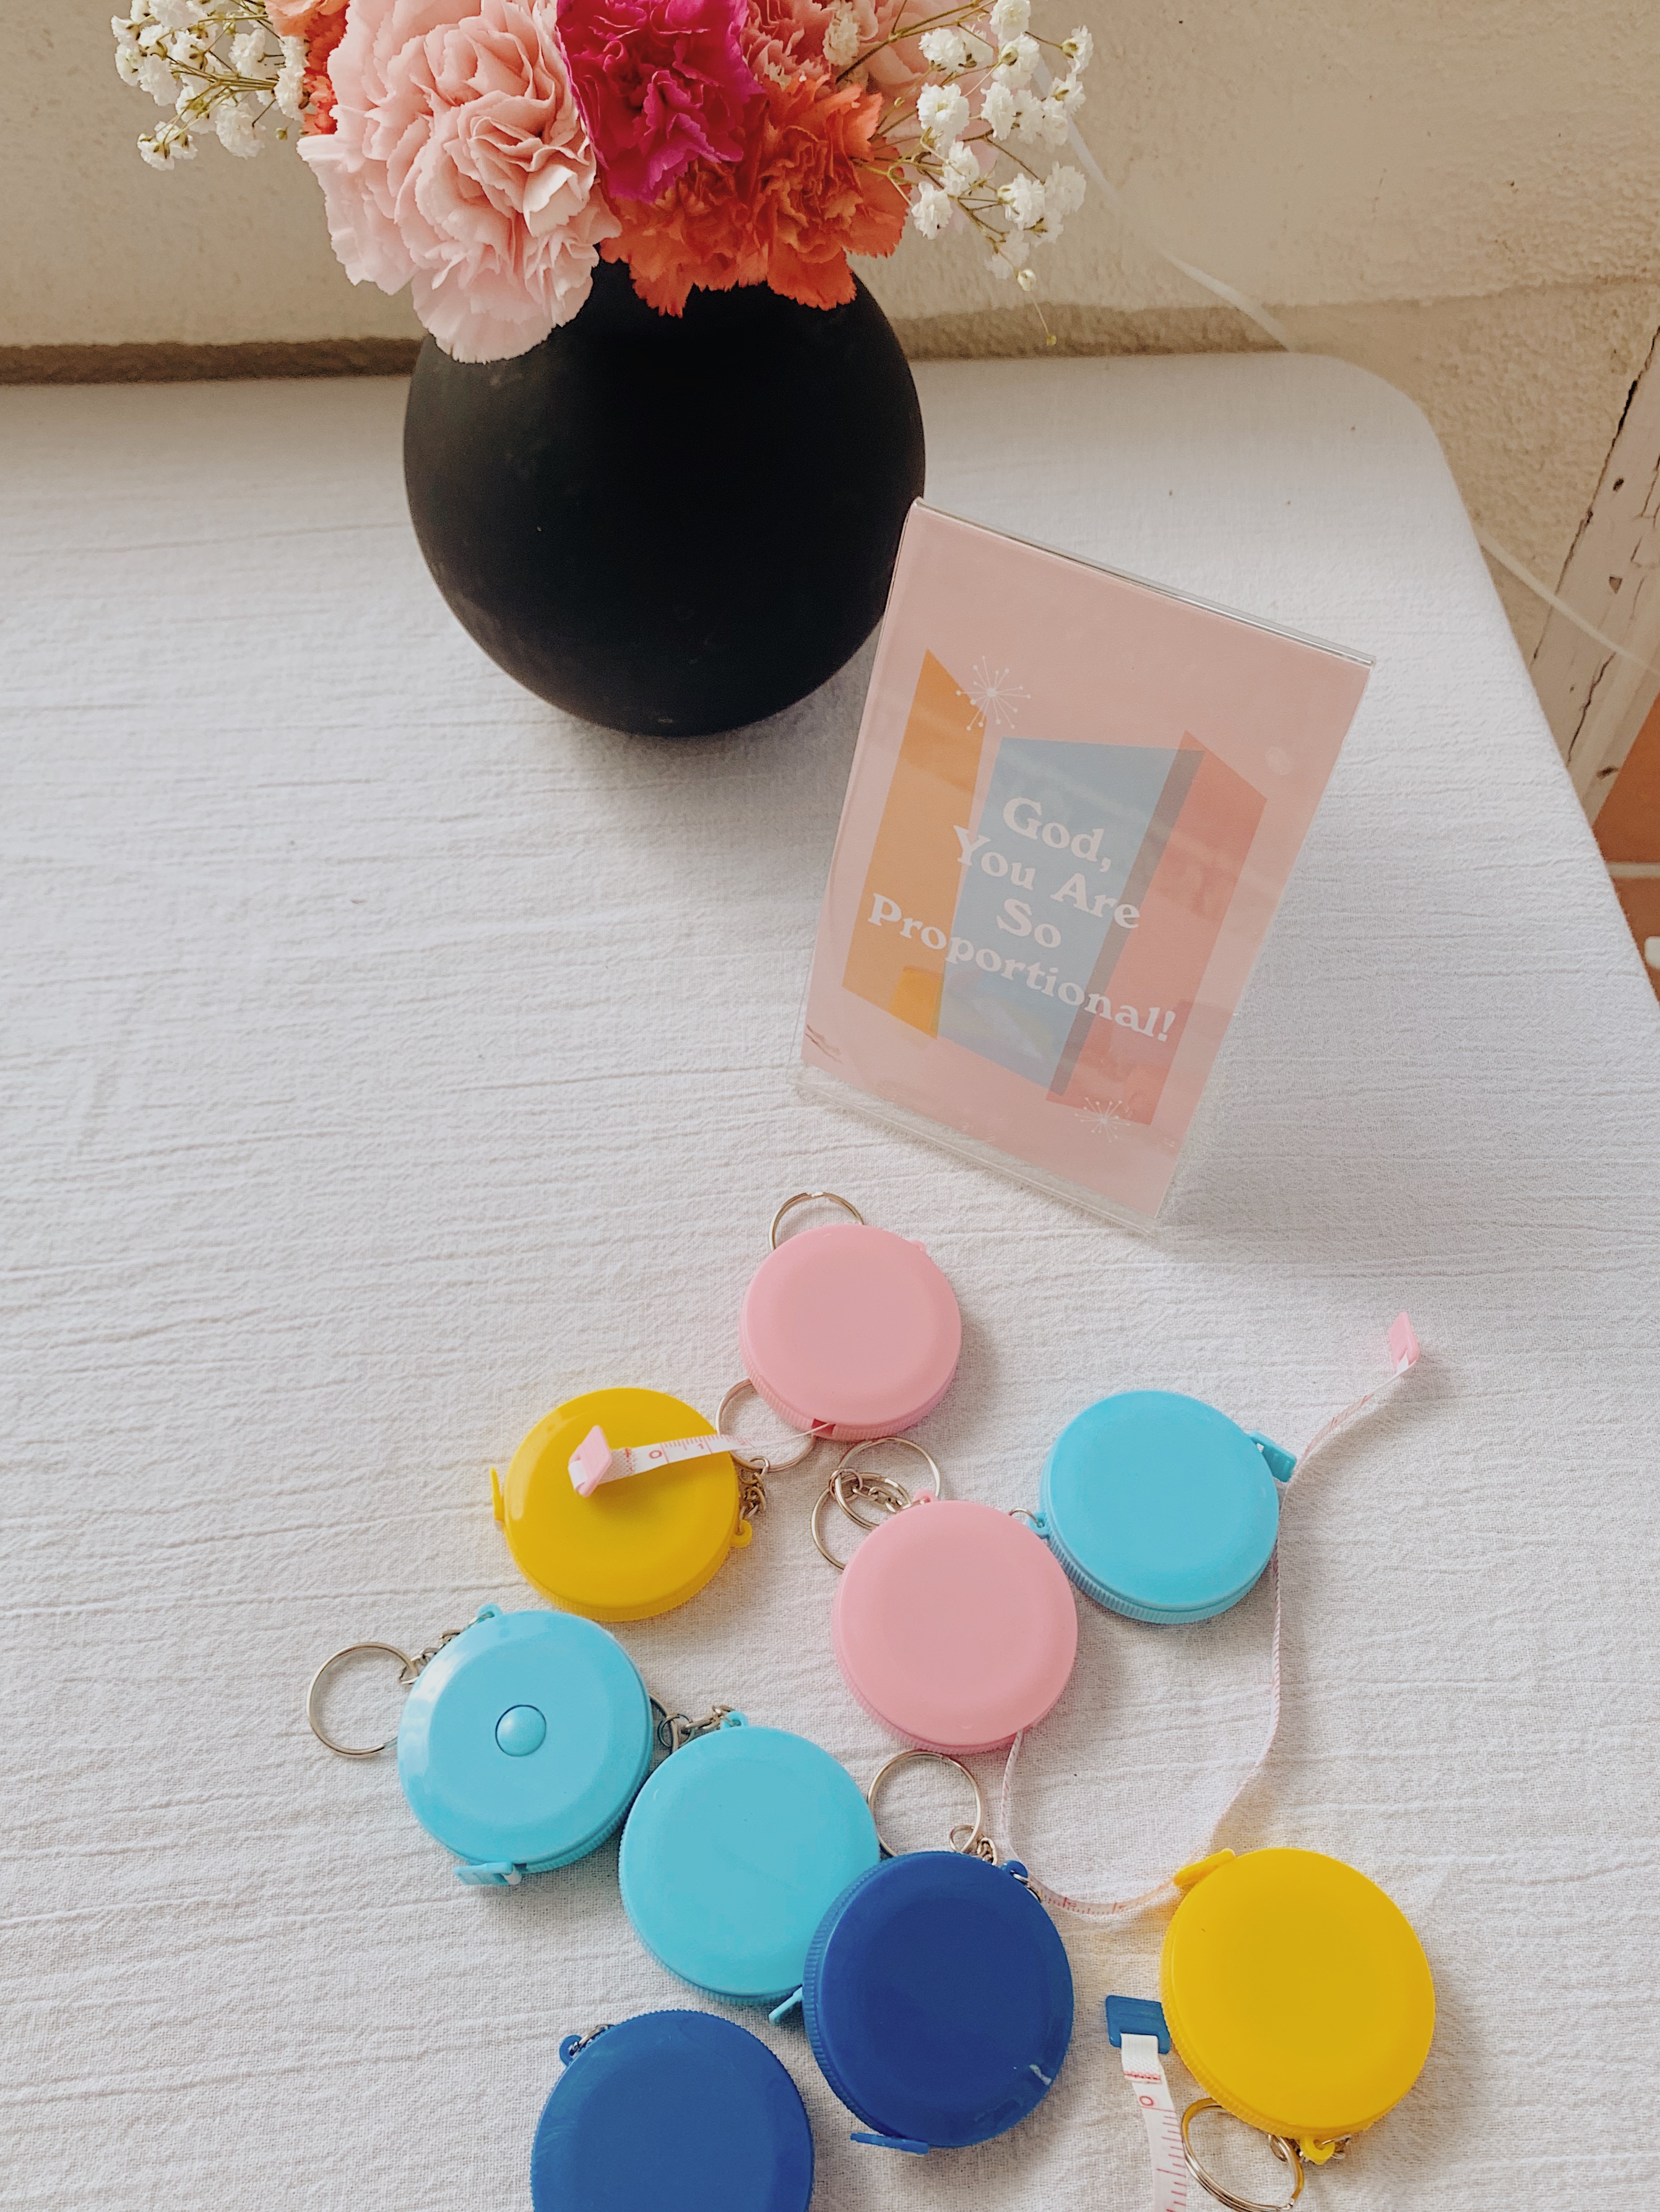
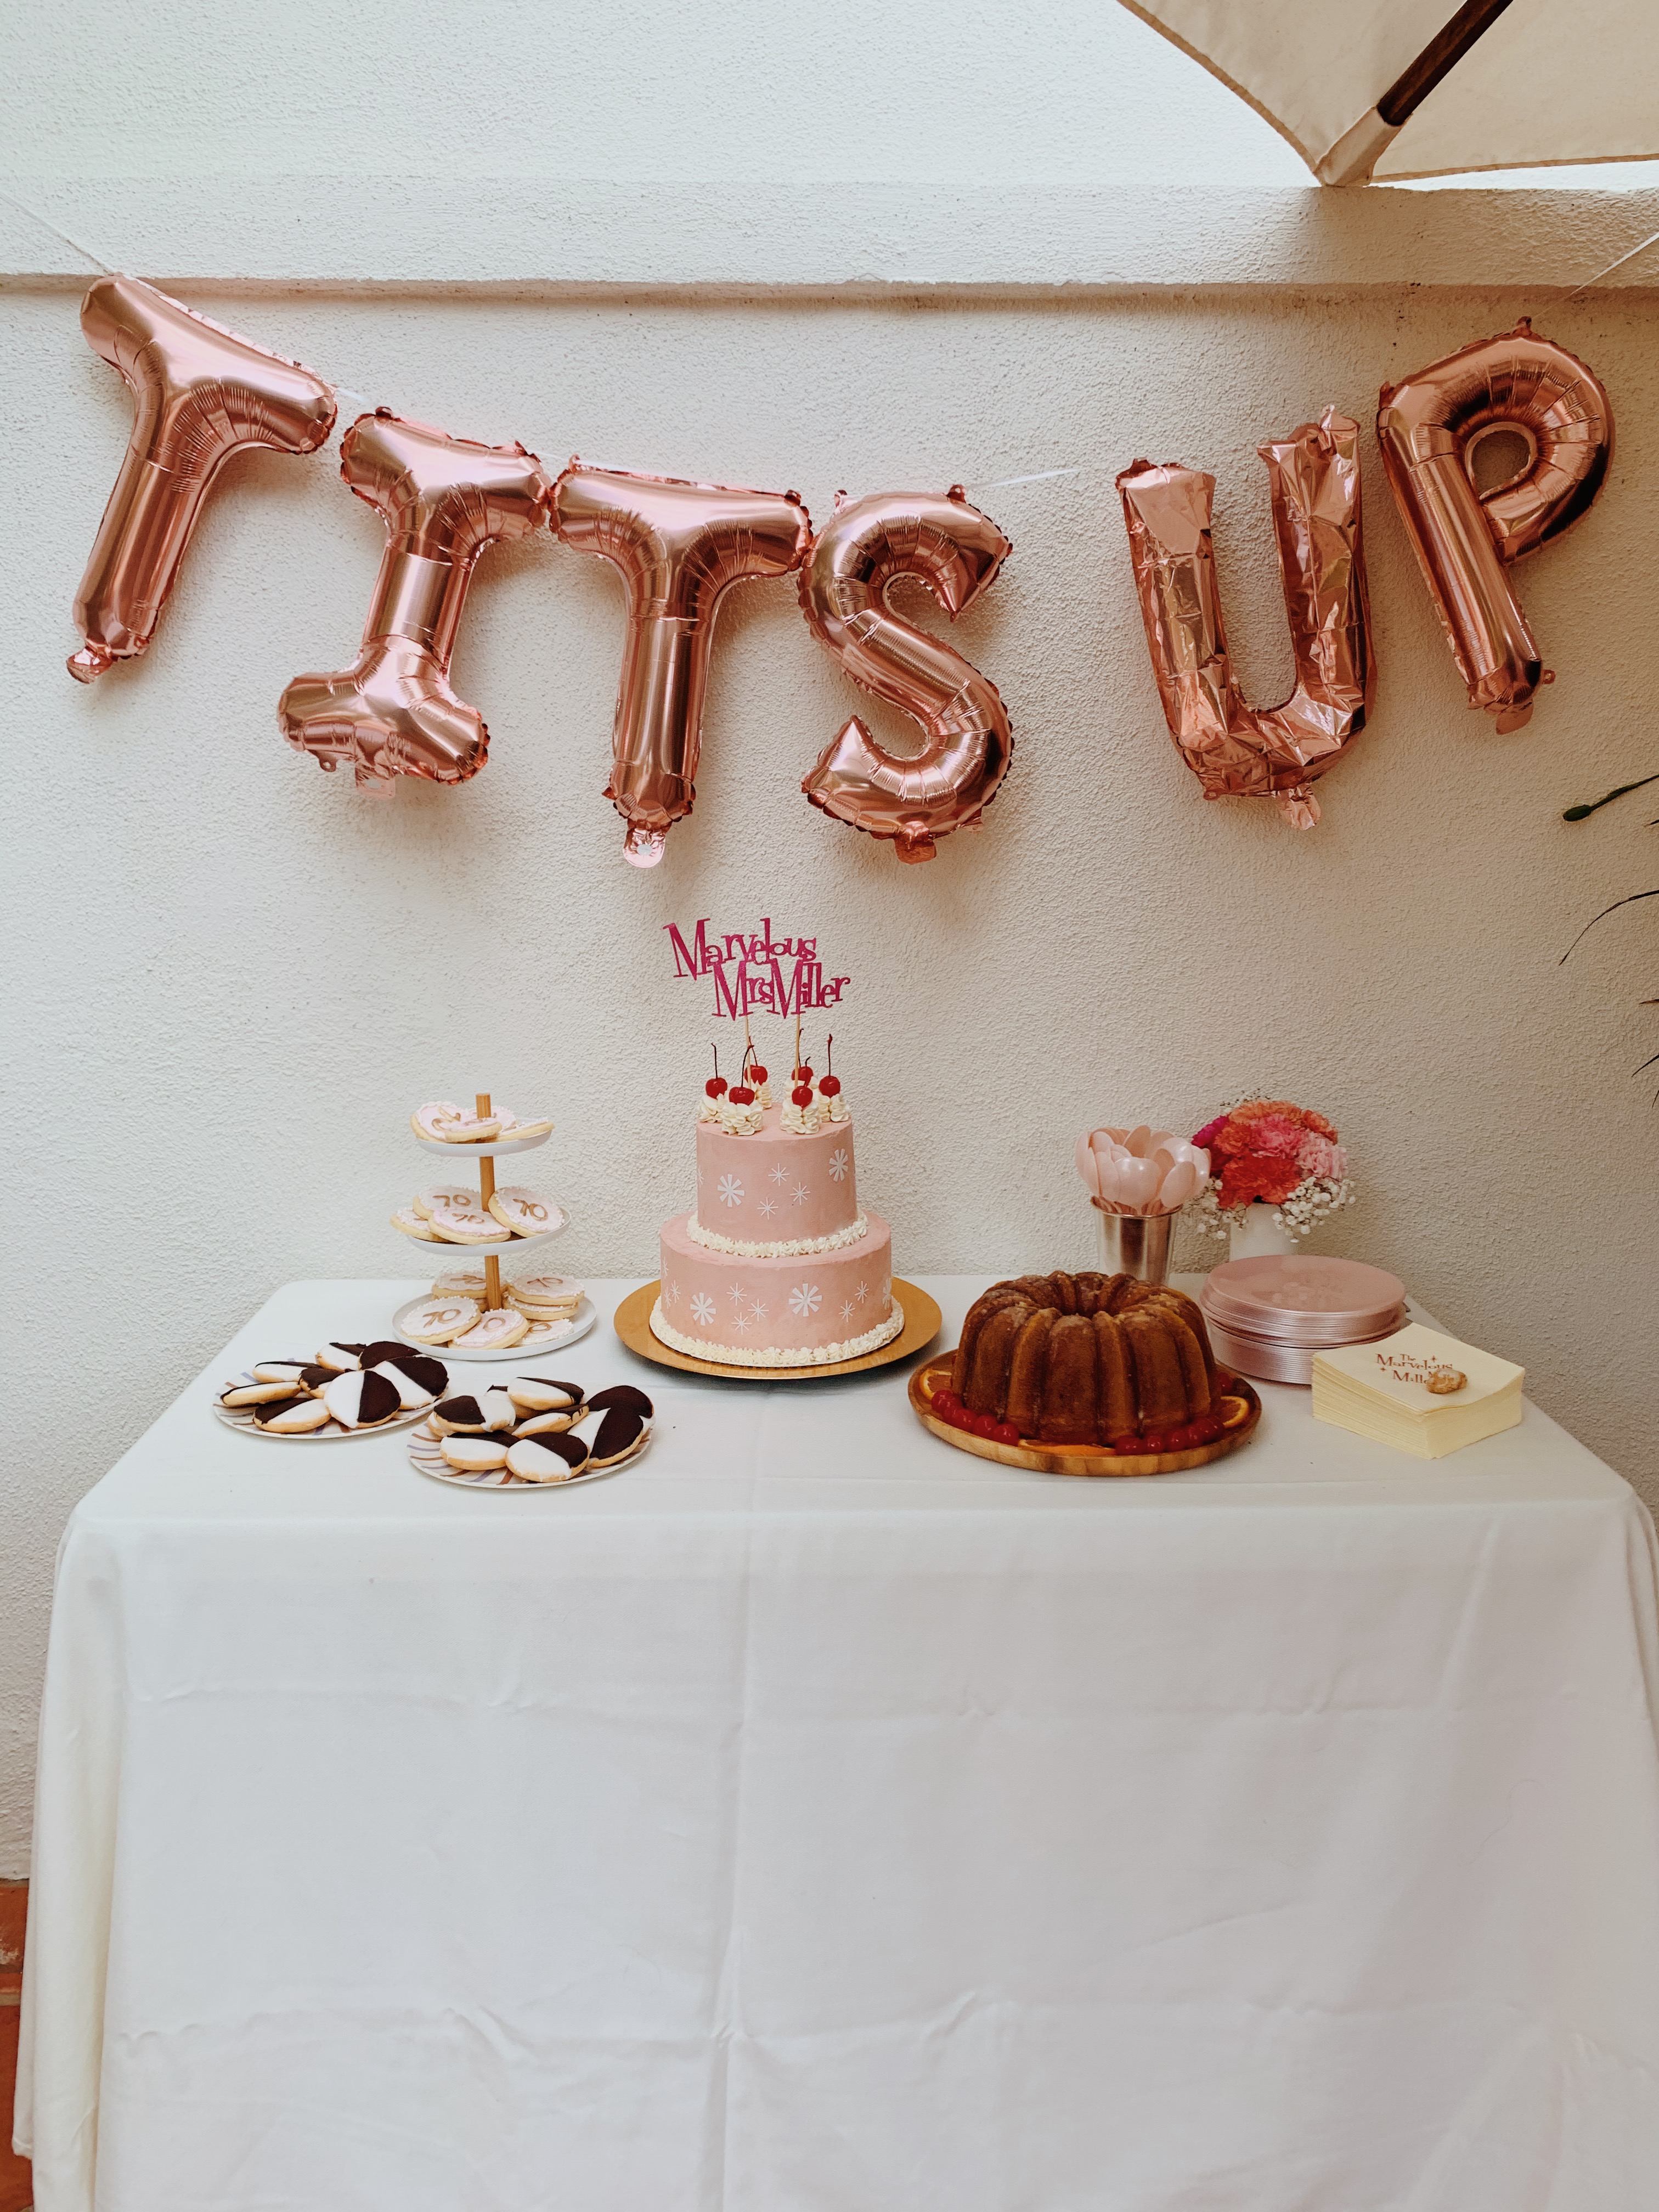
for easy favors, i had matchboxes made from for your party and made a little sign that said “thank you and goodnight”. for another little special touch, i found the cutest measuring tapes and spread them around with another sign that said “god you are so proportional”.
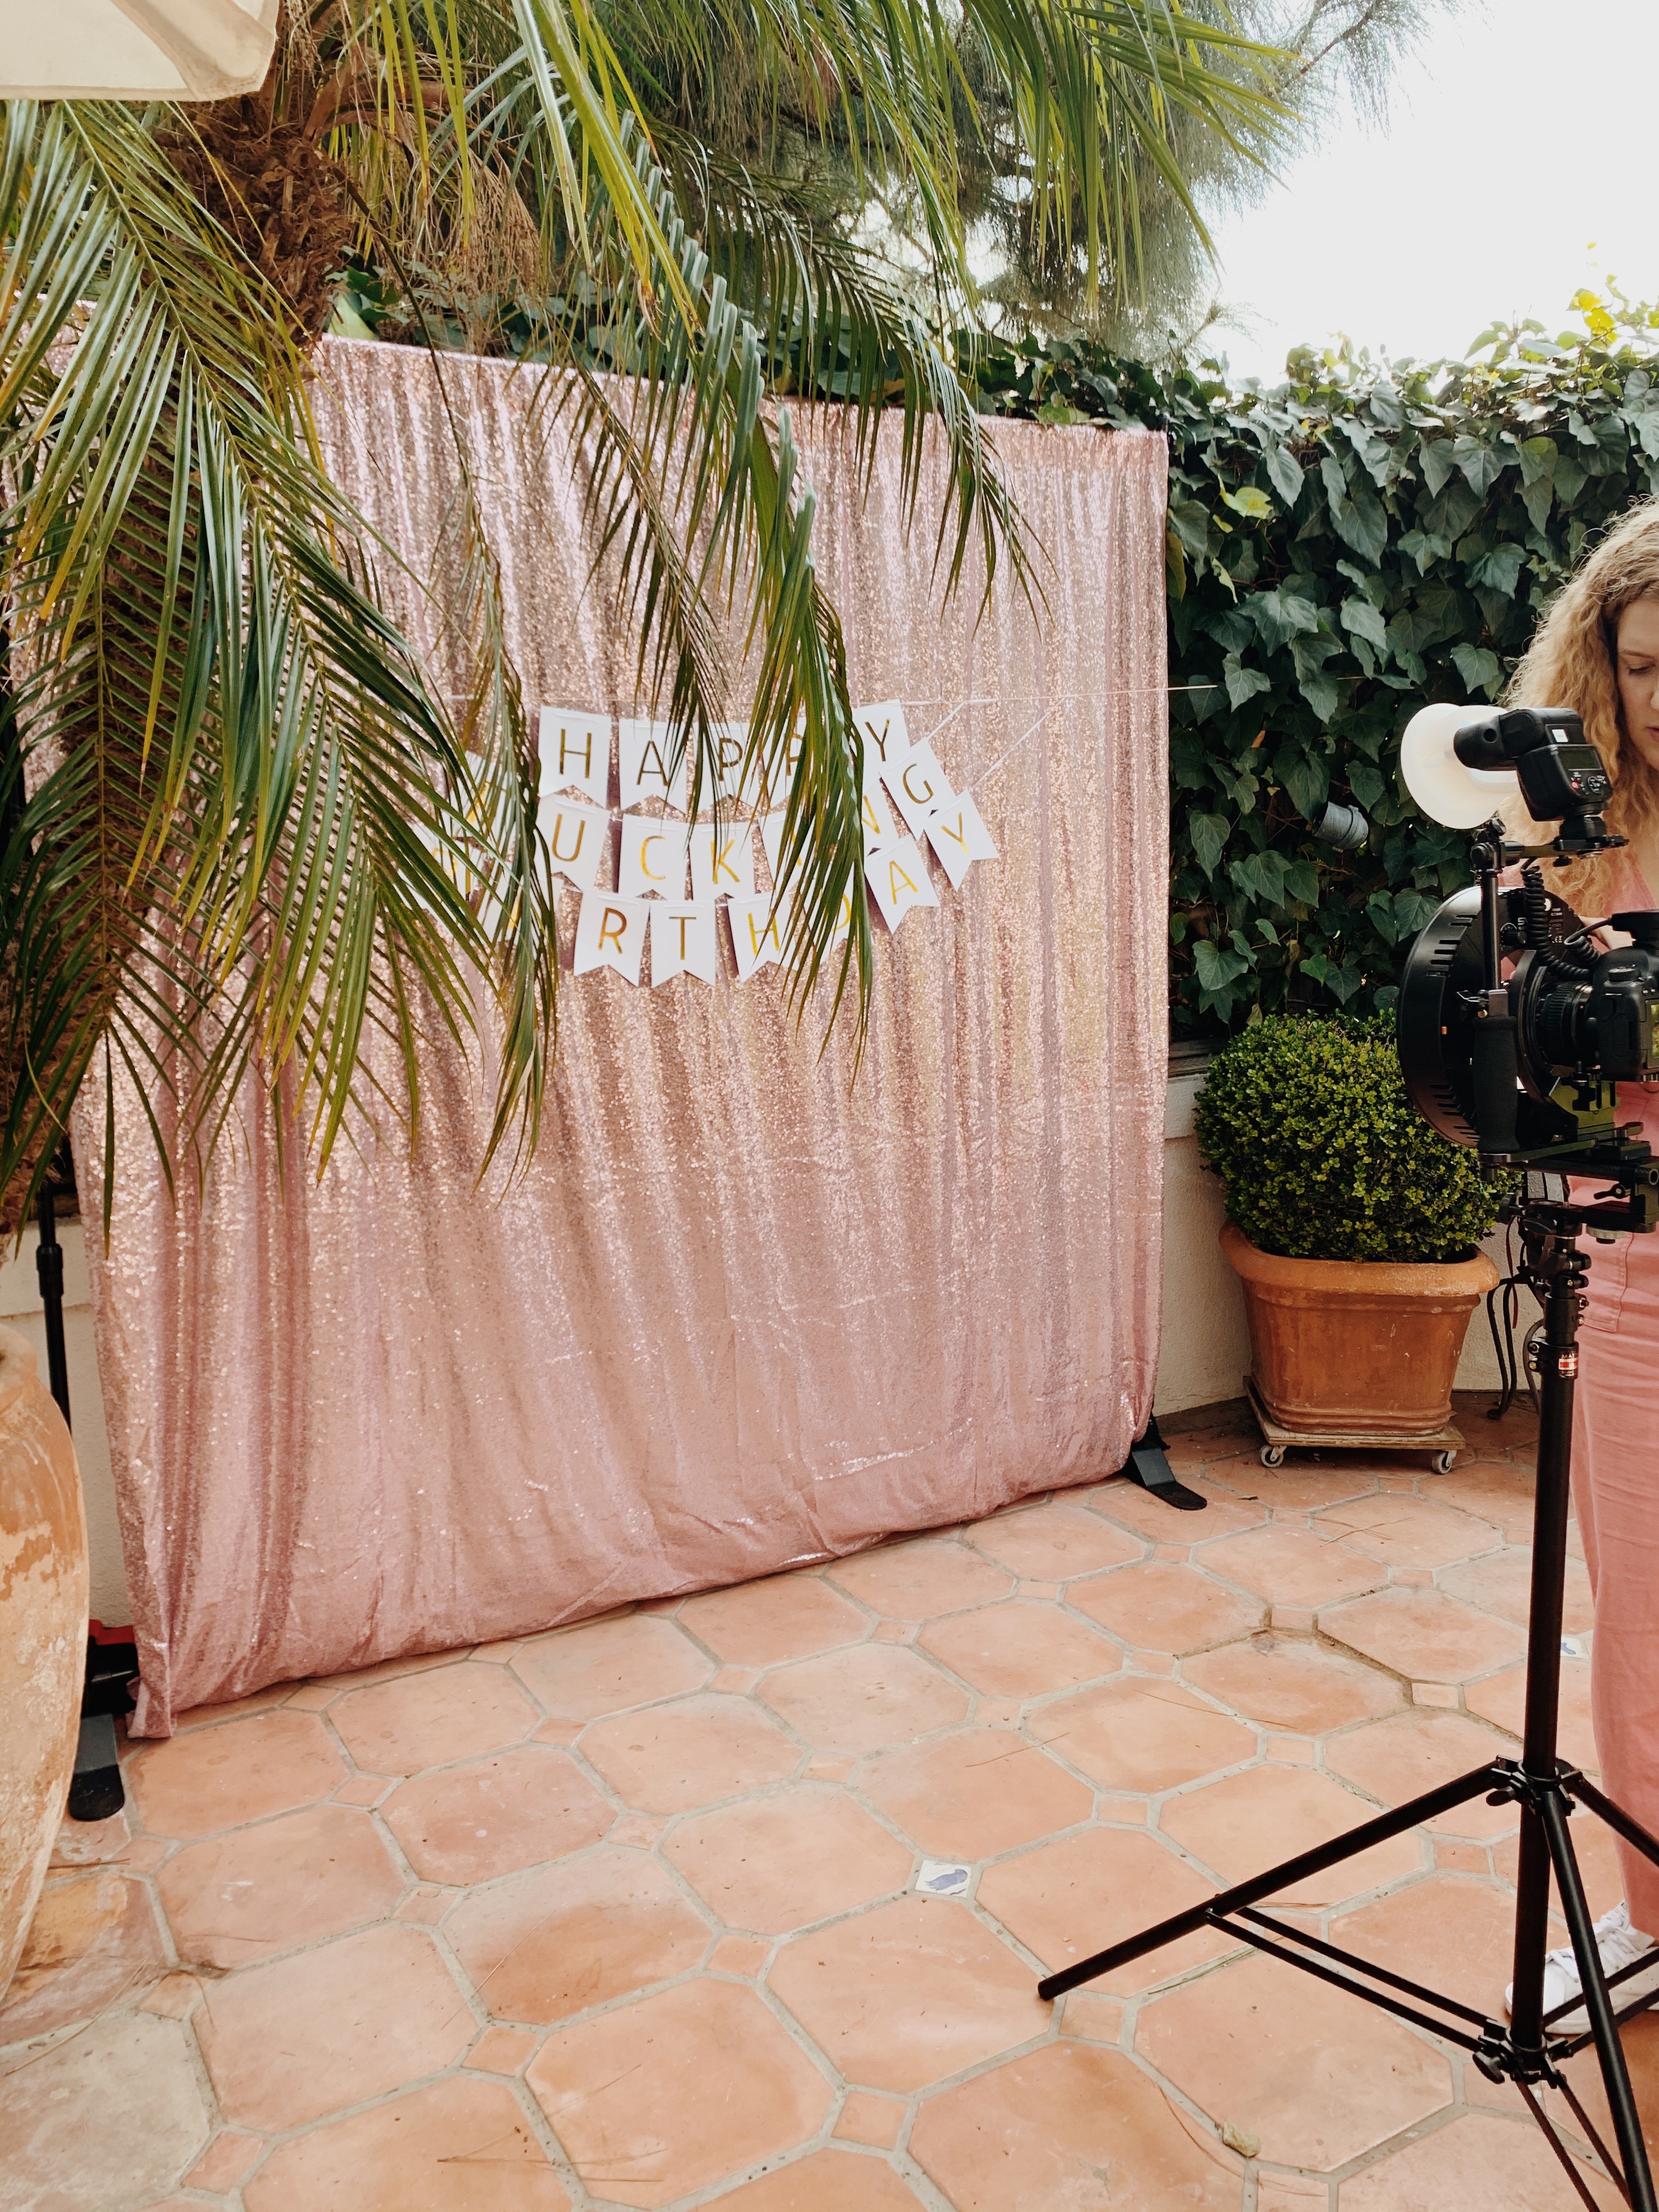
we hired i like lucy for the open air photo booth, and i am so glad we did! it was a last minute addition that everyone loved so much. i got a pack of red cat eye glasses to use as props and based on how many people were wearing them in the photos, they were def a hit.


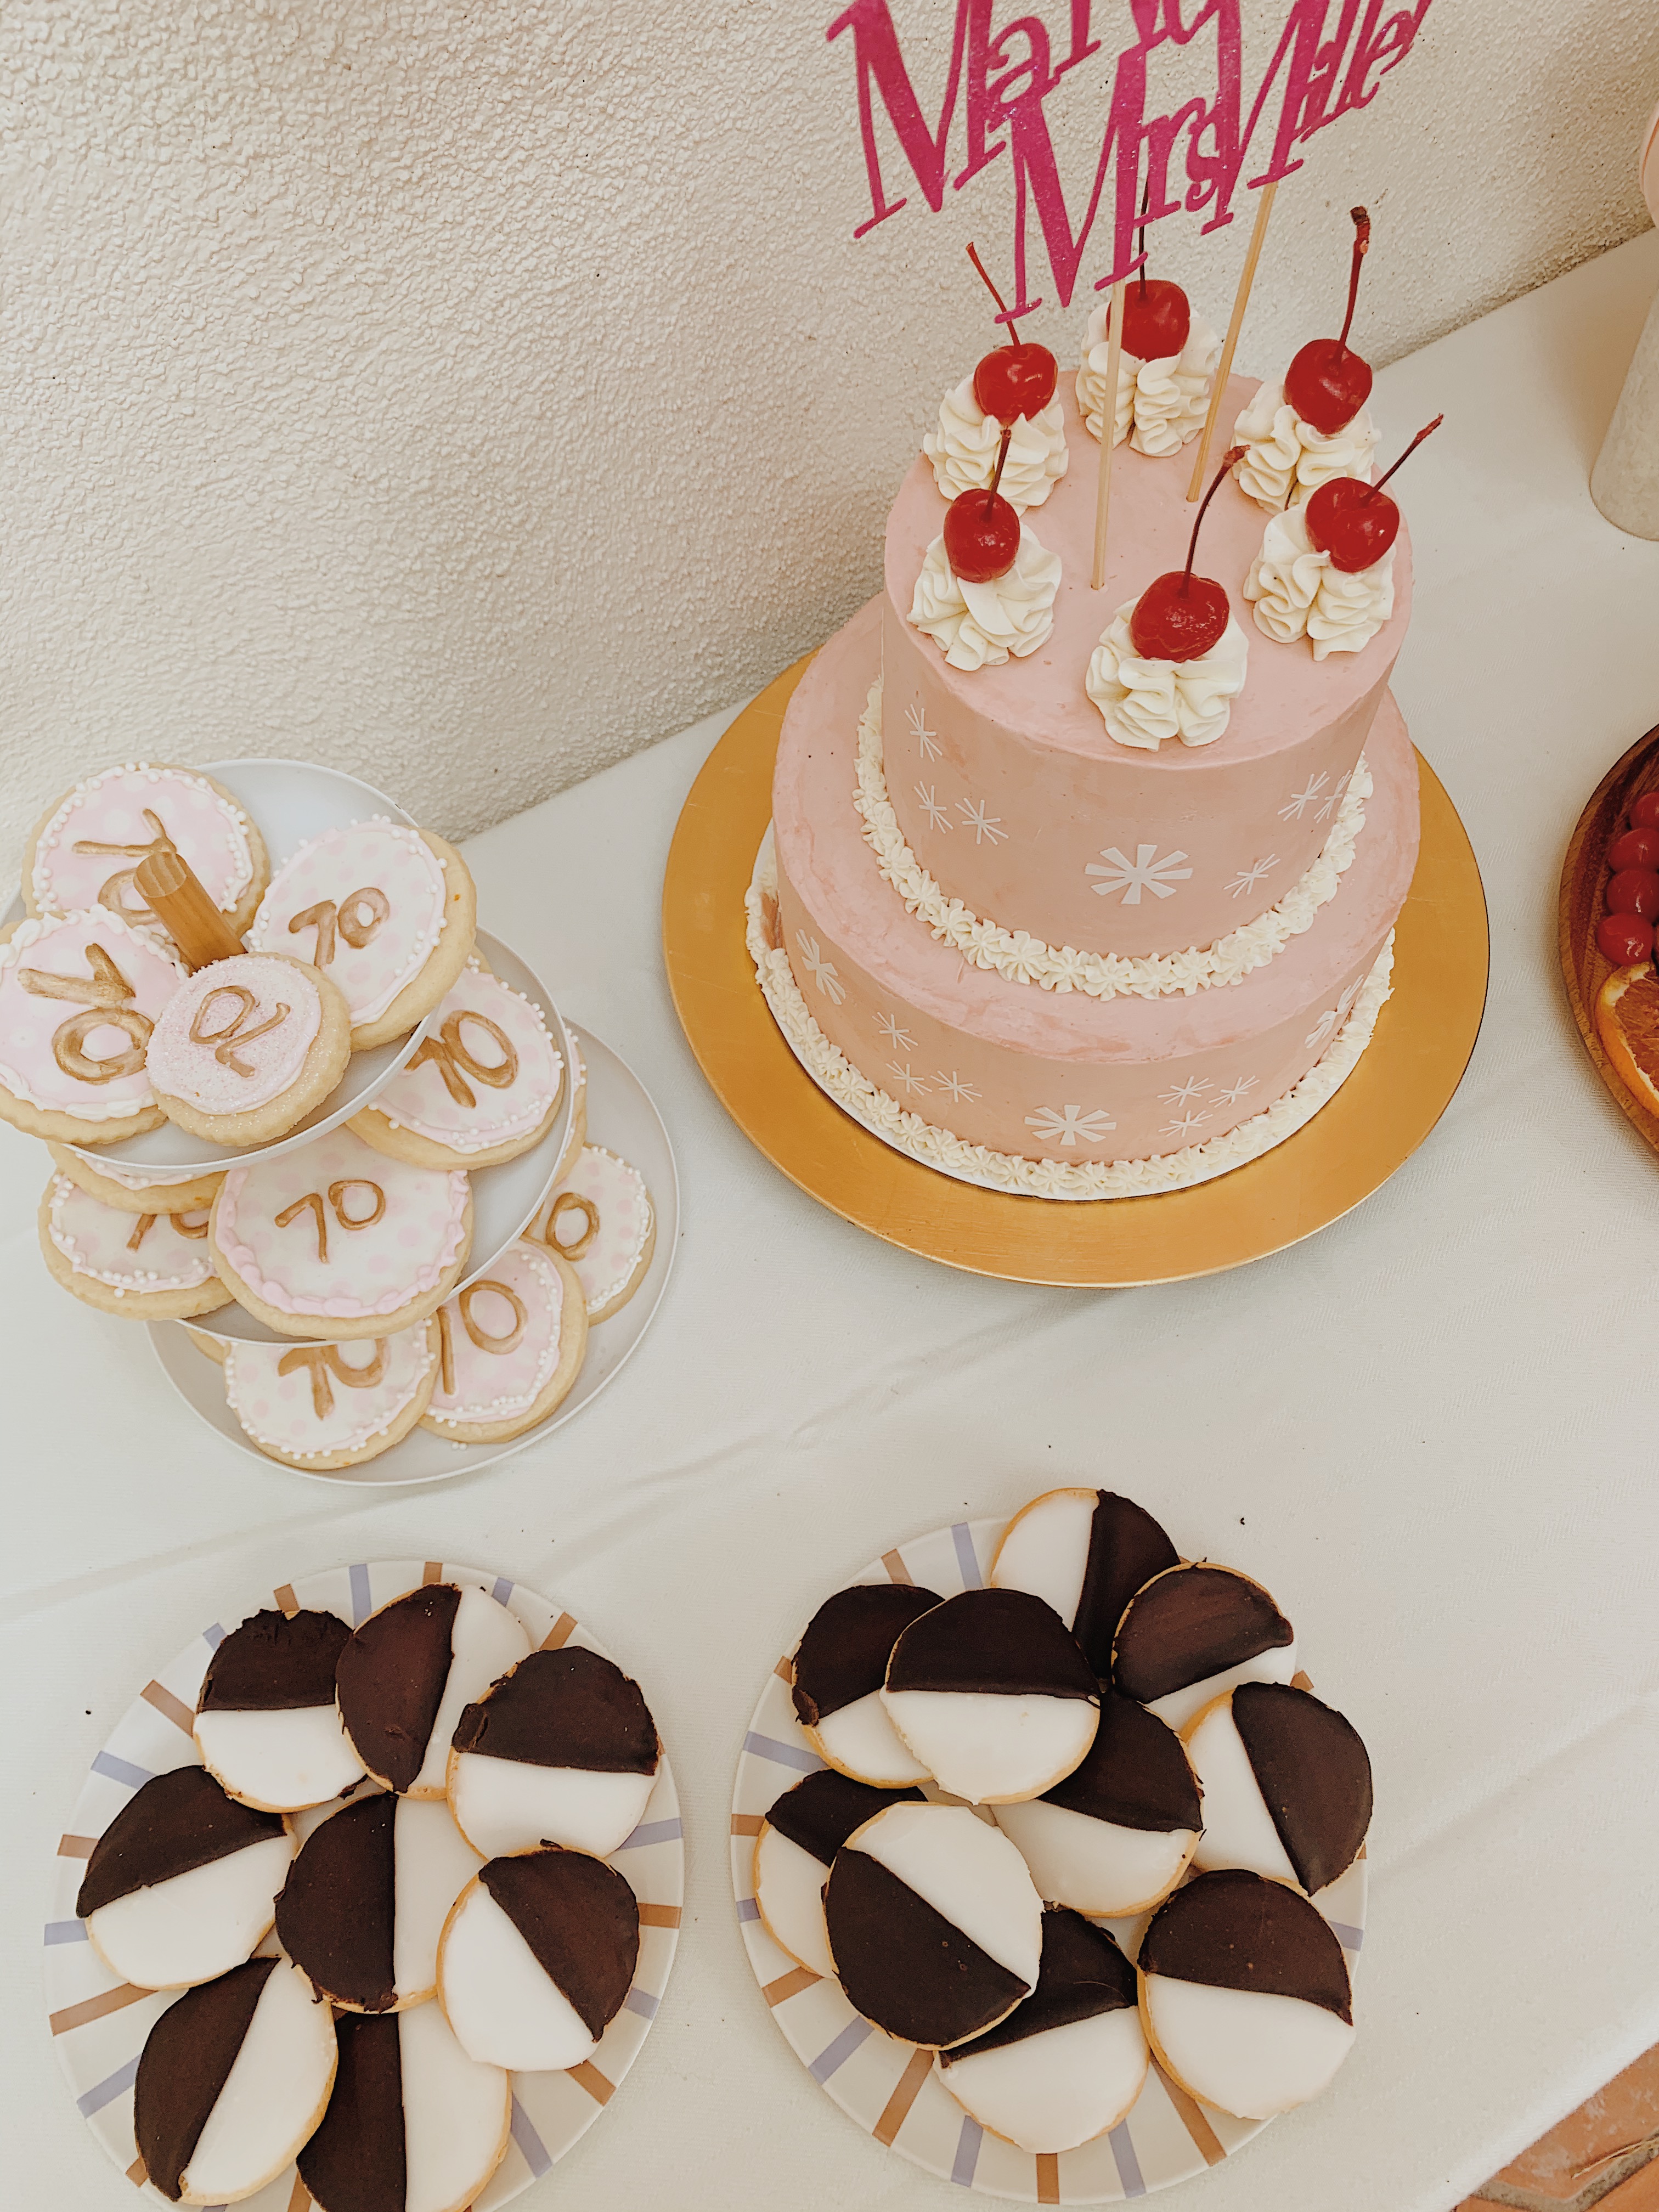
my piece de resistance was (and always is) the dessert table — the show stopping cake was by ashley adams. soo excited about how it turned out. we made the cake topper using my cricut, which i’ve never actually used before and was shocked it turned out ok! we bought TJs black and white cookies and my SIL made pink polka dot cookies with 70 on them. i made a box mix pineapple bundt cake (my first bundt cake ever) with a pineapple glaze and garnished with cherries. (heres a link to the glaze recipe)
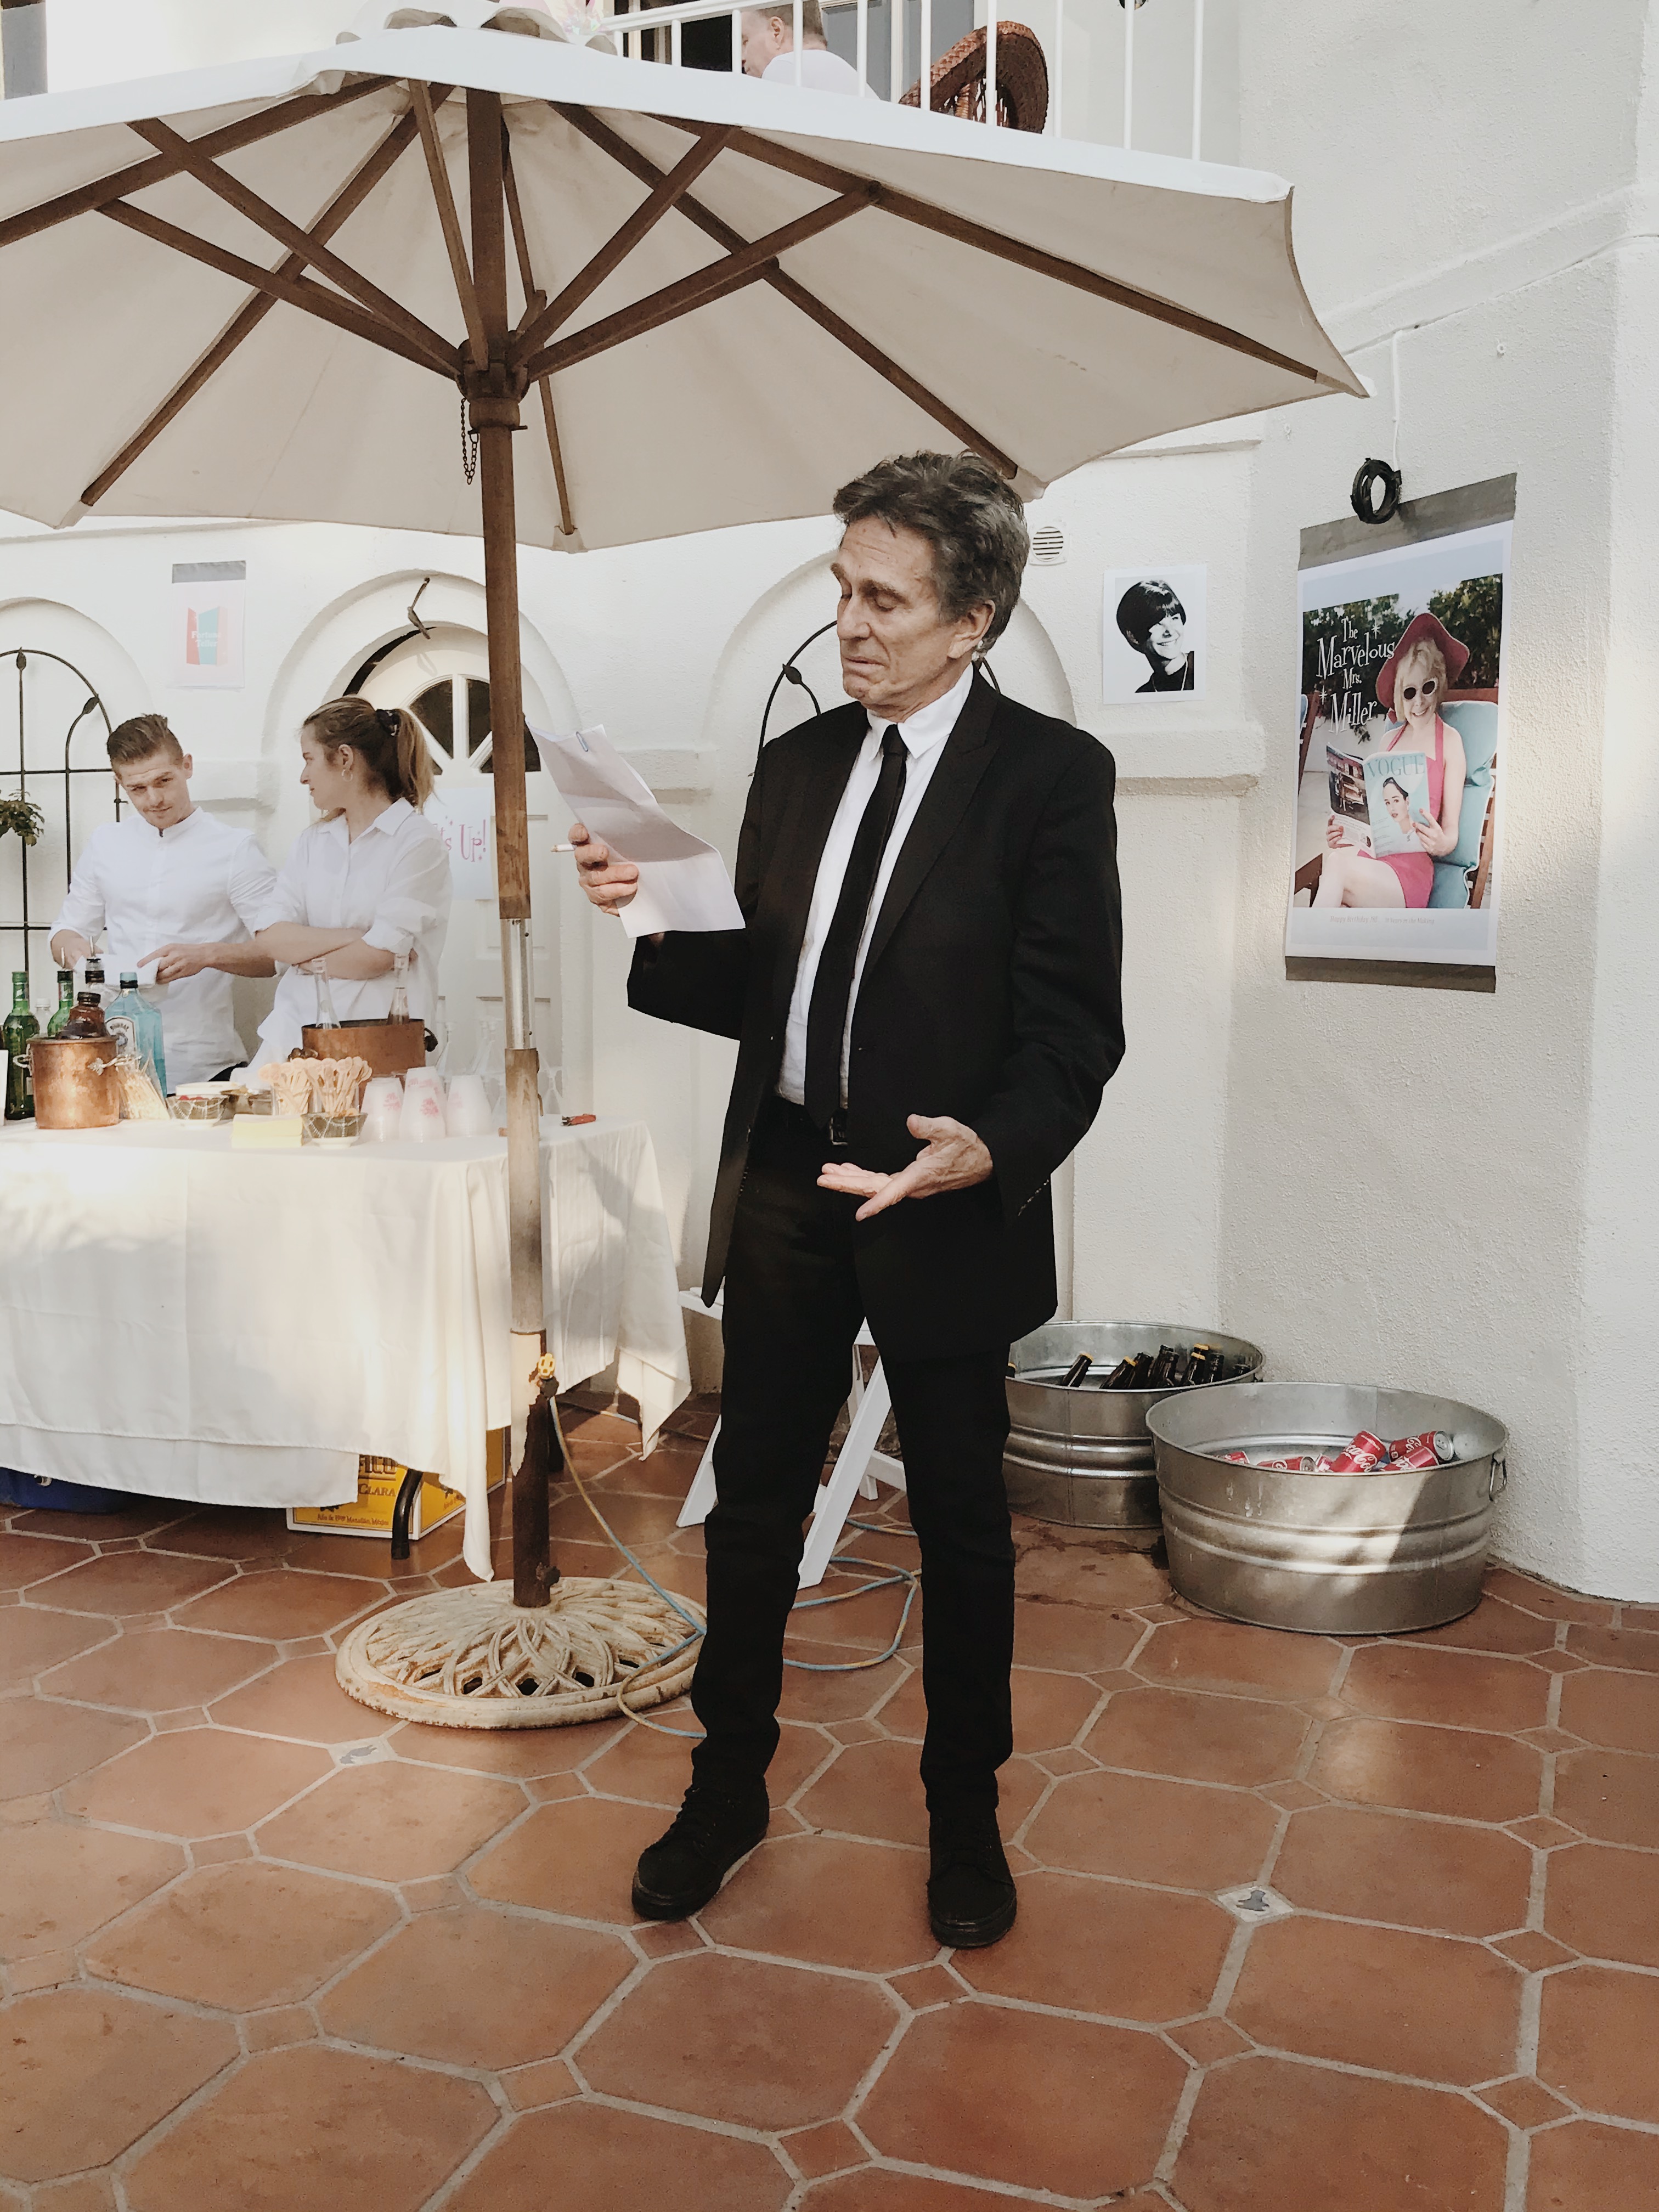
poppy dressed as lenny bruce, spray painted hair, fake cigarette and all, and did an awkwardly long winded performance for everyone haha. we had some family friends perform a few songs on guitar. my mom made a 50s playlist for the party, but i was really confused when bohemian rhapsody started playing lolol. we hired another family friend to do tarot card readings on the balcony above the party– another thing people loved!
it was suuuuch a fun day. but glad it’s over so i can relax again! links for everything below, but lmk if i missed anything!
sources
TITS UP balloons / flatware / plates / custom luncheon napkins / custom cups / custom cocktail napkins / custom stir sticks / custom matchboxes / acrylic frames for signs / red cat eye sunglasses / measuring tapes
photo booth : i like lucy / cake : ashley adams -
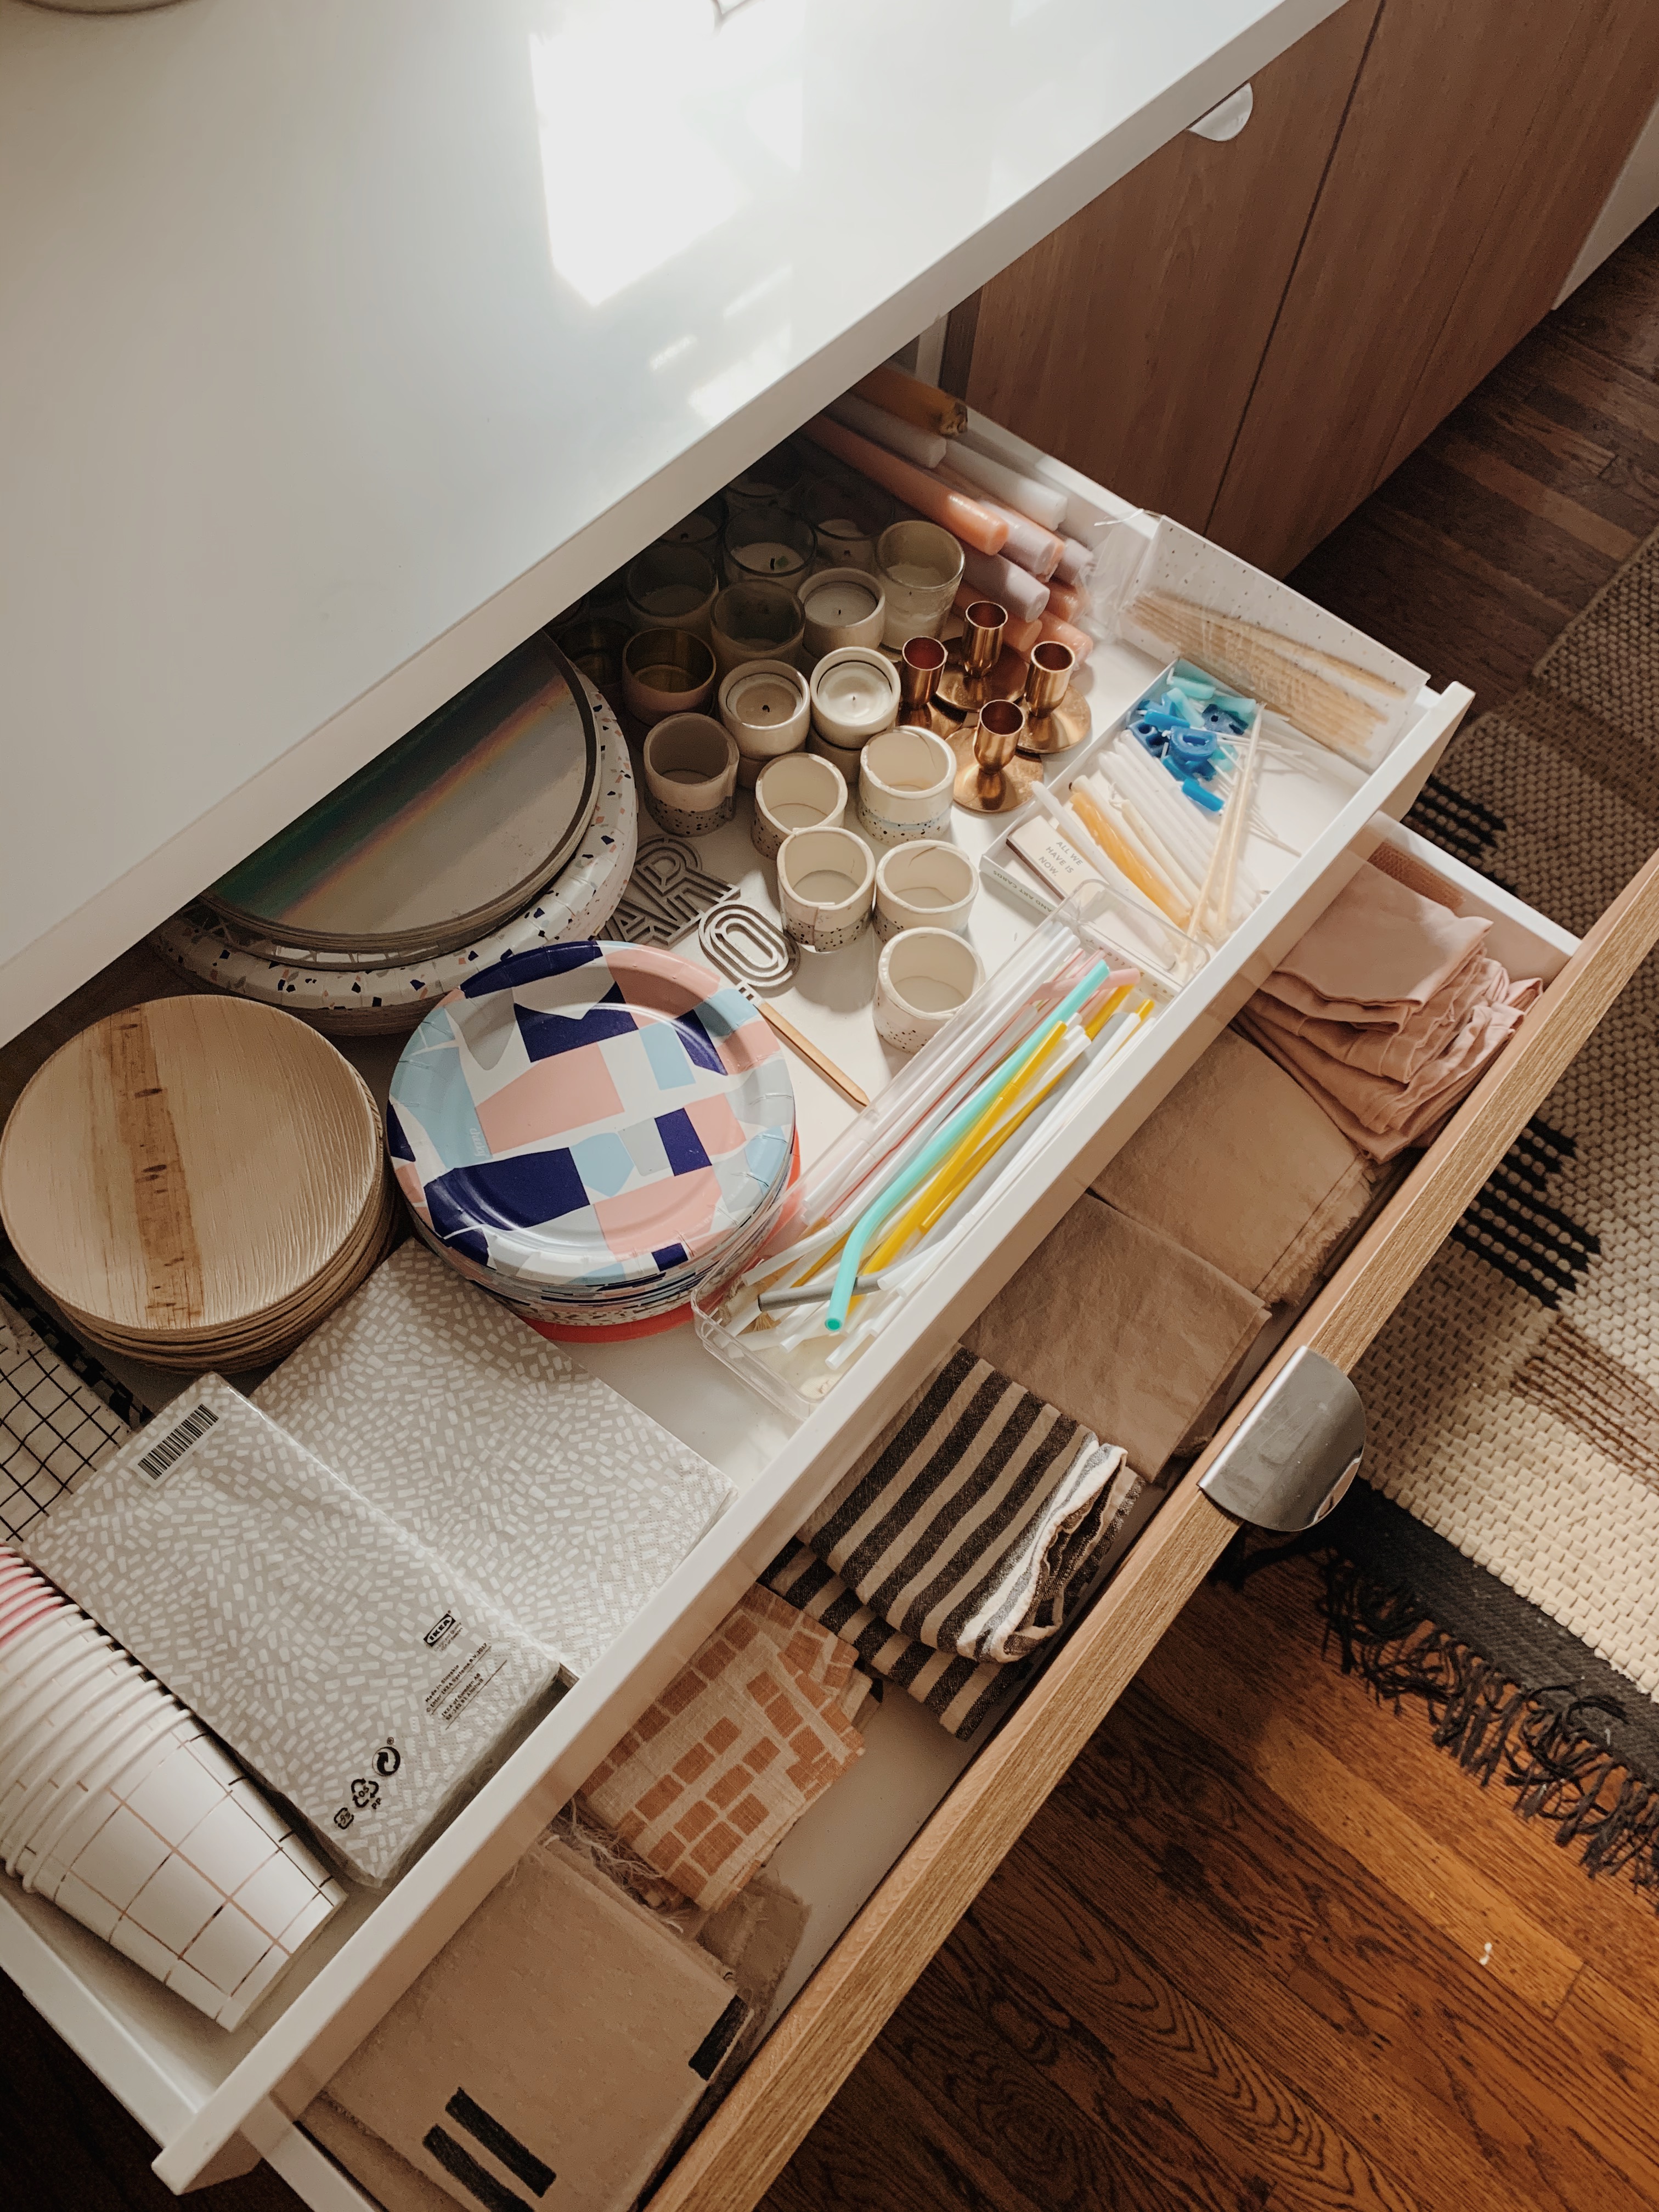
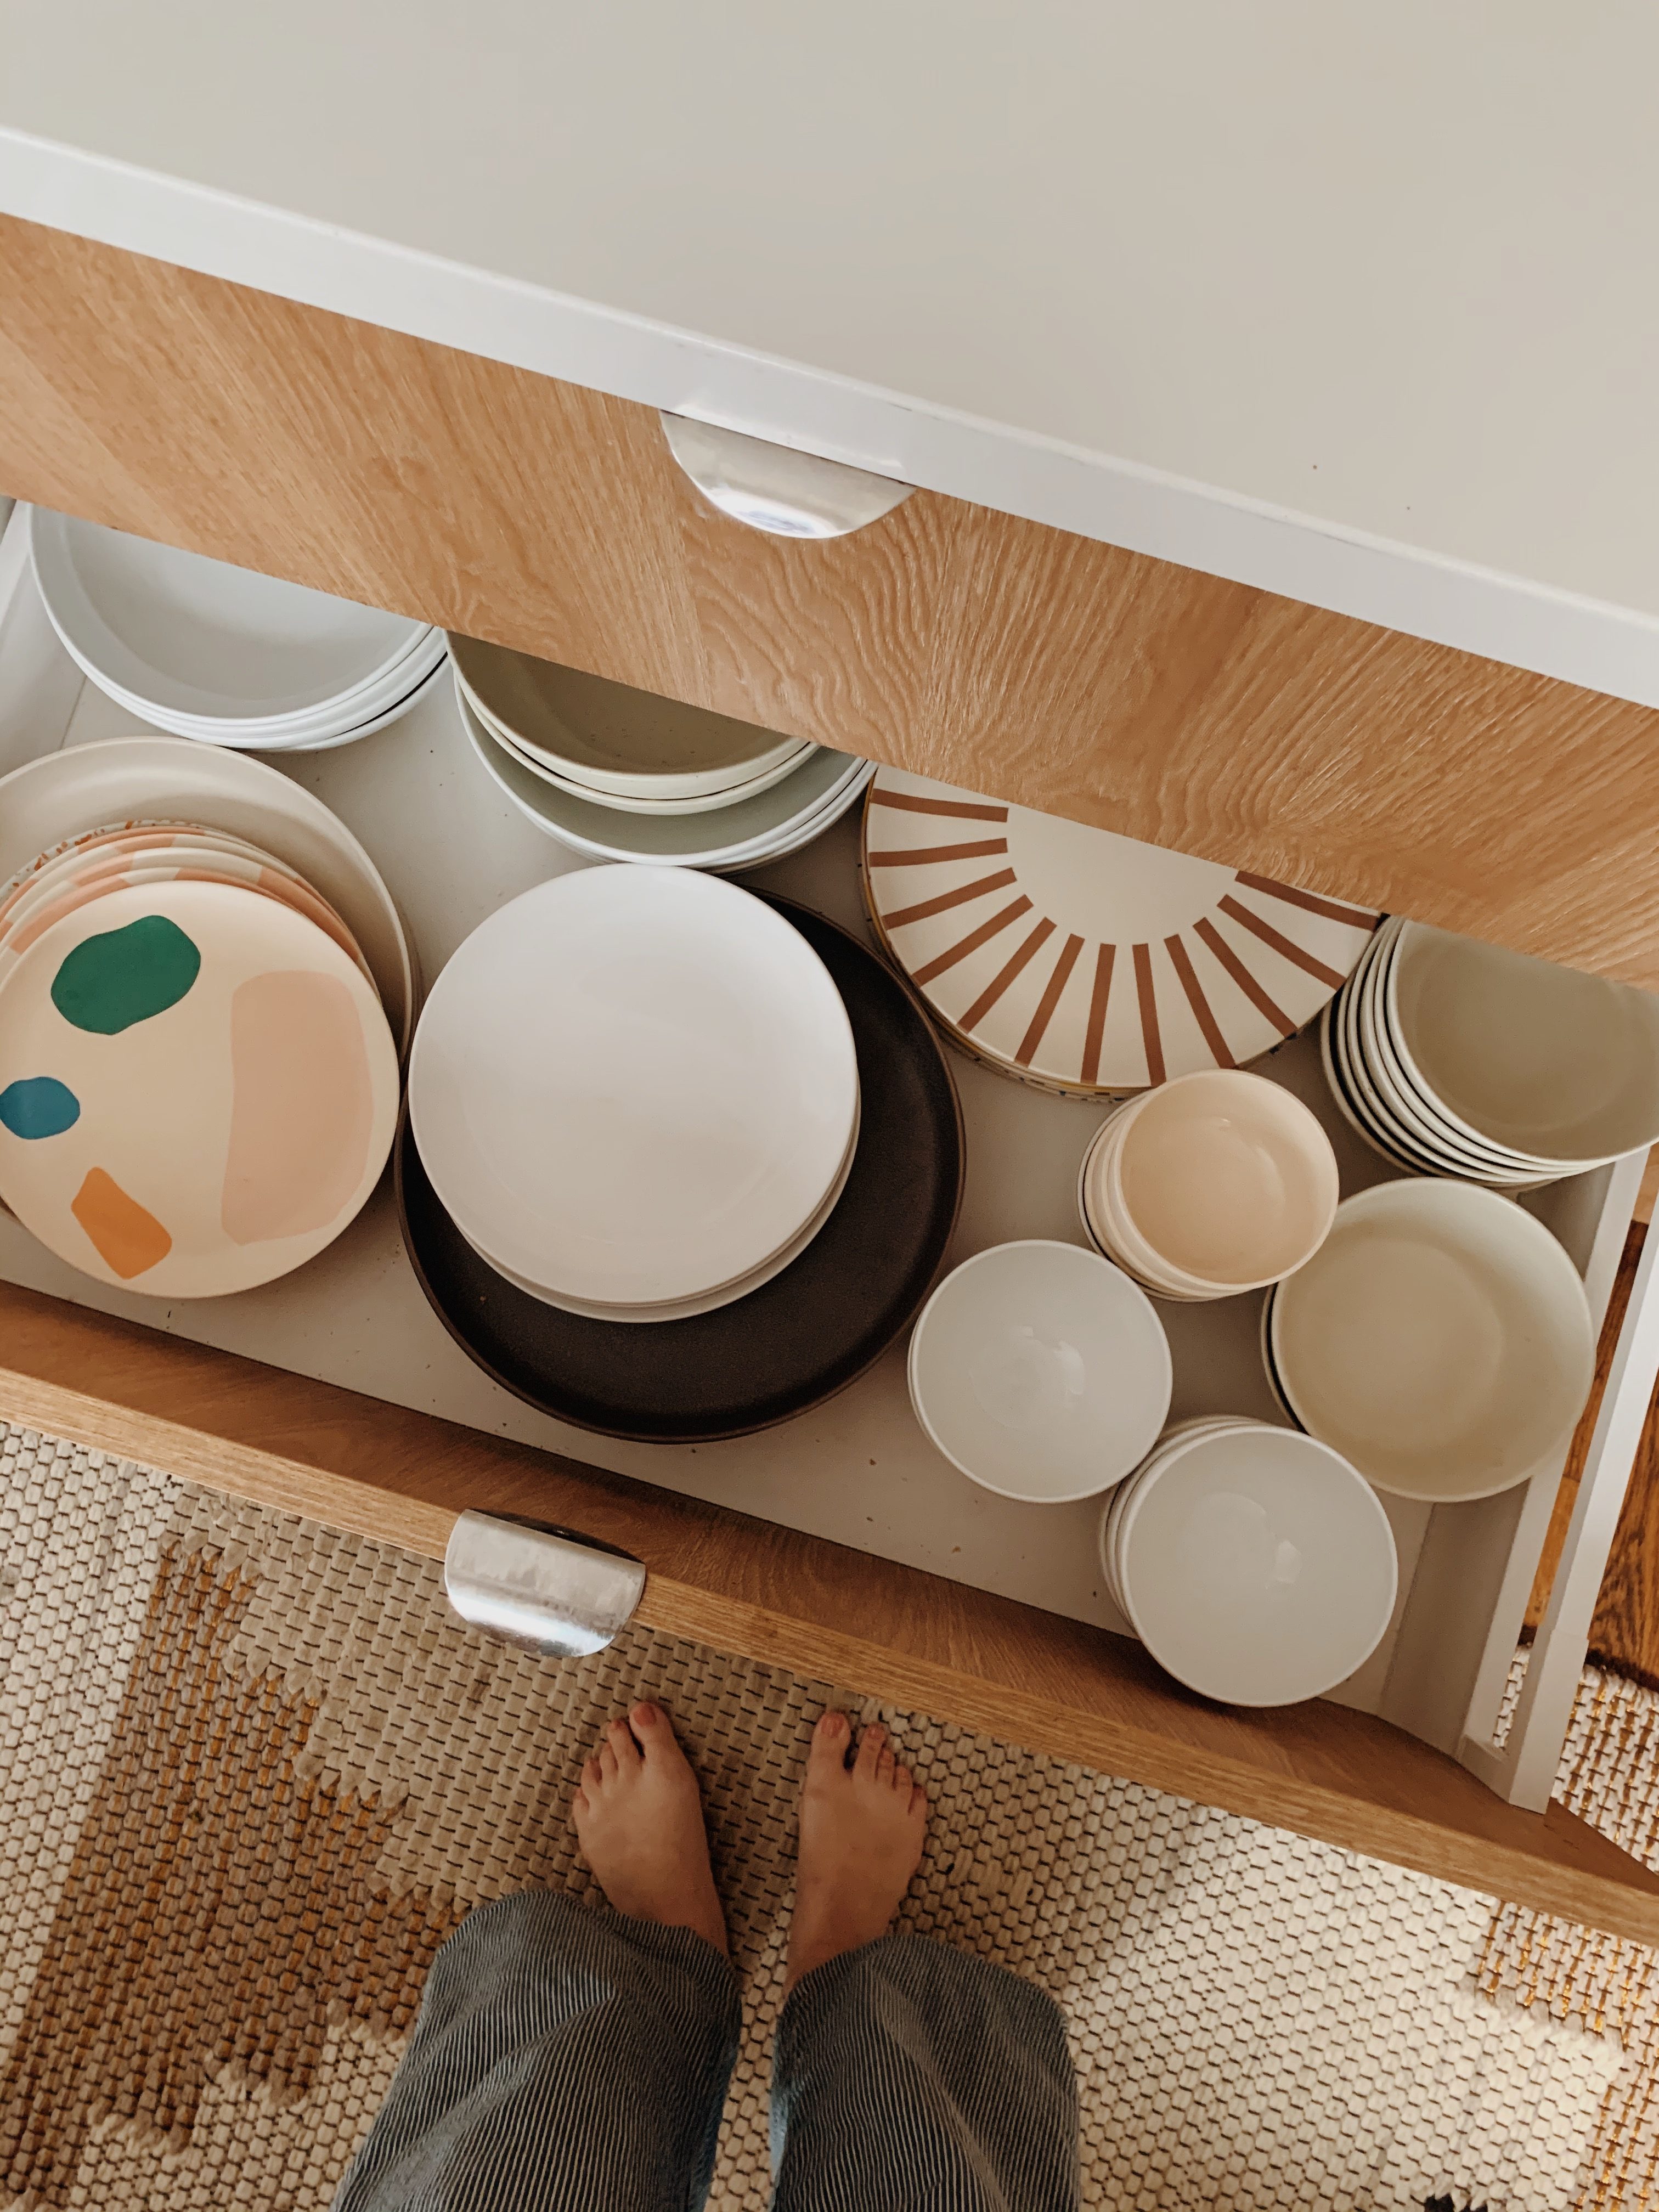
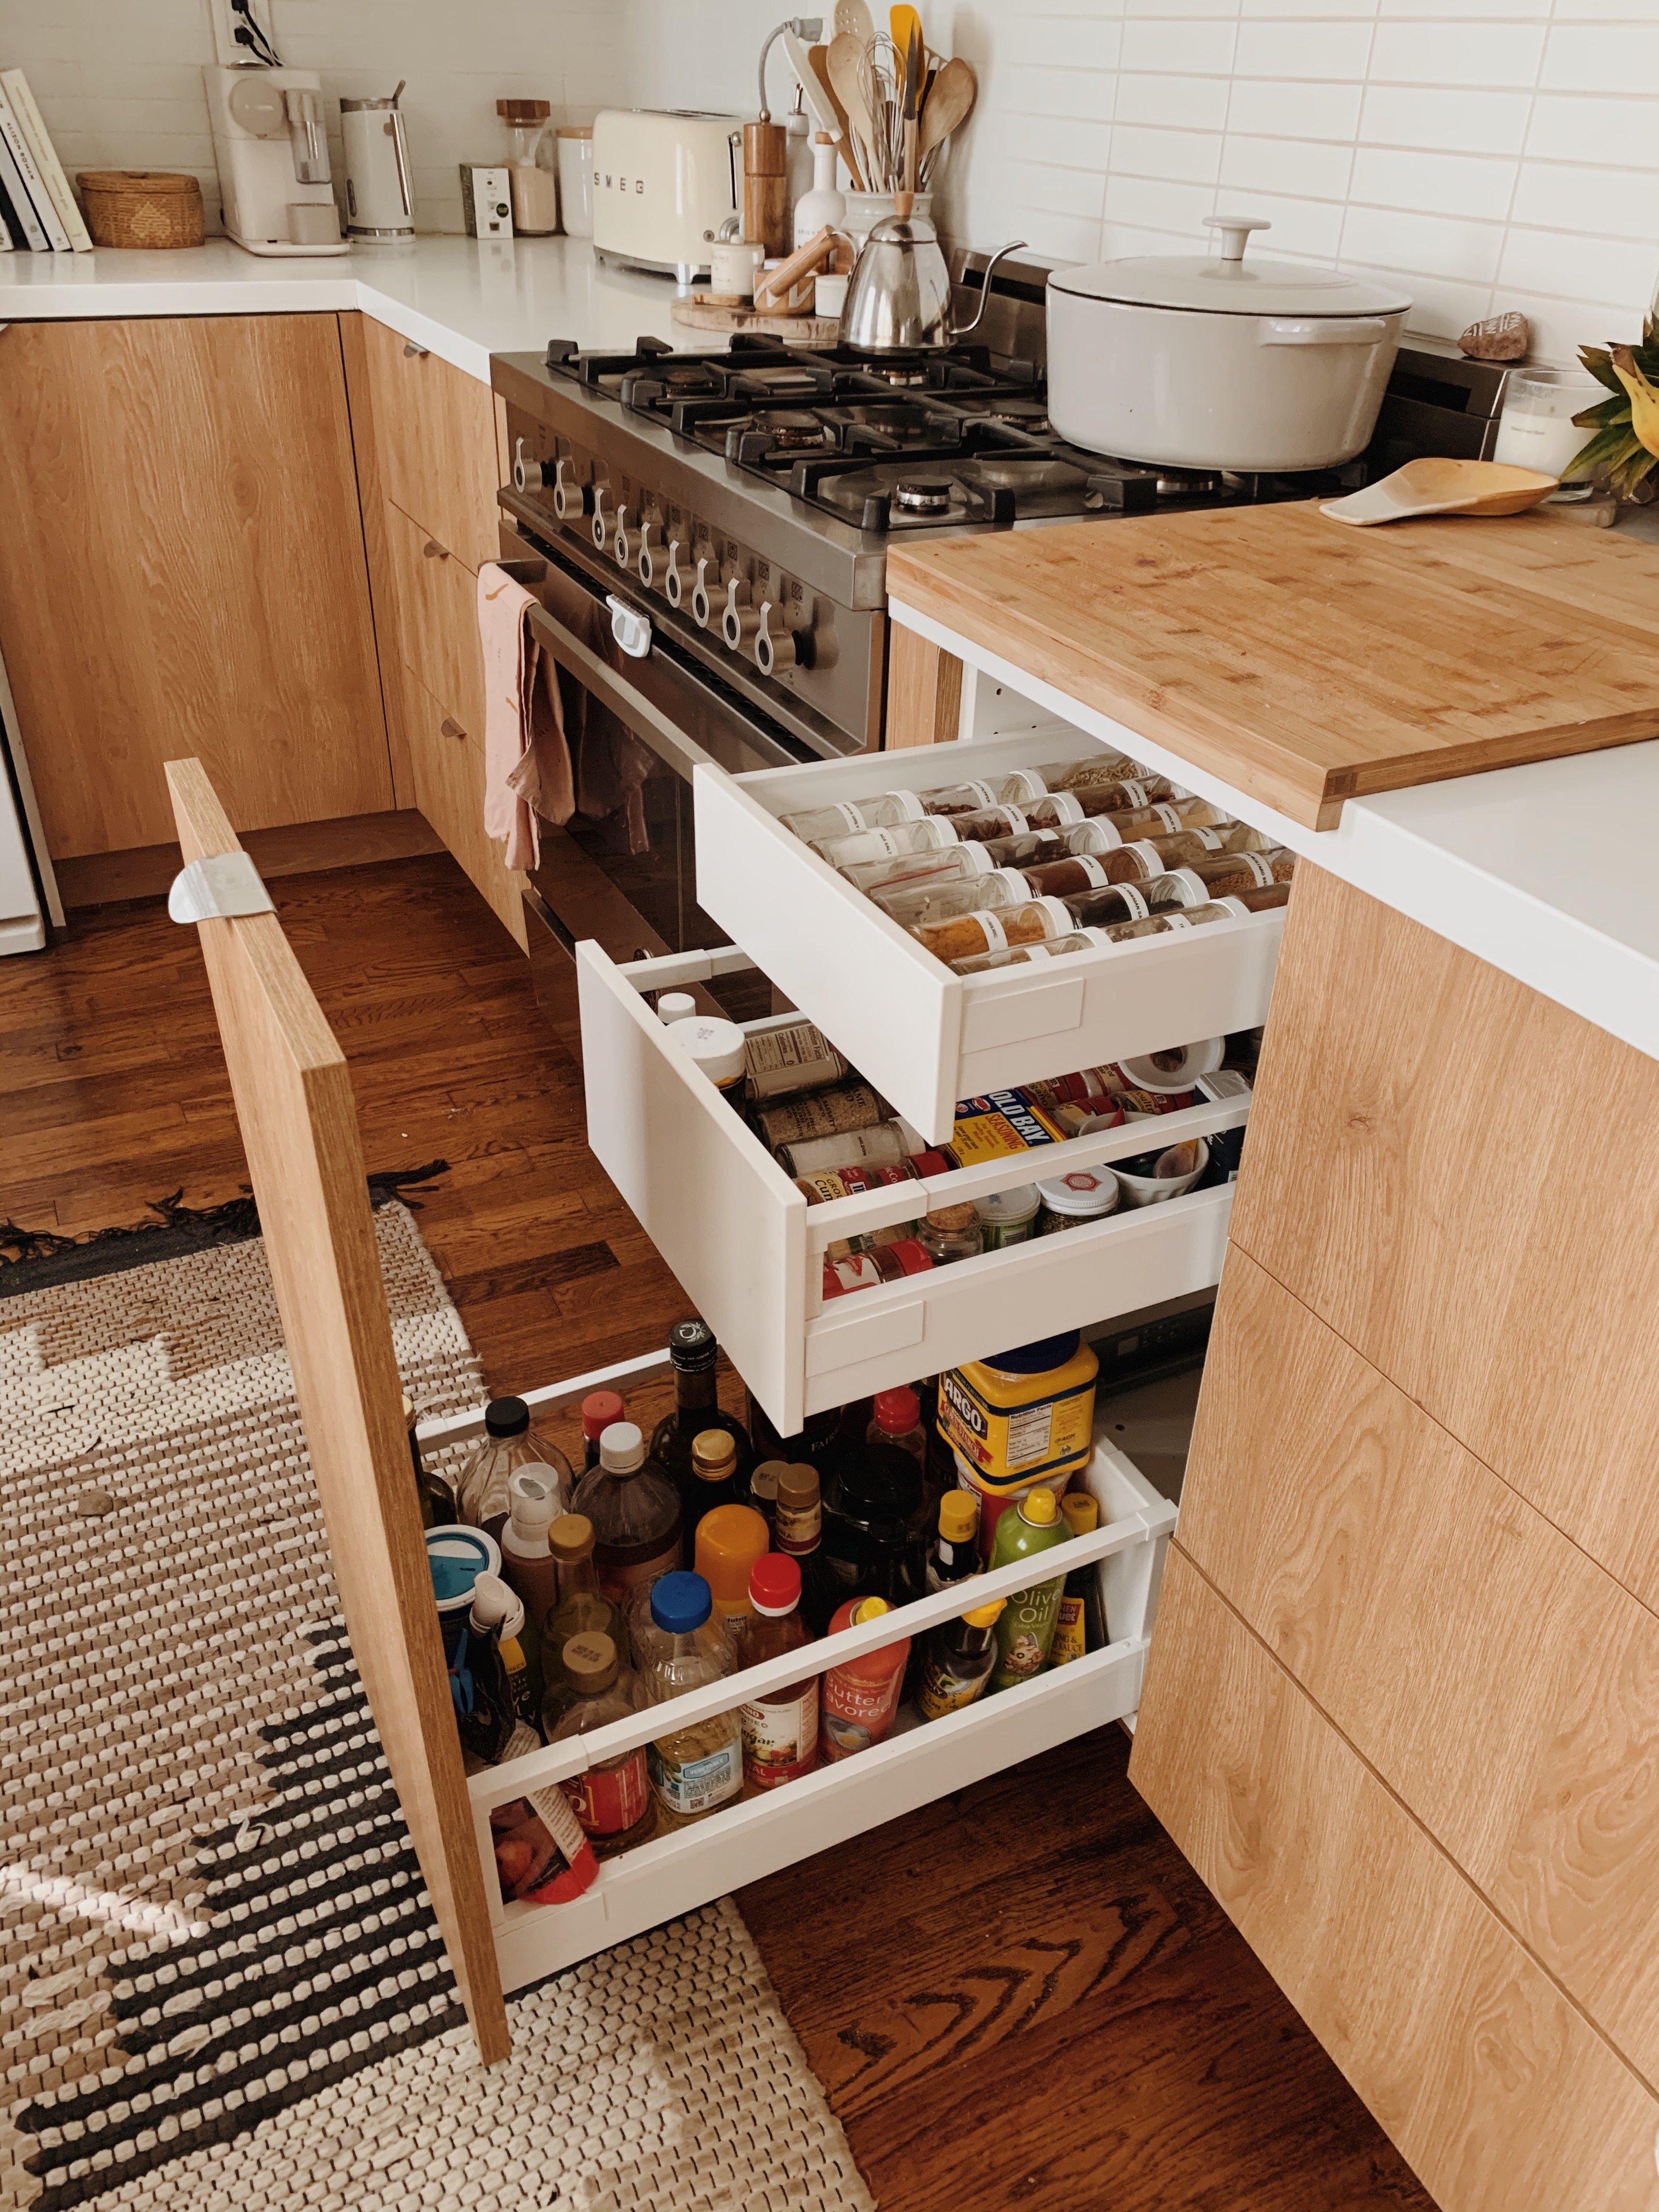
kitchen drawer video tour
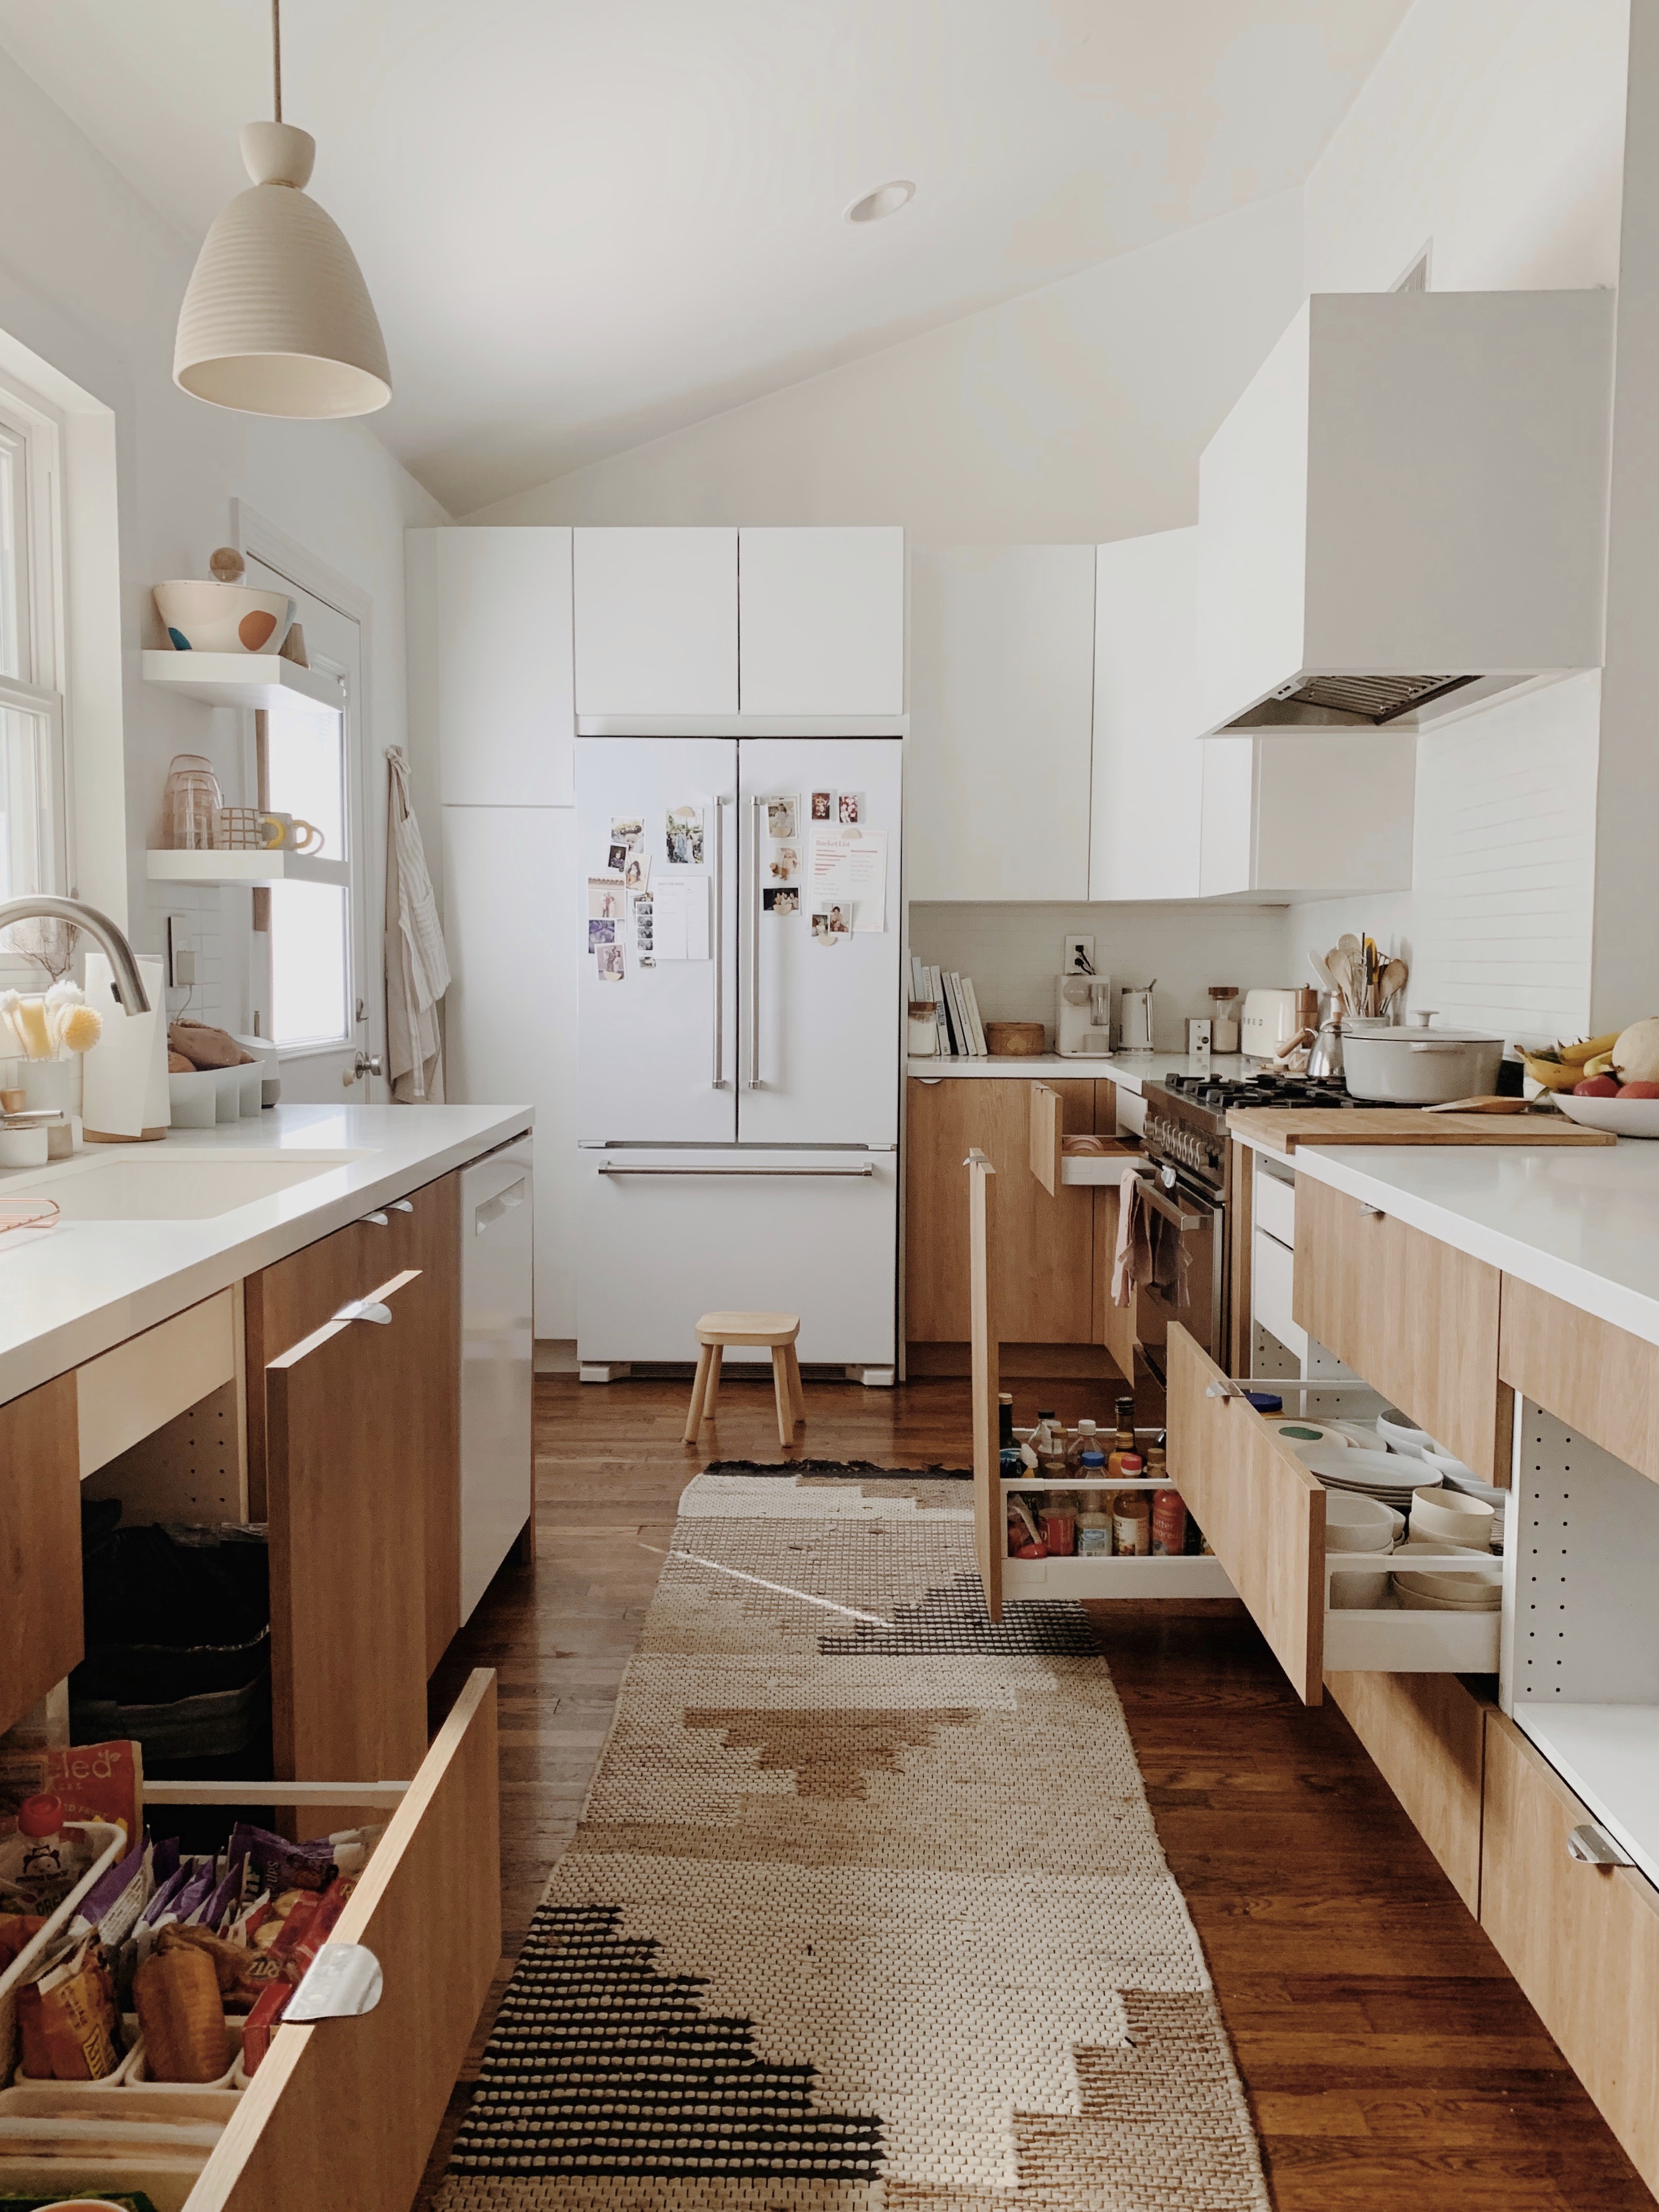
been teasing the idea of recording this video for like years now, well i finally did it! when i was planning our kitchen i was obsessed with seeing how other people had their drawers setup so i hope this can help you if you’re planning your own remodel.
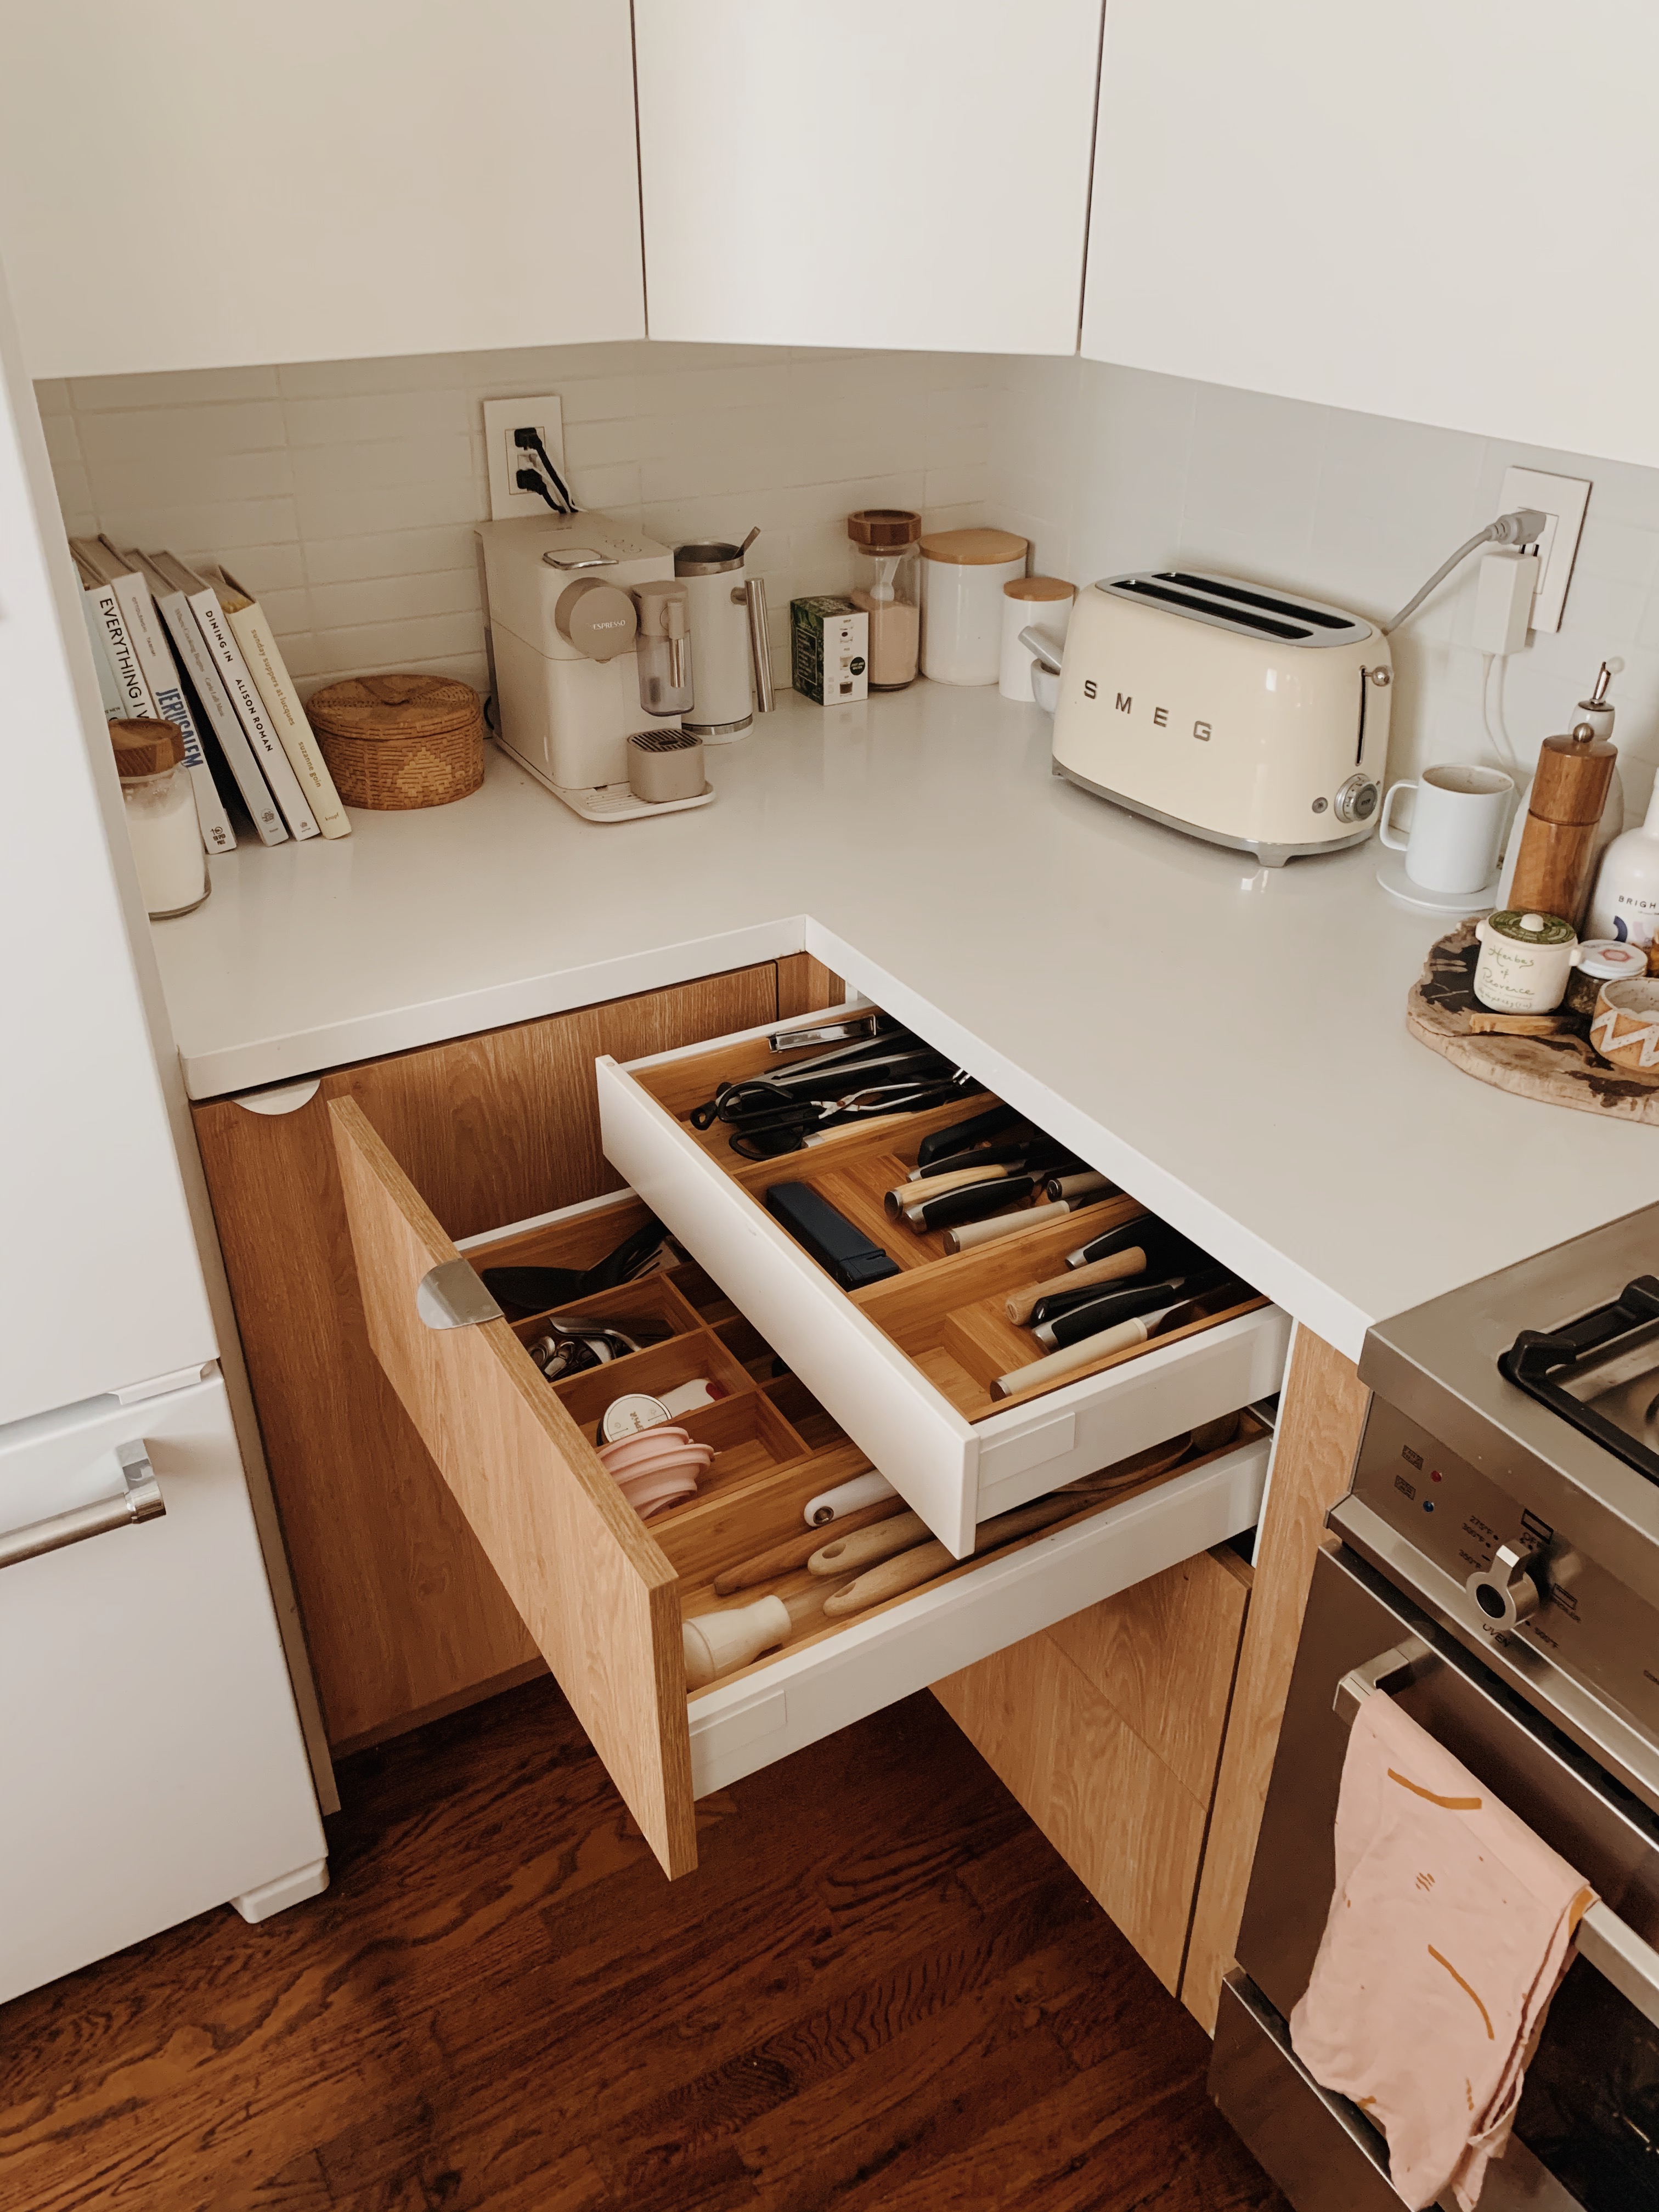
i’m really happy with our ikea kitchen, the reason i was set on doing ikea cabinets was because of the ergonomics and their hidden drawers. every top drawer we have has a second drawer creating a ton of additional storage and it’s been crucial for us. i am definitely not a minimalist when it comes to kitchen supplies!
we had an ikea kitchen designer come out to do measurements and design our kitchen plan before we shopped, this was so helpful for us because she’s done it a million times. i told her what things i needed and where and she put together the plan for us. the only regret i have now is how small the pantry area to the left of the fridge is. in retrospect, i wish we’d made that wider and had the corner cabinets on the other side be smaller– because our food doesn’t fit. besides that, i’m super happy with how everything looks and works.
View this post on Instagramall our wood drawer organizers are from ikea as well, which is so nice to be able to have streamlined organizers that fit perfectly. they weren’t cheap like plastic ones but totally worth it.
the cabinet fronts are from semi-handmade, you just give them your plans and they figure out what you need for your order and deliver it. the whole process was super easy and i would do the same again next time i design a kitchen for sure.
-
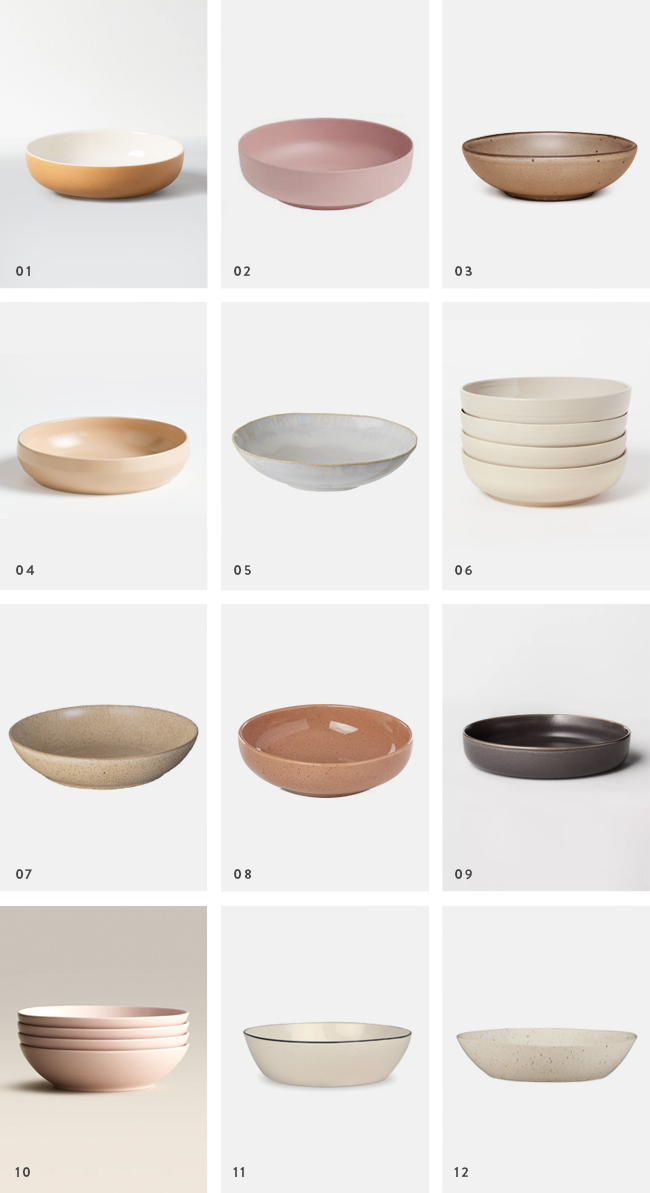
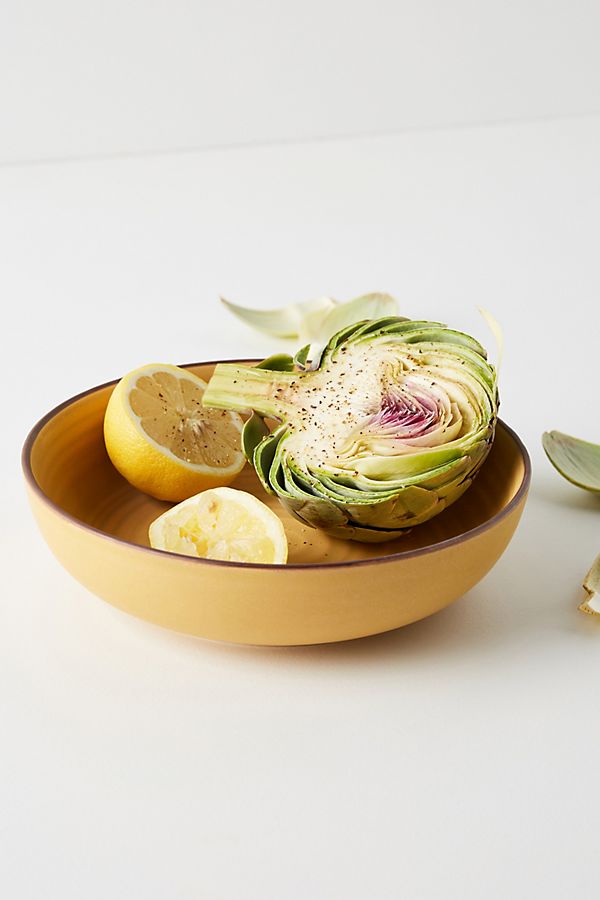
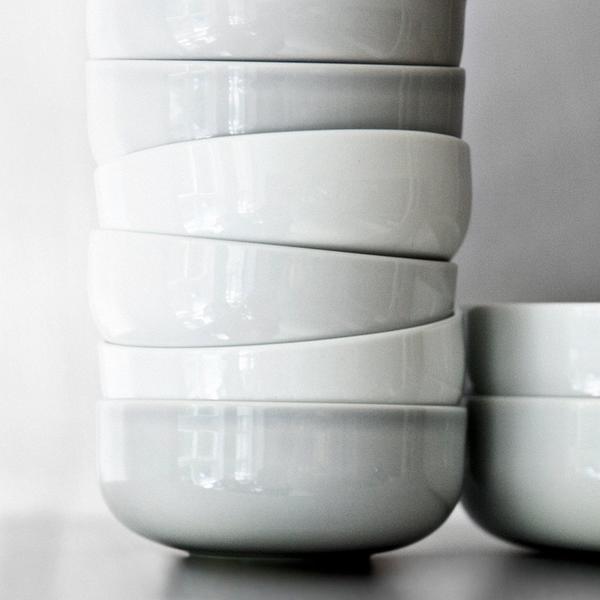
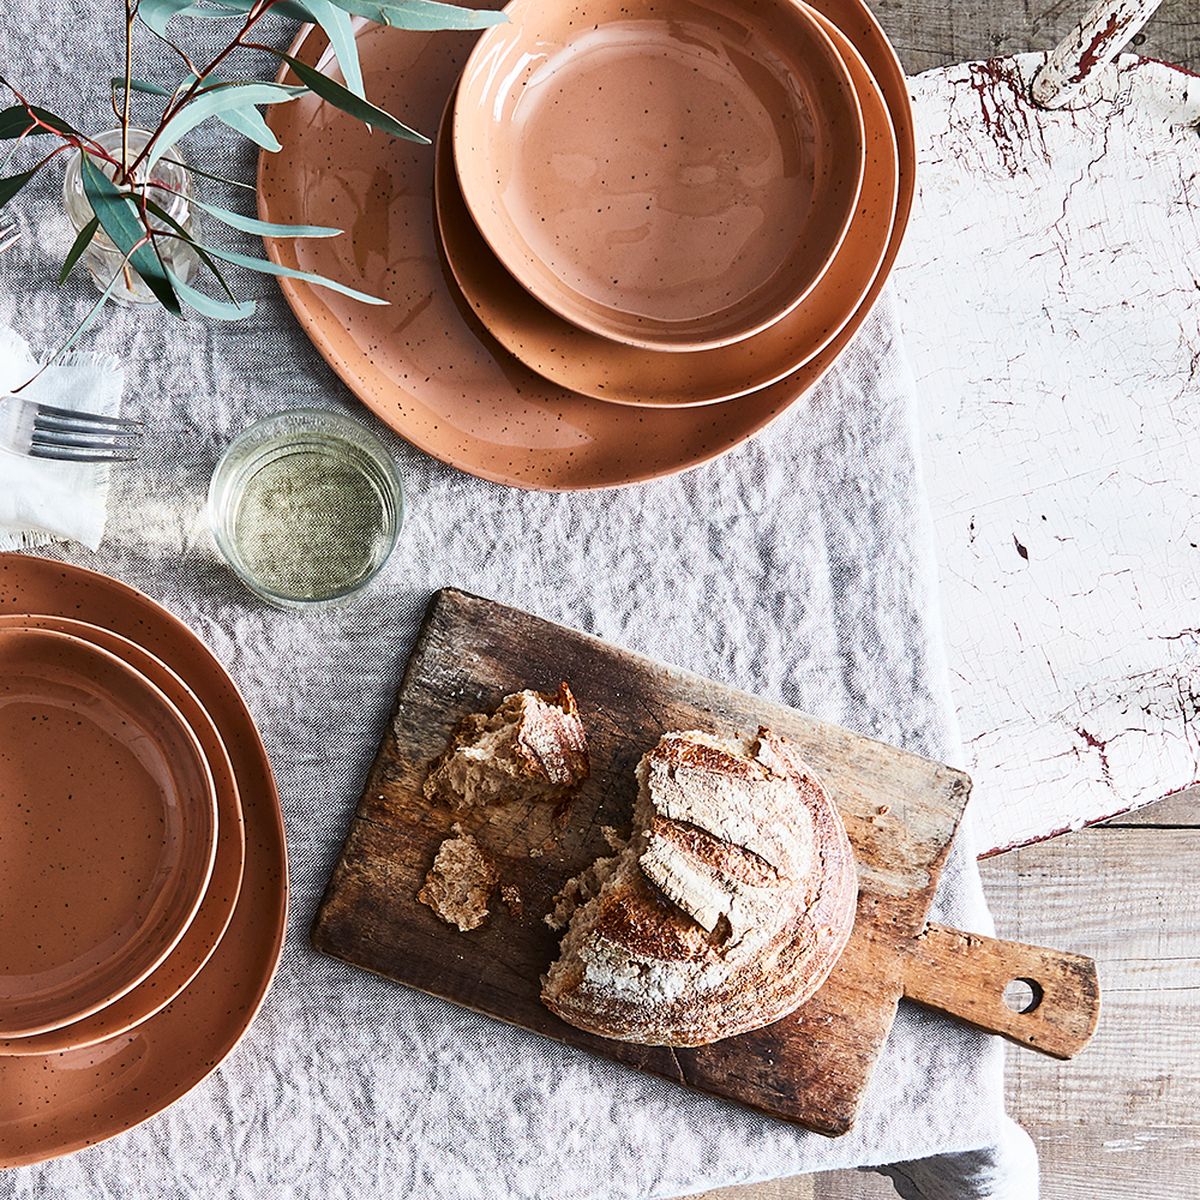
pretty everything : 15 modern dinner bowls
i am obsessed with cooking bowl dishes, mexican bowls, greek bowls, breakfast bowls– if theres a bunch of stuff in a bowl i’m in. but the pasta bowls we got for a wedding gift way back when are too low so i’ve been on the hunt for months for new ones. course i had to do a roundup! let me know your favorites, i’m having a hard time deciding!