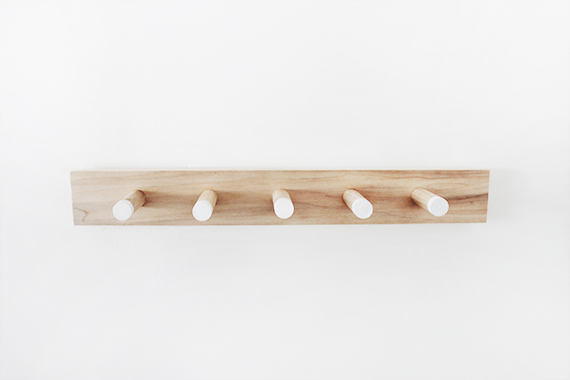
diy simple wood coat rack
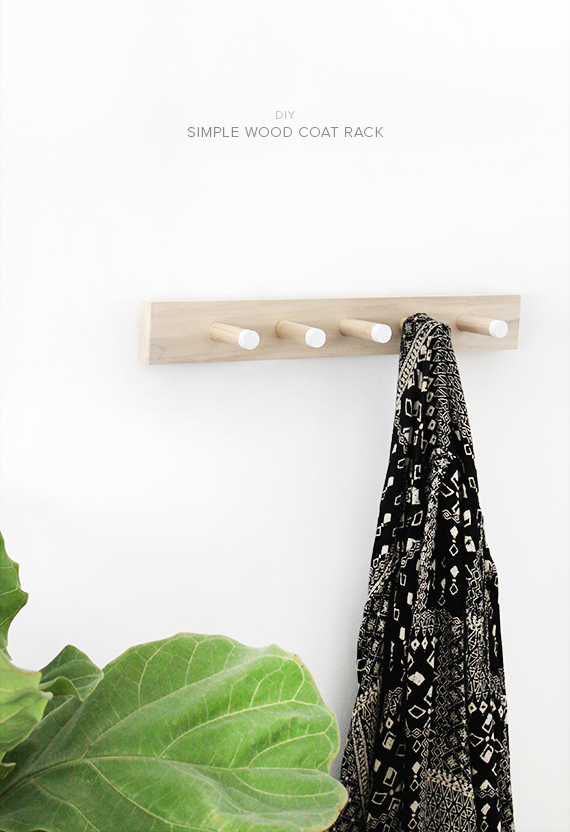

i’ve been wanting to make a new coat rack for a few months to hold our laundry bags. yes we use laundry bags. it’s only because we mostly take our laundry over to my moms house to do it. yes we do our laundry at my moms house.
using just a few items from the hardware store, this DIY only took a few hours (plus drying time!)
the hardest part was picking out my favorite coordinating poplar and dowels! i decided that i liked the natural wood, but i’m sure it would also look dope in a nice stain.
materials
one long wooden dowel
one piece of poplar wood
a saw or miter box
a drill with a 3/4″ paddle bit
wood glue
painters tape
paint
directions
1. measure how long you’d like each dowel. cut them down using a saw or miter box. sand the edges. we settled on 5 dowels at about 2.5″ (there are 6 dowels in the photo. i wasn’t sure yet)
2. after sanding your poplar (and trimming if you’d like), measure out where your dowels will go using a ruler and pencil. to figure out the center of the wood, place your ruler diagonally from one corner to the other and mark. do it to the other side and mark. you’ll be left with an X in the center (art school)
3. using your paddle bit, drill into each hole, make sure they’re deep enough for the dowels to fit.
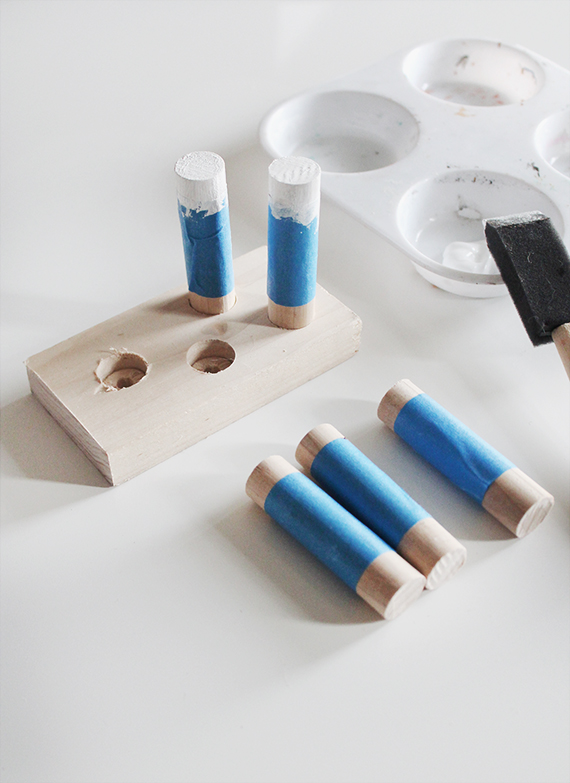
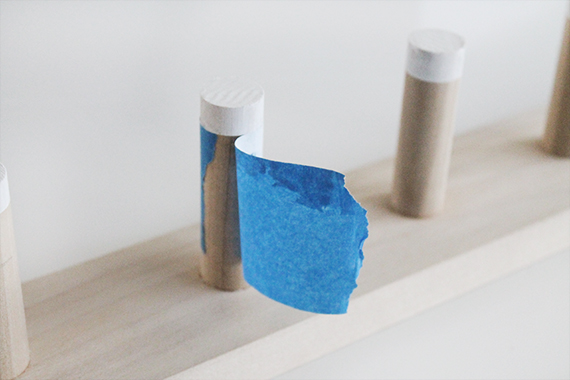
4. tape off and paint your dowels. we used a piece of scrap poplar to hold my dowels for drying.
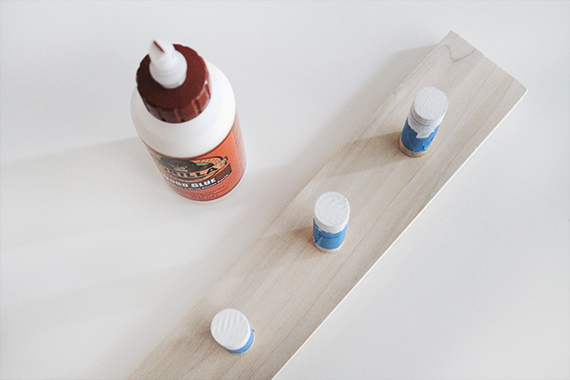
5. once dry, liberally apply wood glue to the holes in the poplar and do a light coat on the bottom of each dowel. place in the hole tightly and make sure a little glue comes out so you know you’ve used enough. wipe away excess and let dry.
6. for hanging, we used mounting hardware on the back, which unfortunately doesn’t flush with the wall. we’ve decided that we’re going to drill it straight into the wall later so that it can actually support the weight of two laundry bags belonging to people who barely do their laundry because they go to their moms house to do laundry.
now you have yourself a simple and modern coat rack that i would totally buy in a store!


so cute and simple. nothing wrong with doing laundry at your mom’s — i did the same until we finally moved to a place that has a washer and dryer!
I too would buy this at store too but my practical (read cheap @$$) side won’t go for the prices they’d charge for something like this. Anyway, thanks so much for the great tutorial.
Looks awesome! Perfectly simple. We used to do laundry at my in-laws for the longest time. WAY better than paying to use nasty old coin-operated machines at apartment complexes, and we would just chat with his parents and watch shows while we were waiting for it. It worked just fine!
So cute! I love the white detail.
Also, your laundry story cracks me up.
Found this post through pinterest! Awesome tutorial
Although, I’d suggest making one additional step if you want to hang heavy stuff (like your laundry bags lol)
Maybe put a screw into the dowels through the back of the poplar. That’d make this thing super solid and it could probably hold a few weeks worth of laundry 😉
Thanks again for the tutorial! Making it tonight!
Love this!!! So cute and simple, and I’m sure a store would charge a ton for it! Great idea, thank you for sharing!
Is the rack still holding up?
it totally is! we hang super heavy laundry bags from it too, and it’s held up fine!
just bought all the supplies to make this project today! so excited 🙂 just wondering, how do you recommend hanging it up? i didn’t notice any notes about how you did it and was curious what the most stable way would be.
I’ve been looking to make this – thanks so much for posting! Any idea how I could angle the dowelling to stop the bags falling off? Should I cut the dowels at an angle or would I need to drill the holes differently?
I must say it was hard to find your blog in search results.
You write interesting articles but you should
rank your blog higher in search engines. If you
don’t know how to do it search on youtube: how to rank a website Marcel’s way
Just what we were looking for. We’ll also place them directly onto the wall. We’re going to hang them in the kitchen in three rows on a black wall. On top we will hang some art, antique kitchen items and at lower levels things we actually use on a regular basis.
Thanks for sharing your diy. I’ll definitely be coming back here!
? Micheile
great diy!! did you use anchors to screw the rack directly in the wall? do u think that is necessary?