diy mounted shelving
our living room wall is HUGE. and of course, there’s a big fireplace in the middle so there isn’t room for a large credenza or console. just one cute skinny fireplace right smack in the middle.
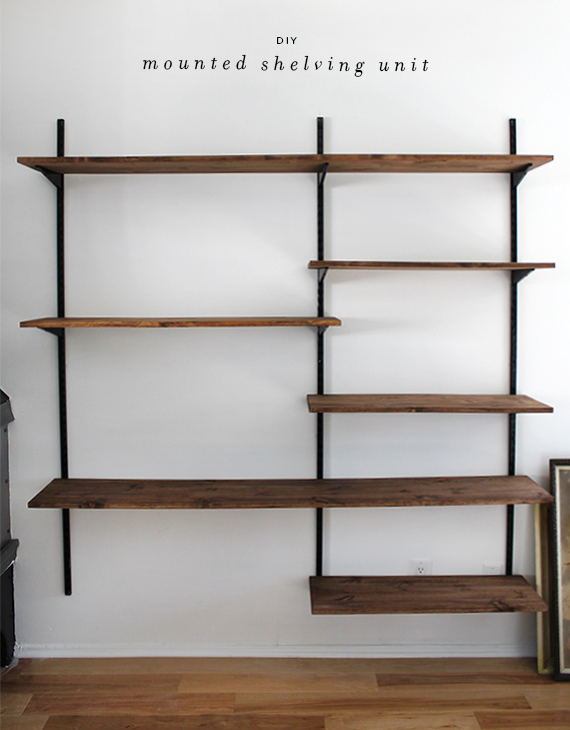
the boyfriend and i spent a month going over how this would look and be configured. drawings and measurements and arguing. we wanted something useful but tasteful, and pipe shelving seemed too permanent and complex (but we loved the look). so we settled happily on this, with custom measured/cut/stained shelving to compliment the wood of our floors and the black of the brackets.
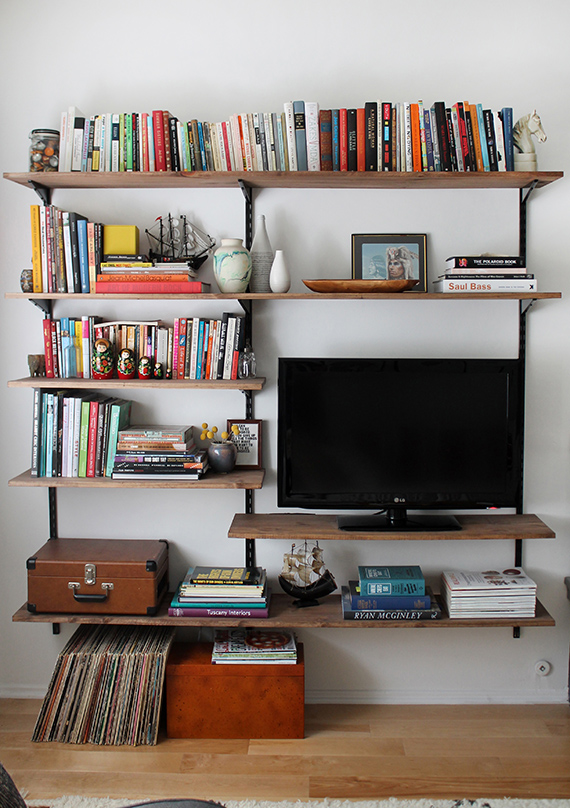
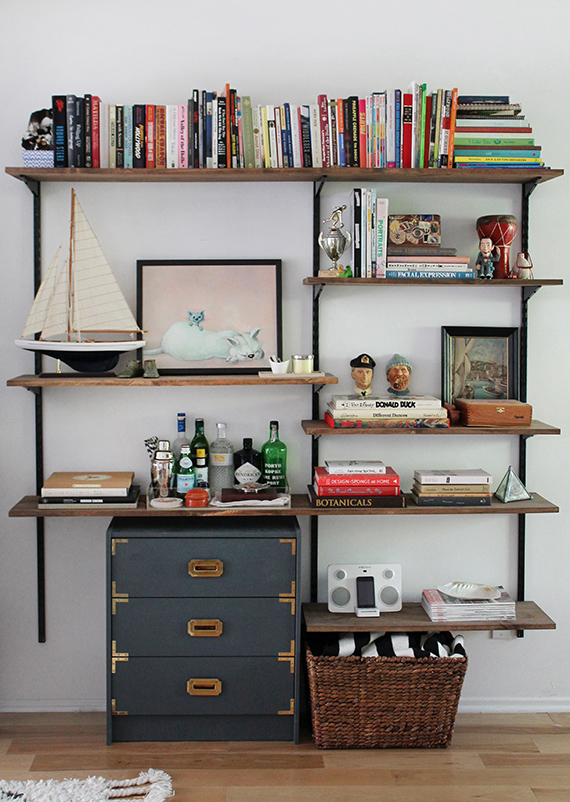
the best part of doing custom is that we were able to customize each shelf in consideration of size and contents, so we specifically measured for the TV, the record player, and the campaign rast. (and we can change the height of shelves whenever)
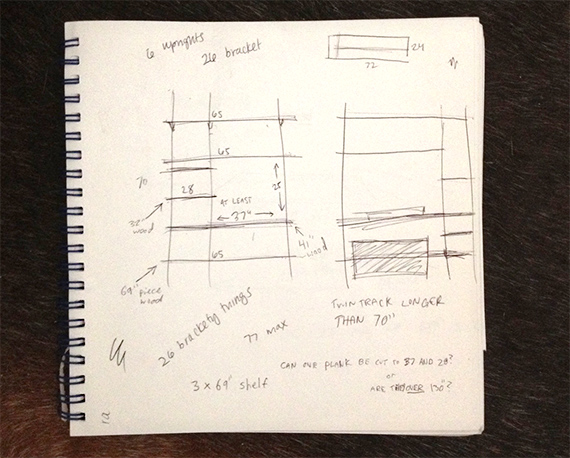
i believe i drew this sketch 50 times before we settled on the design.
WALL MOUNTED SHELVING
six twin track 70″ uprights
26 brackets
12 pieces of wood at 3/4″ thick :
(4 long)
(2 medium)
(6 small)
wood stain
the project was all about the planning. it would have been a lot easier had we been able to just do one big unit without the fireplace, but we wanted to make each side symmetrical without being identical.
we configured on paper (like i said, fifty times) where the uprights and the shelves would sit, and had the wood cut in three sizes.
we then hung the uprights after measuring and remeasuring and leveling and stud finding and all that boring stuff.
and then i sanded and stained 12 pieces of wood. we live in an apartment with a small balcony. so yeah. that took a day.
once all the wood was ready to go and we then decided where each shelf would go, and screwed the brackets to the shelves. and that’s about it!
sawed, stained, delivered … it’s shelves!





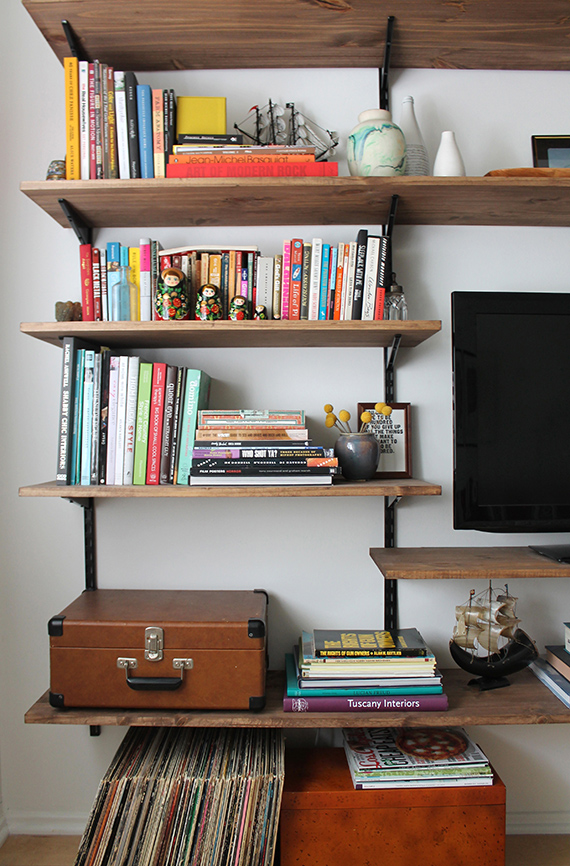

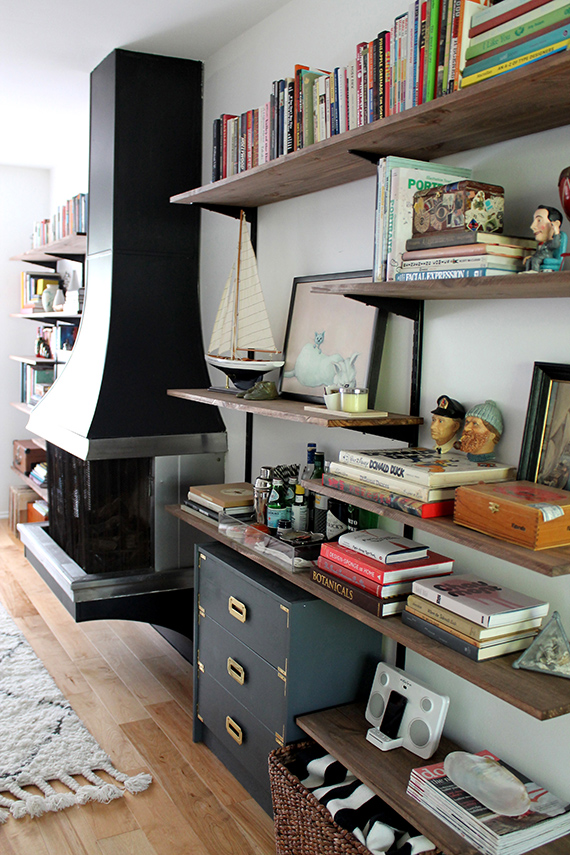





That looks amazing you guys! Absolutely love it! Bravo.
+ thank you heather!
That looks incredibly awesome. You did a great job styling the shelves as well – it doesn’t look fussy or fake.
+ thank you thank you thank you!!! that’s one of those things that never looks right when you do it.
Looks excellent and well done with putting stuff there and mixing it up with the baskets and the dresser. What stain did you use?
+ thank you evy! i want to say it was minwax special walnut – and i only put it on for a second to make sure it didn’t get too dark.
Hi! What do you mean you only put it on for a second? I’m trying to replicate these shelves now and am having some trouble getting the stain right…
hi shannon — i mean that i immediately wiped it off 🙂
This is exactly the look I want. Thanks for sharing. I’m going to head to Lowe’s right now!
Really beautiful shelving solution and I love your collection of sailboats.
+ thank you!!
thanks rosalie!
this is awesome – but how much weight can it support? is there a way to figure that out?
+ i’m pretty sure the weight is dependent on the space between the brackets and the size of the shelf. at the time i made it, i kinda knew what those numbers were but totally forget now. i think each shelf was about 60 – 85 lbs. just as long as you keep an eye on the bowing, i think it’s fine – but i try not to think about those things haha
I LOVE THIS! ❤️
How deep are your shelves?
This looks amazing! I think it might be a much simpler solution to a wall of shelves I had imagined (lots of floating shelves individually anchored into plaster!). I was curious about the little holes in the vertical supports that allow you to move the shelves around. I thought they’d be much more apparent, especially with the light colored walls behind. Did you cover them in some way between the shelves? Or is it just he angle of the photos maybe? Again, this looks really awesome. Well done!
+ thank you! we didn’t cover them, but i think because of the depth of the bracket, the shadow creates the illusion that they’re not noticeable. would love to see if you try it!
This is amazing – exactly what I was looking for! Thank you for this!
Hi!! These look SO great! Can I ask where you got your supplies and maybe even what sort of budget the project came in at?
+ everything was from home depot. i want to say it ended up being around $250 for everything… ?!
Thank you!!
Is this for both shelves or just one?
You got all the supplies I.e. Brackets, braces all from Home Depot?
I’m thinking about doing a similar project and have a couple of questions: are all of your uprights attached to studs? What did you use to attach them? Just regular old screws?
Thanks!
Hi, I was wondering the same thing. I have sanded and stained the wood and am now ready to put up the shelves but got to thinking about anchors and all that…. any need for them?
+ hi rebecca, we did use anchors when hanging the uprights, thats what will end up making aligning the shelves a little bit tougher. good luck!
how were the uprights attached to the wall exactly? just with screws? and about how many were in each upright?
I love this! I just showed a collection of diy shelving on my blog recently. This would fit right in! We also have a large wall in the living room that currently has two IKEA shelves covering it. I like the wall mounted look so much better. Hopefully we can get to this project soon! Beautiful!
+ thanks lila!!
Could you tell me about how much this cost you? it looks awesome! my husband and i would love to re create this in our dining room!
hi rachel SO SORRY for the late response – i think it prob cost around $200 – $250 max? good luck!
so this answered my previous questions. Again – love it!
Where did you get that gorgeous file cabinet!? I’ve been looking everywhere for a mini one like that. Beautiful bookcase, as well! A project i must do in my new place! Thanks for sharing. Xo
hi andrea – that’s actually an ikea rast hack i did. and thank you!
https://almostmakesperfect.com/2012/03/01/the-ikea-rast-campaign-hack/
Hi there! I just wanted to say THANK YOU SO MUCH for this awesome tutorial. Its been months since I found it, but I finally got around to finishing our own shelves. To be honest, I pretty much copied your layout except I extended it to accommodate our larger TV and DVD collection (which unfortunately takes up way more space than I thought it would!) Either way, I think it turned out really well! I wish I had enough room in our apartment for two sets of shelves! Here’s a pic:
http://i.imgur.com/FhIj7vR.png
Thanks again!
that looks amazing! so fun to see someone else try it. and SO SORRY for such a late response – i have no excuse. but thank you so much for sharing! i hope they’re working out for you!!!
How big was your TV? I’m looking to build this and we have a 50 in. I was wondering if you had to buy taller brackets? If so, how tall?
I fell in love the second I saw this! You did a beautiful job with the styling and balance. I just moved recently and am styling my place on a budget so I’m hoping to replicate this look. But I’m a complete novice and will be doing this in my small SF apartment, and maybe fire escape too? 🙂 What type of wood is it? I read that they all stain differently and my local Home Depot has a ton of wood options. Also, did you sand by hand? 220, steel wool? and last, did you use wood conditioner and anything after putting on the stain? Thanks so much!
thanks laura! i sanded by hand with this sanding sponge i had mostly (it makes it a lot easier for me) and the wood is all just cheap pine that was stained. i did not put conditioner on, i had planned on it but after doing all the wood on the fauxdenza project, i was sick of conditioning and just wanted to get the wood up on the wall!
I really like your shelving and much more reasonable than one we were looking at buying. I live in the UK so will try and source similar brackets and wood. What wood did you use and are the brackets black metal?
Thanks for sharing!
hi holly – the wood is pine and the brackets are metal. they should sell them at most hardware stores anywhere i’d think. we had a hard time for a bit finding black uprights, but then one day our local home depot started carrying them. good luck!
Hey, really love the shelves. My wife and I are going to use these as inspiration for our own hopefully. Thank you!
These are amazing! Great job! Definitely want to do this one day.
WOW! I love this! I think this will be perfect for a wall in my bedroom i’ve been trying to decide what to do on, love it, so well done, thanks for sharing!
Hi
Thanks for letting me know about the wood. What colour stain did you use on the wood? We have the black metal uprights fixed on the wall and just need to buy the wood and stain it. I’ll post a picture when it’s complete.
Thanks again for the inspiration!
Holly
thanks holly — i think i used minwax special walnut, but i forget!!! good luck!
Sorry if this has already been asked and I missed it! Do you know exactly what lengths you used for long, medium and short? Planning on do this with baskets to store my craft supplies!
Thanks for the inspiration!
Just built one myself!
https://scontent-a-ams.xx.fbcdn.net/hphotos-ash3/1513318_10152094010347453_504666933_n.jpg
Like everyone else, Im so excited to start working on this!
I also plan on putting my record player on one of the shelves
and possibly a bar area but I was wondering- what is the depth
of your shelves? Thanks so much!
Great job!
How did you conceal your TV wiring and how did you line up your brackets so the shelves would be straight?
I’m a neophyte
How wide are the planks you used for the shelving? This is a great project and you all did a fantastic job!
Can you tell the depth of the boards you used? 8 inches? or are they 10 inches? Thanks! 3/4 inch thick right? Also where did you get the tracks and brackets. This is rad. Thanks.
I’d also love to know the depth of the boards and brand of brackets/uprights you used!
This is just beautiful, you did a great job of getting the exact color on the wood. I think I saw something like this for $1-2K at West Elm or Crate & Barrel. You have amazing taste. I’d love to see more of your projects.
this looks awesome!! I’m getting ready to install some shelving and wish I’d gone this route!!
I love these shelves and we are going to try and replicate it. What colour/ kind of stain did you use?
I absolutely love your shelves and have in the process fell in love with your fireplace. Do you know any information about it?
i don’t! we’re the only apartment in the building with a fireplace, no idea why they put it in! sorry i’m no help!
Thanks anyways! I was hoping maybe it’s brand name or something was etched on the back or inside. Darn.
Hi Molly,
Can you tell me the width and depth of the pine boards? Were they 8′ (width) by 12″ (depth)? Did you use the higher quality pine boards or the cheaper pine boards? I’d really love to replicate the look over our sofa, but I’d like to try to keep it as budget-friendly as possible. 🙂
Thanks so much!
Ashley
Wow, that is such a great way to utilize the space on your house! And it looks so great, you did a wonderful job!
Nic
http://www.salvageandstoneblog.com
What is the width of the boards you used? 12 or 16 inches?
I cannot get over these shelves. Seriously. SO COOL. I’m currently designing my own rendition of these, but I’m struggling finding board wide enough to fit my record player! If you don’t mind sharing, what width are yours? Did you get them at Home Depot??
I want to make this project, but am having trouble finding track or brackets in anything but white. Did you purchase the hardware this color or did you paint it?
Thank you.
This looks amazing! Have you seen this similar look from the 1968 Better Homes and Garden Decorating Book? http://goo.gl/7bYUz6
Anna,
The font is too small for me to read. Does this article say anything about the fireplace. I’m in love with both their fireplaces!!
Hi Molly!
I love your shelving, it looks great! I wanted to ask if you can remember what kind/color of wood stain you used? I’m making my own desk, and have been looking for colors, and I think the color of your shelves is the one!
Great pics and great job. After days and days of googling pics for ideas on space-saving in my ever-so-small eBay/Etsy/sewing room/office, I came across your first pic and immediately took out the measuring tape and a piece of paper. After an hour at Lowe’s, I’m home now staring at the wall. LOL I have a corner to fill and am planning desk and work space in the design. I’ll post pics if/when I get finished. 😉 Thanks for the inspiration.
(I’ve had your post up on its own tab throughout) LOL
What screws did you use to fasten the wood?
I am so doing this. I found it on Pintrest, after I already had my online Home Depot cart filled with items somewhat similar. This is just what I needed to find for some guidance. We, too, have a very large wall with a huge water heater leak stain that I will be painting in Red Delicious as an accent wall and as this wall is the focal point of the room; these shelves will do the trick. Thanks for sharing!
I love these shelves, they were actually a major influence in what we put together for our living room! Take a look at what we ended up doing here!
I’ve seen several people ask but gotten no reply on the depth & length of the shelves. I’ve looked at your drawing but it doesn’t make any sense to me. I too would like to know the length & depth of the shelves.
Hi, I love how the shelves turned out. Is it okay to ask what kind of wood boards and stain (color) you used for this project? And did you have to finish the wood on top of the stain?
Thank you!
Looks incredible! Inspired me to tackle this for my new apartment! Gave you a shout out for the inspiration. See how ours came out here:
http://www.ari-lesser.com/blog/2015/8/16/diy-wooden-track-shelving
Wow! It looks totally amazing.
The design that you both settled on is fantastic! Could I trouble you for the exact measurements? I can’t really make out the numbers in the picture you’ve posted. Again, beautiful work! Can’t wait to build my own!
Hi, this is awesome! can you tell me what size screws you used?
Love this design! Any chance you remember the T X L X W of the wood used here, and the brand of stain? Thanks!
I stumbled upon this blog while looking for shelving options for the TV I have in my bedroom. My boyfriend and I ended up following your guide and while ours has a little different set up, we did enjoy the process and it looks so amazing! Thank you for showing us how!
May I ask a question please? What method did you use to sand and stain? Sand until smooth? Stain and let sit or stain and wipe? I’ve seen that the method has an effect on the result. Here’s and example: http://7thhouseontheleft.com/wp-content/uploads/2013/07/stainoptions.jpg
Thank you so much for your time. I’m working on getting this up in my home thanks to your clever ingenuity 🙂
This looks amazing! We’re going to get started on this project for our condo.
Just a question on how much weight the shelves hold. We are going to use only books for the shelves — we don’t have a TV — and wanted to see if you have any thoughts two years out on how sturdy the shelves have been.
What are the shelves dimensions? More importantly what’s the depth?
Just tacking on! Very curious what the depth of the shelves are! Love this project! I just finished hanging up the uprights and I’m using cardboard to figure out where I want my shelves I’m trying to figure out how I’m going to get shelves that are deeper than 11.25 inches. Thanks for the inspiration, clearly this look is timeless as it’s seven years later.
Love this type of shelving! Just wanted to let you know that we included in our list of the Best Shelving Ideas http://www.listsforall.com/best-shelving-ideas/ Good job!
These look amazing! I love it. Would you be able to tell me what your measurements were for the long, medium, and small shelves?
Thanks!
Hi Beautiful work!! QUESTION: Do you happen to remember what size screws you used for attaching the brackets to the planks? I’m assuming two different sizes but not sure.
Thanks
I’m thinking of doing this for our apartment. How many screws did you take to the walls? I want to know how damaging the shelves are for the deposit at the end! Super cute!
Loving this!! It will be perfect for my small space and home office I was envisioning. What are your measurements for spacing on your twin tracks?
So what were the overall dimensions of the wood and the spacing of the rails? I too and trying to replicate this project and the drawing is kinds of hard to see.
Great job, btw!
Amazing work, so amazing! One small question. How did you screw the brackets to the shelves. Did the brackets you buy come with screws?
I like this. I was looking for ideas using the brackets for bookshelf plus a reading desk. You one looks really cool
Hi! Do you remember what color stain you used?
Hi! What size brackets and wood dimension did you use? Thanks.
My question is one I don’t think has been asked. Question: were the uprights and brackets black when you bought them? If I did this project I think I’d try using gold or silver ones.
Hi, these shelves are amazing! My wife and I are planning on making a smaller version in our home. Could you tell me me what the brackets and the tracks are made of? I was doing research and it seems the only ones I found at Home Depot was the Rubbermaid brand, are those the ones you used?
Thanks,
Jalen
Hi I was just wondering how you screwed the brackets to the shelves. The of not brackets I can find are skinny and flat and the wood would sit just resting on the thin edge. Need it a little sturdier with children around…
Hi,
I want to do these for my son’s room!! Love them! Can u tell me the sizes of the boards please?! Depth and width? Thanks so much!!
This is exactly what we’ve been looking for, and your project turned out amazing!
Just wondering where did you buy the vertical tracks and brackets?
Thanks!
Chris
Hey molly, big fan of this project and the fauxdenza project (and more) but I am about to do something similar and am wondering about the shelf depth you used. How deep were the shelves and what length were the brackets if you don’t mind me asking? and do you like the depth? Thanks so much!! *mo
Whats the name of the tipography off the first picture?
email me back with 2 or 3 models and pricing for the Shelving Wall Mount you do have in stock so that i can select one and let you know the quantities that am interested in purchasing from your company hope to hear from you soon…
Holy schnitzels guys… this is EXACTLY what I have been looking for for our living/dining room. Thank you thank you thank you thank you!
<3
This is amazeballs. I just started to a DIY bedroom remodel and I could not find a website that actually listed the “ingredients” for a mounted shelf. You just saved me from completely just winging it.
What a great idea! I wish I would have seen this yesterday before I installed shelves in my den. Will be using this concept in my bedroom though!
I can’t believe I didn’t think of this! Thank you!
Hello!
I came across your idea and did one for myself! thank you!
I am writing a blog post in my language and in english on my blog, I am referencing to your post for credits!
I hope that is alright for you!
Loves
Gorgeous! Thanks for the inspiration!
Derivativedishes.com
Hello I was wondering if you could write the detailed information on the materials. I am trying to build this amazing shelf and I want to order the materials through amazon. Do you think you can help me over here 🙂 Thank you
Nicely done!
Looks absolutely amazing! I was wondering, from where did you get the 3/4in wood??
Great Idea! Challenge solved. Thank you for sharing.
Pingback: 30 DIY Pallet Bookshelf | Ideas4DIY
Hi, Love this idea. What was the depth of your shelves? I know they are about 3/4″ think, but I’m not sure what depth to buy or if it was called anything in particular.
Thanks!
Lovely work! Where did you get those blue set of drawers from??
Looks amazing! Thanks for the inspiration, I’m planning to try this in my storage room. Ayan xox
where did you get the hardware for this?’
Thanks for the examples and inspiration. I’ve made my own shelving based on your work. It’s on the front page of my website.
These look awesome. Been a lot of years since posted. Noticed lots of folks asking dimensions. For those that come here in the future she mentions 70 inch twin track (probably Rubbermaid since that’s what Home Depot carries in black in 70 inches). I’m pretty certain the brackets are 9 inch (also Rubbermaid) and the wood is 1×12 pine board (all Home Depot). 1x12s are 3/4 inch thick. Again, hope this helps someone. Also wondering…. 9 years later – still on the wall being used? They look great!